< TOOLS FOR NAVIS. Coloring | TOOLS FOR NAVIS. Properties >
This tool allows you to export properties of all elements to Excel.
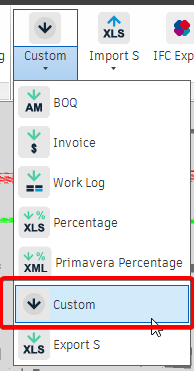
1. Click on the SIGNAX PRO tab in the Export | Import panel ➤ Export
2. A window for setting up the export of properties to Excel will open. Select the properties to export and click “OK”
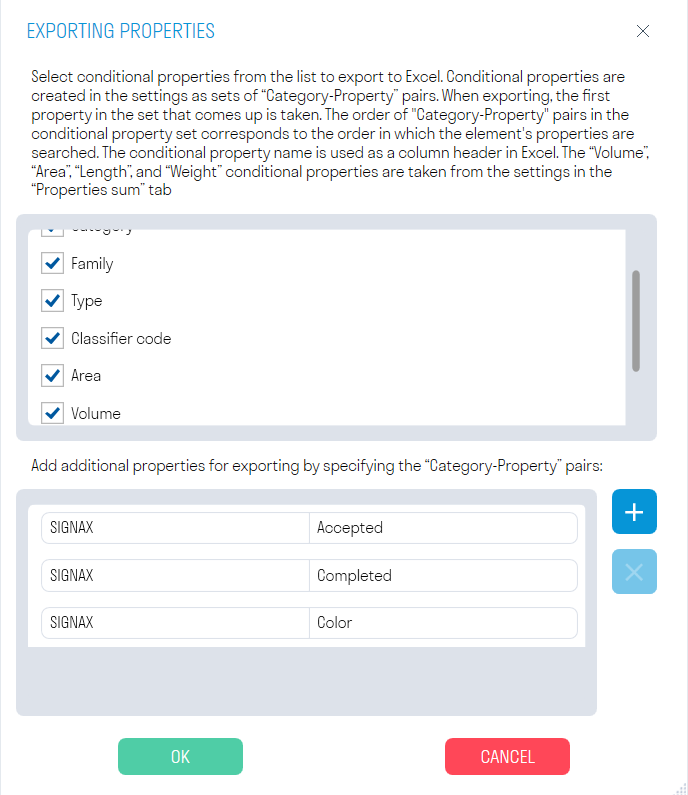
- In the upper part of the window, select the previously created “Conditional Properties” that you want to export
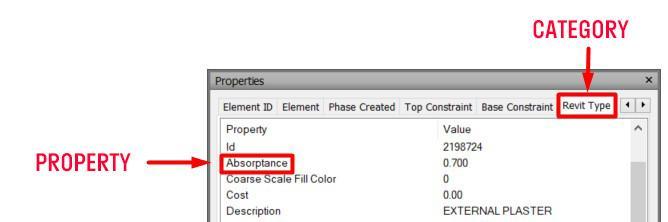
- In the lower part of the window, add additional properties as a “Category-Property” pair
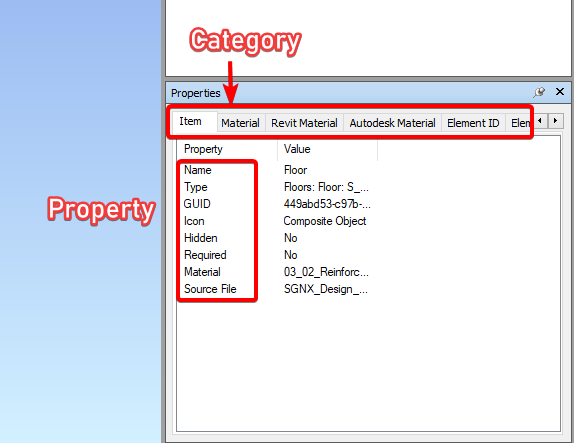
- To import additional properties, click the button and select an Excel file with the following structure: Column A contains “Category”, column B contains “Property”
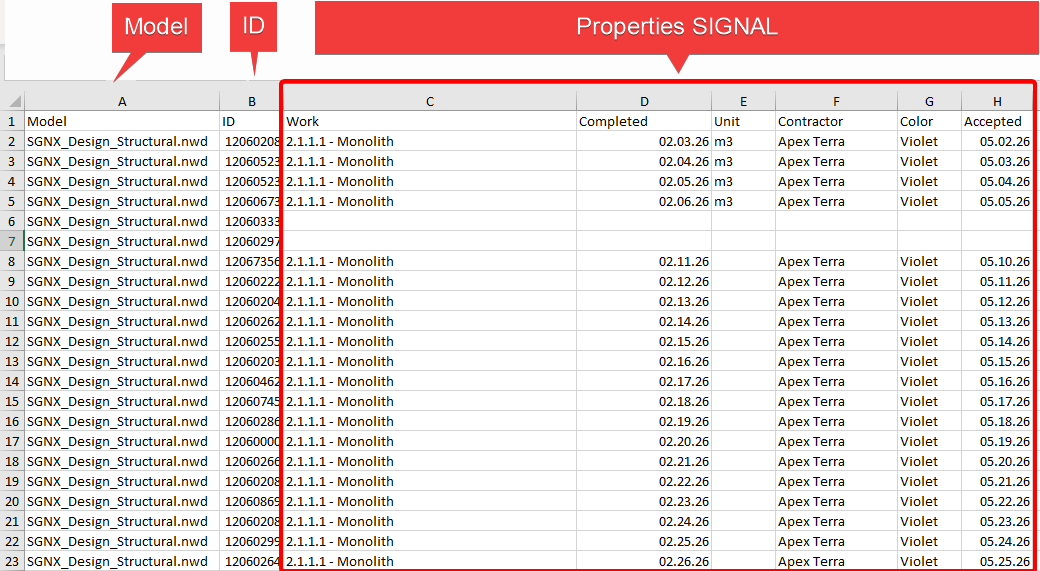
3. An Excel file with all the elements and the specified properties will be downloaded. If necessary, you can create a pivot table by properties and filter it as needed to view the volumes
The tool allows you to export to Excel all the properties from the “SIGNAX” tab with their values for all or selected elements. For example, you can export SIGNAX properties, adjust them and load them back into the model.
1. Click on the SIGNAX PRO tab in the Export panel | Import ➤ Export S
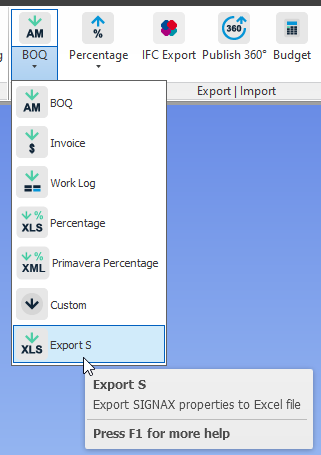
2. An Excel file with all the elements and properties from the “SIGNAX” tab will be downloaded.
The tool allows you to load all the properties from the “SIGNAX” tab with their values from the Excel file into the model. For example, you can export SIGNAX properties using the “Export S” command, adjust the filled in work types and load them back into the model.
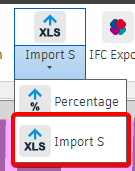
1. Click on the SIGNAX PRO tab in the Export panel | Import ➤ Import S
2. Select the Excel file and click “Open”
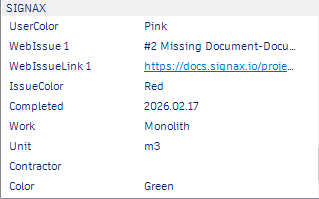
3. The property values of the elements in the “SIGNAX” tab will be added or updated
The tool allows you to export volumes (m3, m2, m, kg, pcs) to Excel based on search sets. For example, you can export the “Completed” search set and view the volume of completed items
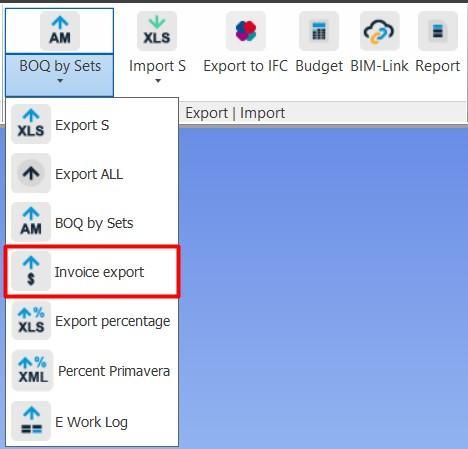
1. Click on the SIGNAX PRO tab in the Export | Import panel ➤ BOQ
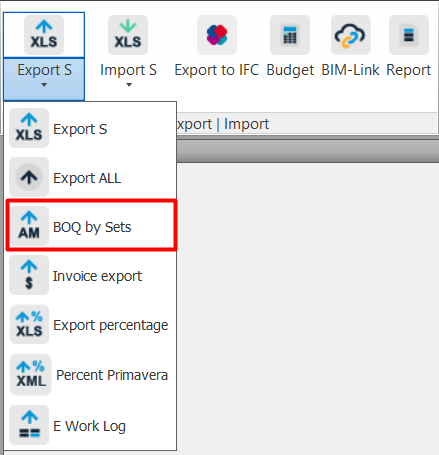
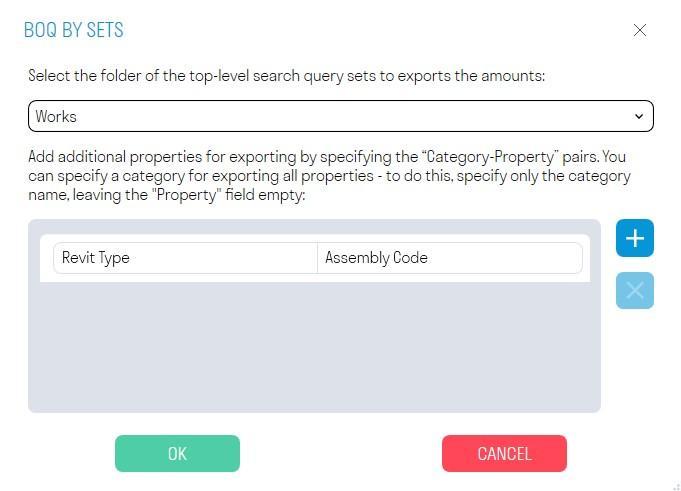
2. A window with export settings will open. Select the previously created folder with search sets from the drop-down list and click “OK”.
-
To export volumes, the search set name must contain units of measurement in square brackets, for example, [m3,m2]. Multiple units of measurement are specified separated by commas.
-
At the bottom of the window you can add additional properties in the form of a “Category-Property” pair
Note: Search sets can be created using the “Standard”
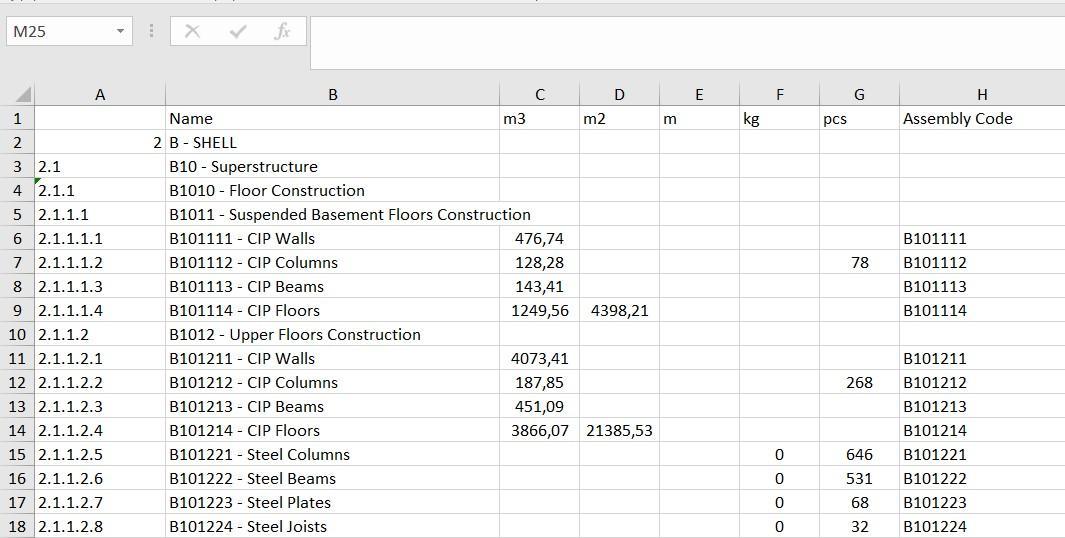
3. An Excel file with search sets and volumes will be downloaded.

The tool allows you to export Invoice with reference to the works and volumes entered into the elements from the BIM model.
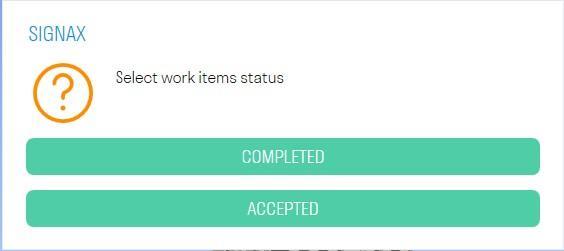
1. Click on the SIGNAX PRO tab in the Export | Import panel ➤ Invoice.
2. Select the work status you want to upload to Invoice.
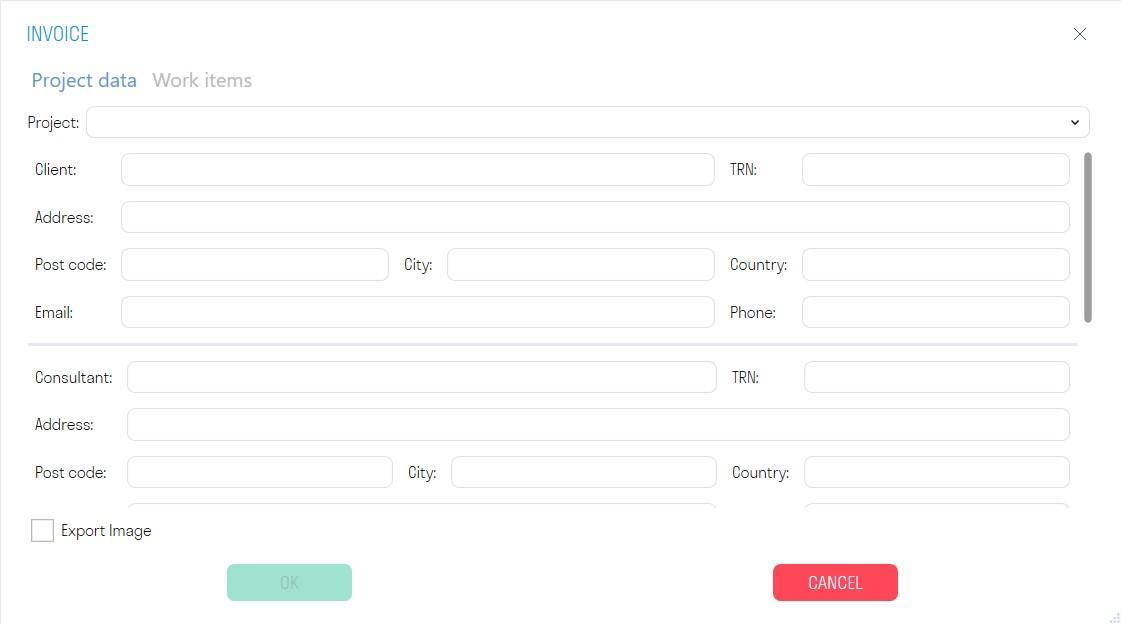
3. The export settings window will open.
In the “Project Data” tab, select the previously created project from the drop-down list.
In the “Work Types” tab, select the work period and the work types themselves. Then click “OK”
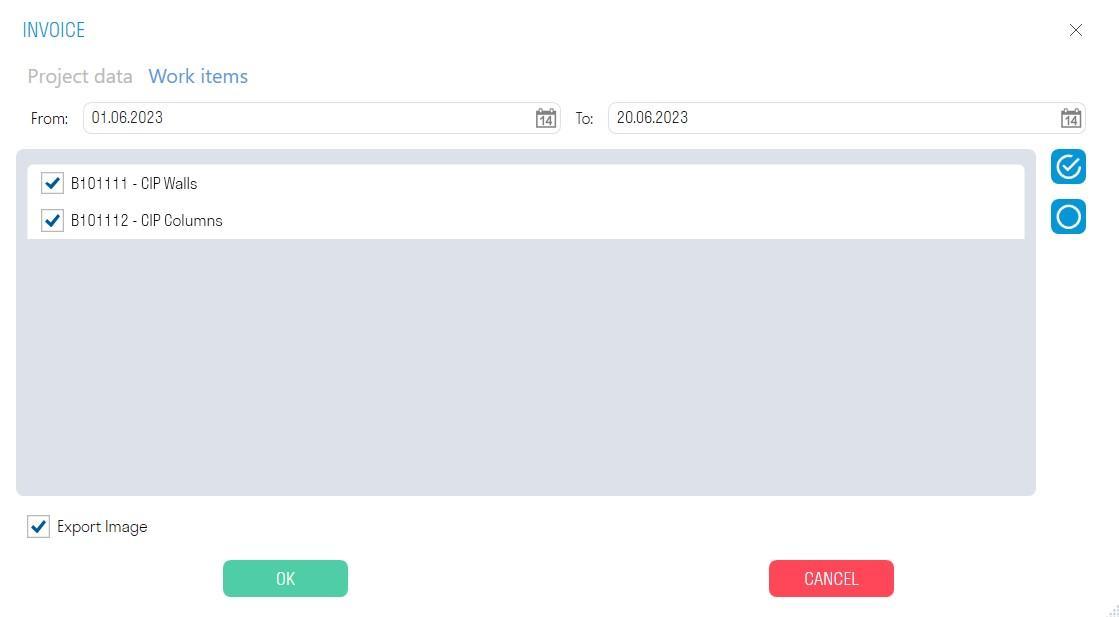
- The “Export image” switch allows you to upload an image of the elements completed during the specified period.
4. An Excel file will be exported as a Invoice file and an image of the elements
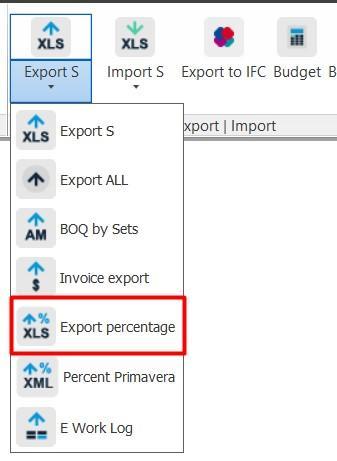
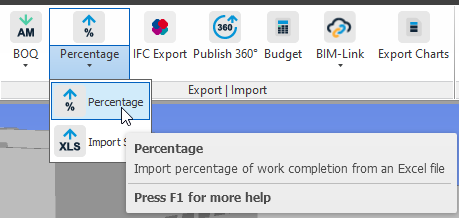
The tool allows you to export to Excel the volume of work types, with the calculation of the percentage for the completed work
1. Click on the SIGNAX PRO tab in the Export | Import panel ➤ Export percentage
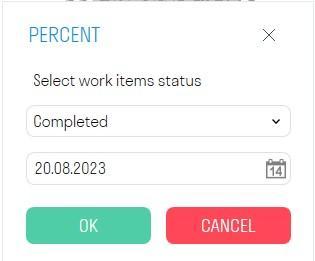
2. Select the status of the work and the date of work completion, and click “OK”.
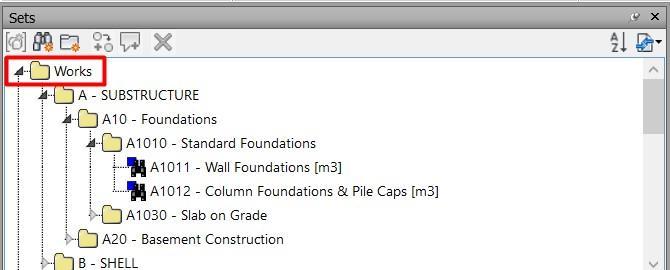
- A search set "Jobs" with correctly populated conditions must be created in the "Sets" panel. A search set can be created using the “Jobs”
tool - Completed jobs are marked using the “Complete or Accept”
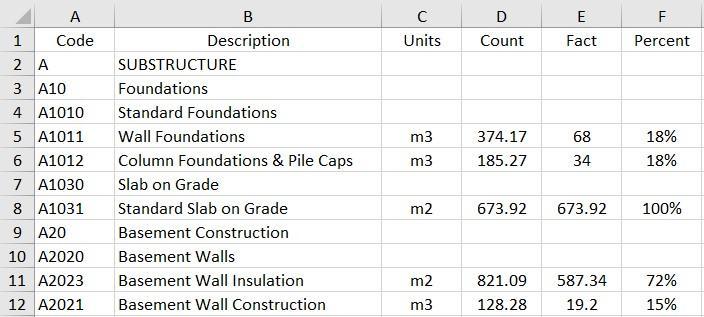
3. An Excel file will be downloaded containing the volume of job types, the actual volume, and the percentage of work completed.
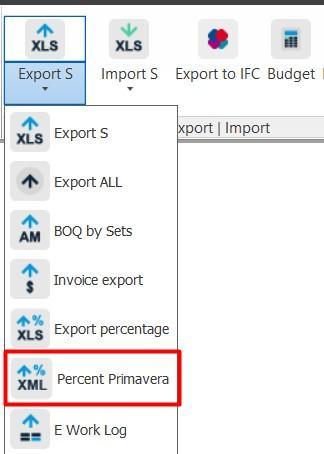
The tool allows you to export the percentage of work completion to an XML file originally exported from Primavera.
How to use: After exporting work types from Primavera in XML format, import them into Tools for Navisworks using the "Import from Primavera" command (see Job Types ). Next, mark the dates of work completion using the “Complete/Accept” commands. Now the percentage of work completion can be loaded into the same XML using this "Primavera Percentage" command. Finally, import the XML file back into Primavera to view the percentage complete.
1. Click on the SIGNAX PRO tab in the Export | Import panel ➤ Primavera Percentage
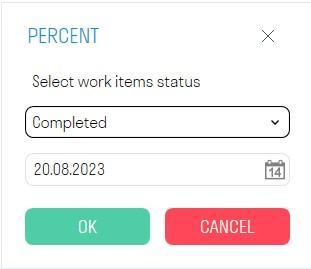
2. Select the job status and job completion date, and click OK.
- It is required that the "Jobs" search set with correctly filled in conditions be created in the "Sets" panel. A PP can be created using the tool “Jobs”
3. Select the XML file previously exported from Primavera and click "Open"
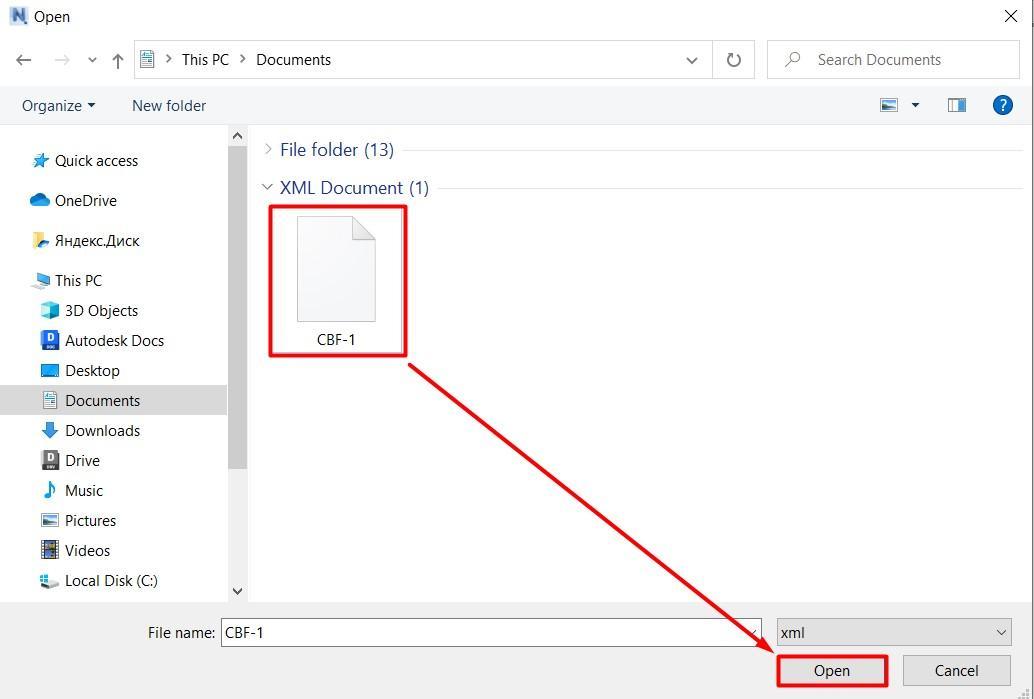
4. The percentage will be written to the specified XML file. Now you can upload it back to Primavera.

The tool allows you to export work types to Excel, broken down by volumes and completion dates. For example, a construction site foreman can compare his general work log, which he maintains daily in paper form, with the data exported from the BIM model
1. Click on the SIGNAX PRO tab in the Export | Import panel ➤ Work Log
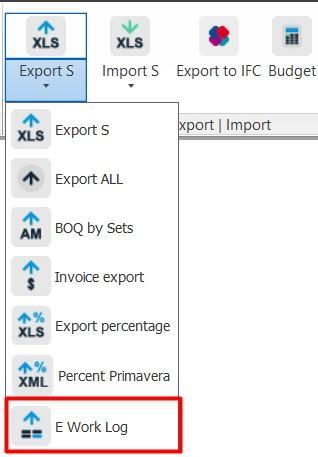
2. Select the status for which you want to upload volumes from the drop-down list: Accepted or Completed. The corresponding search sets must be created in the Sets panel: Accepted or Completed.
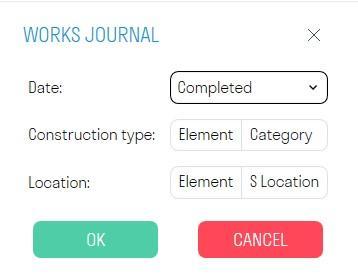
- You can also additionally split by “Structure Type” and “Location” by specifying the corresponding “Category-Property” pairs
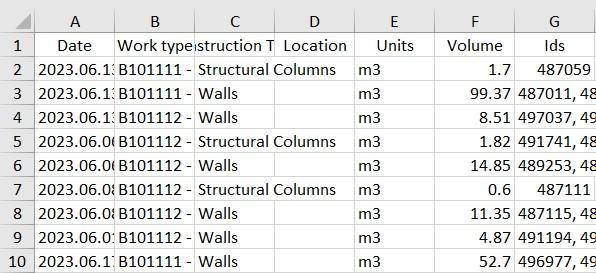
3. An Excel file will be downloaded containing the dates of work completion and the work itself, a breakdown by category and level, the volume of work performed, and the IDs of the elements included in the specified work.

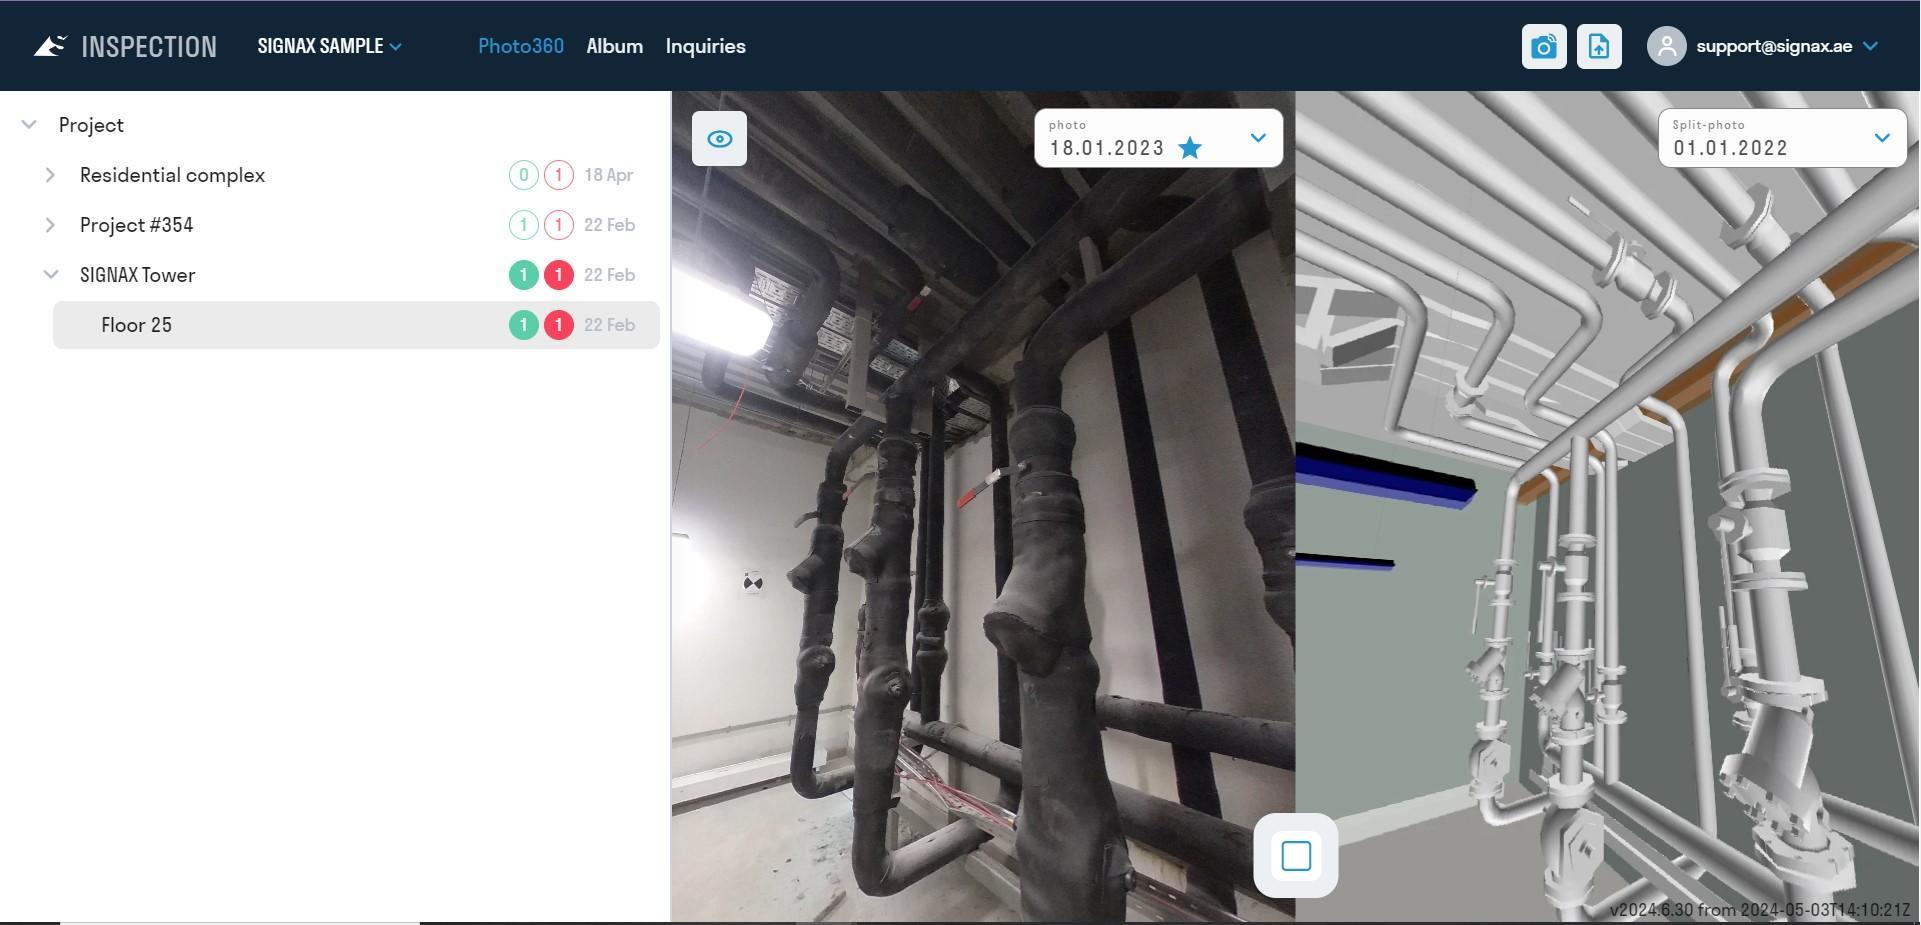
The tool allows you to upload viewpoints created in the Navisworks model to the INSPECTION service for comparing the model with the actual state of the construction site. Administrator rights in the INSPECTION service are required to upload photos.
1. First, create viewpoints in Navisworks. To create a viewpoint, you need to select the location where you want to get a panoramic photo and position your view at this location.
Attention! You must align the view precisely vertically using the "Align camera vertically" command. Otherwise, if the camera is not strictly parallel to the floor, the image will be stitched incorrectly when published to INSPECTION.
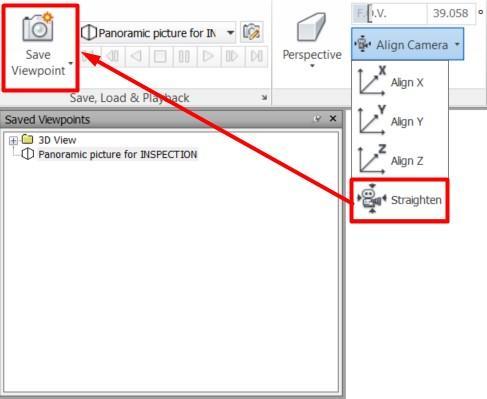
After this, you need to save the viewpoint, giving it an appropriate name. It is recommended to adhere to the BLOCK-FLOOR-POINT tree structure for automatic matching of viewpoints with INSPECTION points (see point 4).
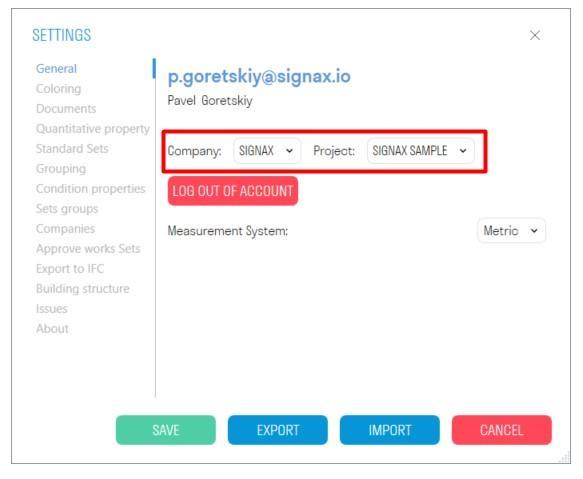
2. In SIGNAL settings select the project to which you want to upload 360 panoramas
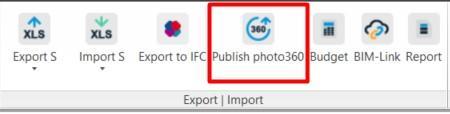
3. Click on the SIGNAX PRO tab in the Export | Import panel ➤ Publish Photo360
4. In the window that opens, expand the desired plan in the left part, and in the right part, match the point from INSPECTION with the viewpoint from Navisworks by selecting the latter from the list in the "Viewpoint" column.
To automatically match viewpoints with points from INSPECTION, click DEFINE at the top of the window.
Viewpoints will be populated automatically, provided that the viewpoint location in the tree matches the point location in INSPECTION, i.e. the BLOCK-FLOOR-POINT tree structure matches.

5. Select a Lighting Type. If there are backlight leaks in the panoramic photo, it is recommended to select a different lighting type.
6. Select a Resolution. The higher the resolution, the longer it will take to upload a panoramic photo. Low - 5-10 seconds. Medium - 30-60 seconds. High - 3-5 minutes.
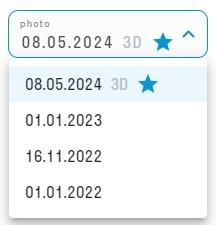
7. Specify the Photo Publishing Date and, if necessary, a Comment. The comment is displayed in the list of photos in the INSPECTION service, it is required to mark the photos uploaded from the model, and is limited to five characters.
8. Click “Publish” and wait until the photos are uploaded to the INSPECTION service
The tool allows you to export selected viewpoints as a panoramic image for subsequent insertion into the INSPECTION module.
1. To create a viewpoint, you need to select the place where you want to get a panoramic photo, and place your view in this place.
Caution! You must align the view exactly vertically using the "Align Camera Vertically" command. Otherwise, if the camera is not strictly parallel to the floor, the image will not be stitched correctly when published to INSPECTION.

After that, you need to save the viewpoint and give it a name.
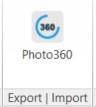
2. Click on the SIGNAX tab in the Export | Import panel ➤ Photo360
3. Select the required viewpoints, specify the lighting settings and the photo resolution. Click “OK”.
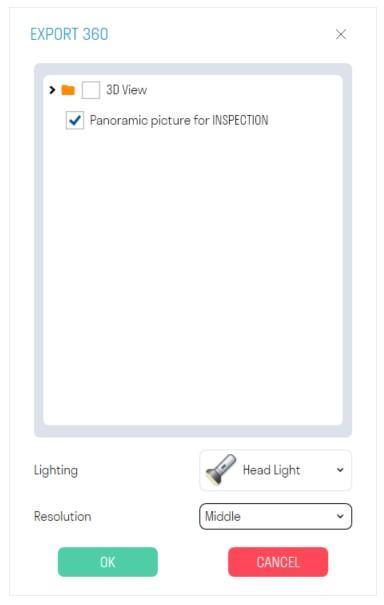
Note: If you experience backlighting in your panoramic photo, we recommend choosing a different lighting type.
Note: The resolution of your panoramic photo affects how long it takes to upload. Low - 5-10 seconds. Medium - 30-60 seconds. High - 3-5 minutes.
4. The resulting panoramas in .png format can be inserted into the INSPECTION module for comparison with the actual condition on the construction site
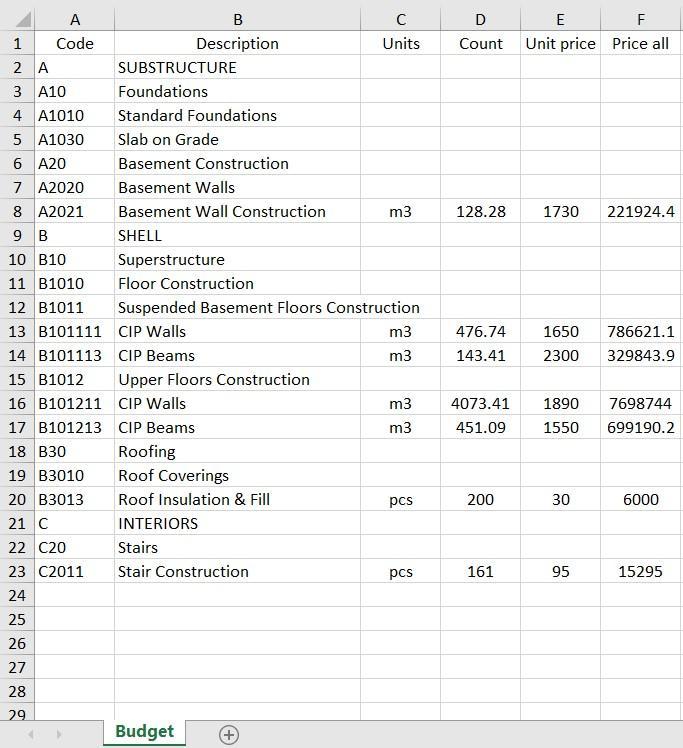
The tool allows you to export the cost of volumes by types of work to Excel.
It is necessary to create search sets by types of work in the “Sets” panel. This can be done using the “Jobs” command. The “Rate” by type of work must be filled in in the types of work themselves. ( see Job Types )
1. Click on the SIGNAX PRO tab in the Export panel | Import ➤ Budget

2. An Excel file with the cost of volumes by type of work will be downloaded
The tool allows you to import the percentage of work completed from Excel into model elements. For example, it can be used to evaluate the progress of utility networks by floors, apartments, or rooms. This allows you to more accurately monitor the progress of work and assess the degree of completion of the project.
1. Click on the SIGNAX PRO tab in the Export panel | Import ➤ Import percentage
2. In the window that opens, select the Excel file and click "Open"

The Excel structure looks like this:

- The first three columns (A, B, C) are responsible for the properties and their values, by which the plugin will search for elements in which a percentage should be entered. Properties are written in the form "Category-Property". Not all three columns may be filled in.
- The following columns indicate the types of work and the percentage of completion. The plugin will write these values to the elements. If the type of work does not have a CODE, then only the name of the work is indicated, for example, Socket network. If the work does have a CODE, then it is indicated as follows: CODE “space” - “space” NAME. (For example, 4.1.1 - Installation of OV1).
3. After import, the corresponding property “P_{Type of work}” appears in the element properties in the “SIGNAX” tab, as well as the percentage of work completed

4. To color elements by percentage, use the “Coloring”

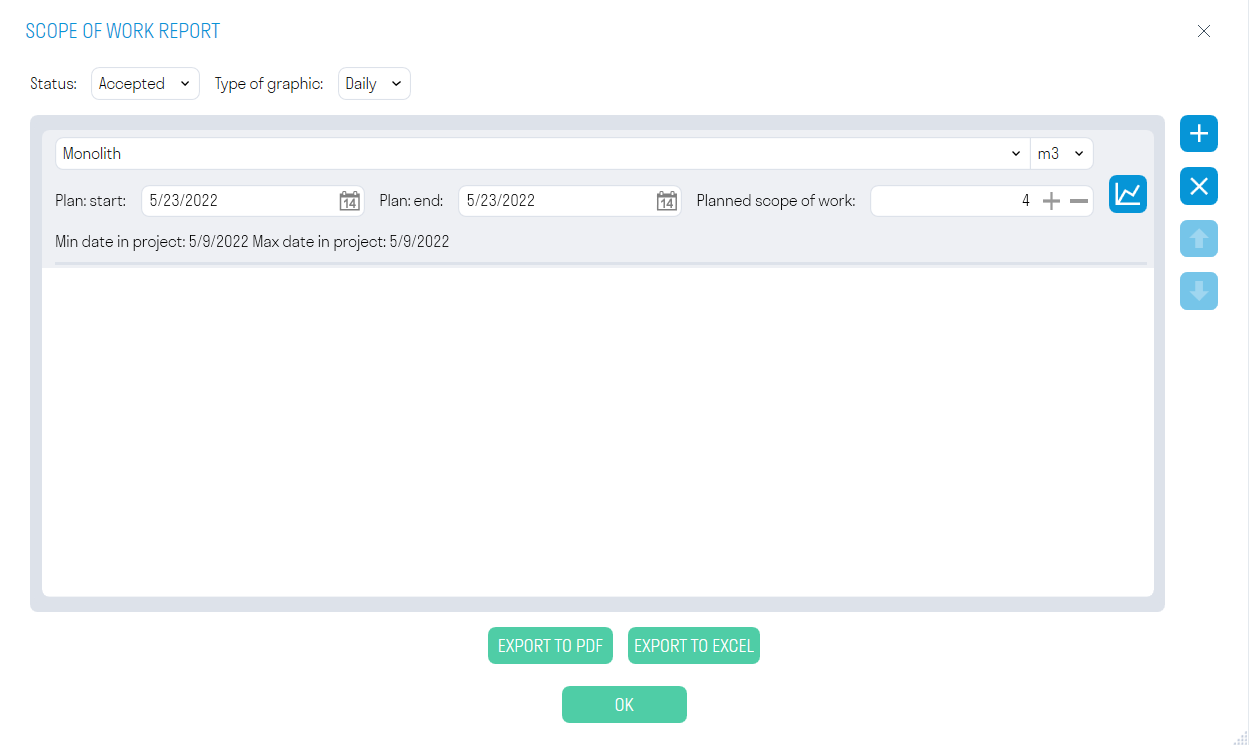
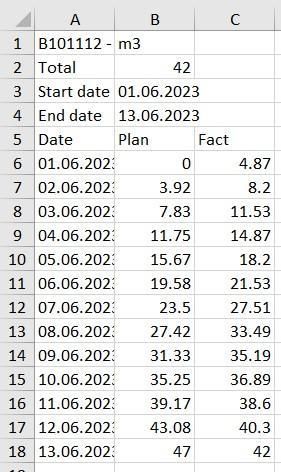
The tool allows you to generate a report on completed types of work with an Excel table and a Graph.
1. Click on the SIGNAX PRO tab in the Export | Import panel ➤ Report
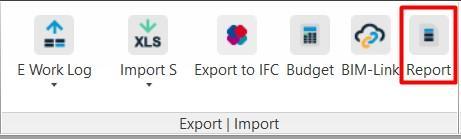
2. The report setup window will open. Add a report by clicking

. Fill in the required data and click “EXPORT TO PDF” and “EXPORT TO EXCEL”.
- In the “Status” line, select the status of the elements for which you want to generate a report from the drop-down list: “Completed” or “Finished”
- In the “Chart type” line, select
from the drop-down list - From the drop-down list of work types, select the work for which you want to generate a report and the units of measurement for the work. - In the lines “Plan: Start” and “Plan: End”, indicate the boundary of the planned work, and also indicate the planned volume of work.
- Click to check the correctness of the compiled schedule
3. The table will be exported to Excel, and the schedule with the planned and actual volume of work will be exported to PDF
