3.1 DOCS
SIGNAX DOCS Common Data Environment is cloud storage for file sharing and project information management, with the option to deploy it to your S3 servers.
3.1.1 ADMIN SIGNAX DOCS
Admin SIGNAX DOCS
SIGNAX DOCS is a technical document management system that stores1, transfers, and shares construction data files within projects. The system supports uploading files in various formats and allows viewing PDF documents, DOCX, XLSX, JPG, MP4, RVT, DWG, NWD, and other CAD formats and editing Google documents.
SIGNAX DOCS offers functionality for data storage, file viewing, comment issuing, maintaining version control, and document review processes. Access to the data is available through a web browser on desktops, laptops or mobile devices. Users need to create a SIGNAX account, where the login is their current email address.
[1] Data can be stored on the customer's local servers by installing and configuring S3 storage. If the customer does not require this, data is stored on SIGNAX servers by default.
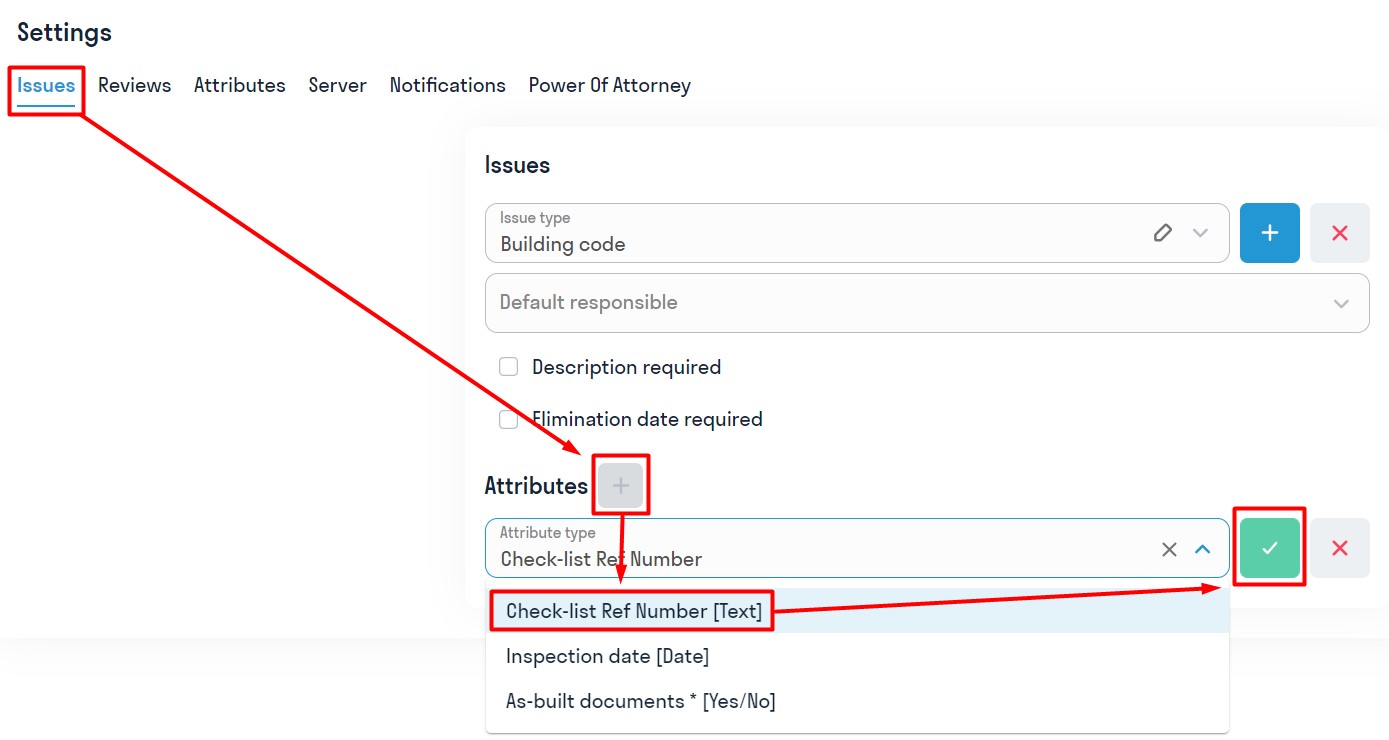
The SIGNAX DOCS Administrator has the right to:
- Create folder structures
- Configure folder access rights
- Create types of Issues
- Set up Review workflows
- Choose the type of BIM model file viewer
- Rename files
- Delete and restore files from the trash
Creating a Project and Adding Users
The SIGNAX hub administers companies and projects. Section 2.1, Authorization in the Common Data Environment, provides a complete guide to creating and managing companies.
In this guide, we will consider creating a project and adding users and roles.
After creating the company and assigning licenses to the administrator, it is necessary to create a project and add users to it.
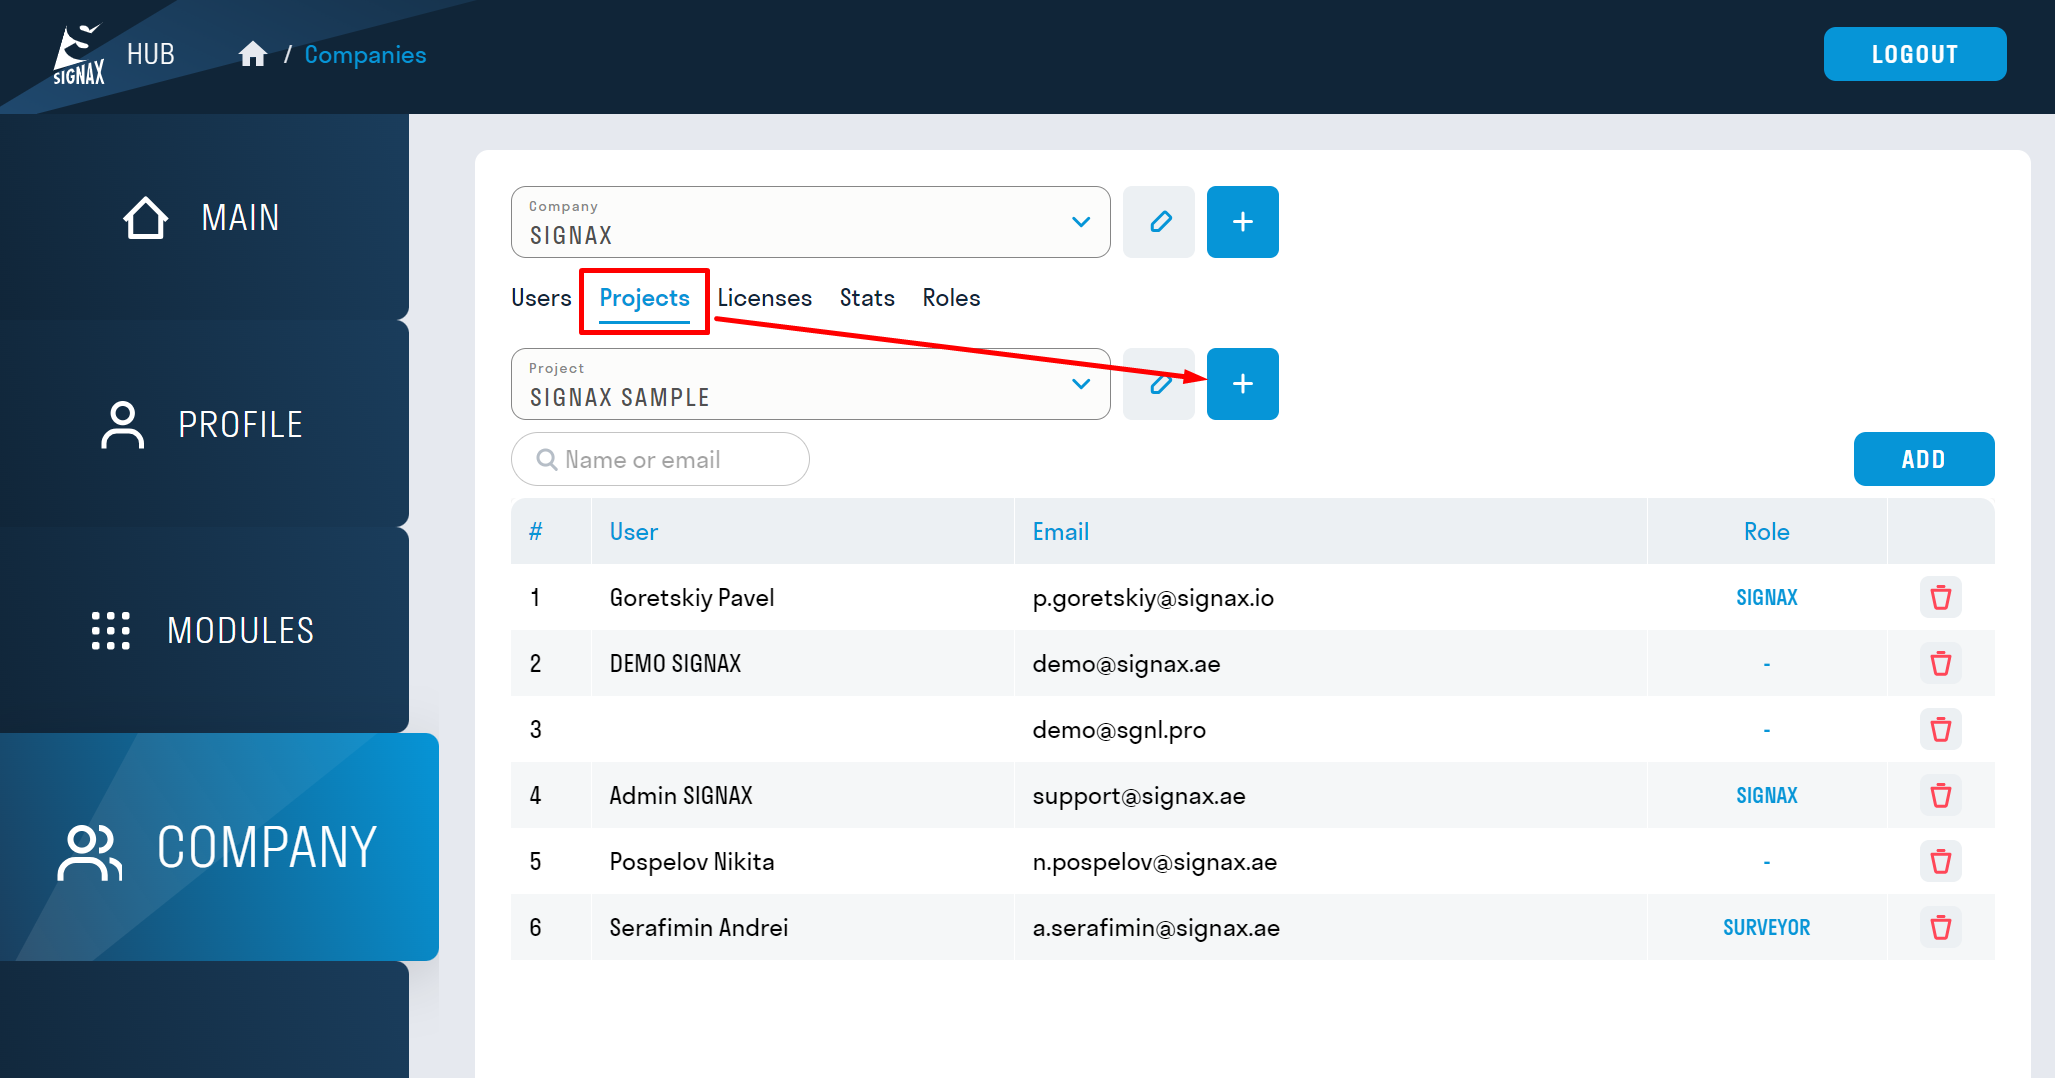
1. Let's create a project. To do this, go to hub.signax.io ➤ COMPANY section ➤ PROJECTS tab and click +
2. In the pop-up window, fill in the fields and click "Add"
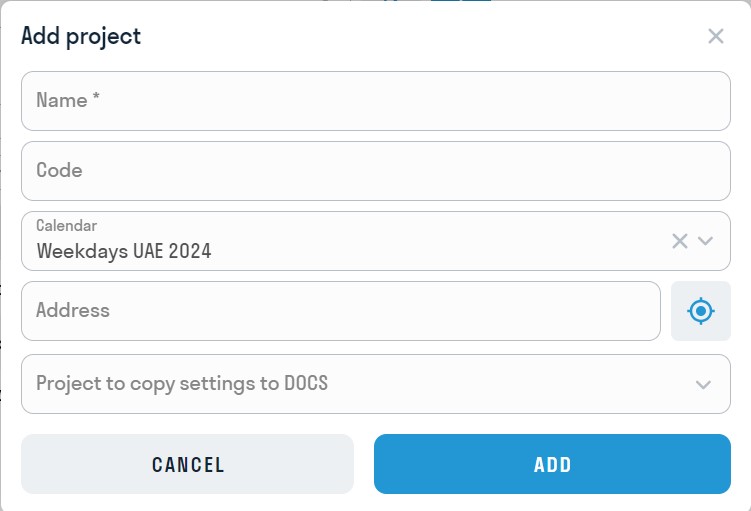
When creating a project based on a template, the following will be copied:
- Folder structure settings
- Access rights settings
- Attributes assigned to folders
- Types of Reviews
- Types of Issues
If the Review types in the template project include users in the workflow rather than roles, then to ensure these users participate in the workflows in the new project, it's essential to follow this sequence:
- Specify the template project for copying settings when creating the new project.
- Add users to the project.
- Open the newly created project in DOCS (at this point, the settings will be copied).
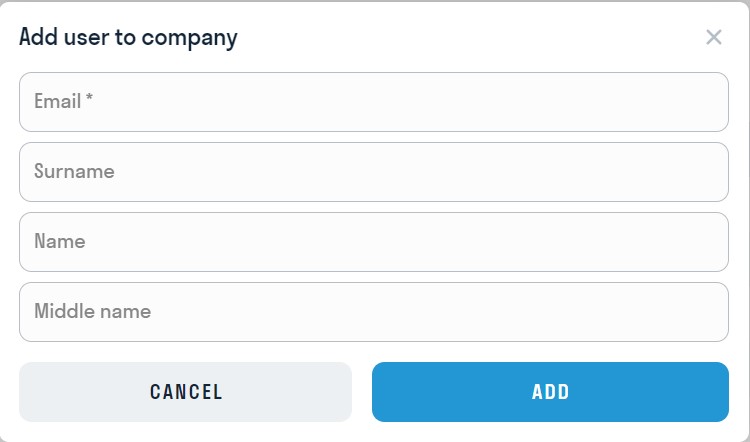
3. The project is created. Now, let's add users to the project. Click "Add User".

4. In the pop-up window, select the user from the list and click "Add."
5. Users are added, now you can add them to company and assign roles to them.

Role Creation and Assignment
In the SIGNAX DOCS service, "roles" are used to customize project participants' access to additional modules and system elements based on their responsibilities.
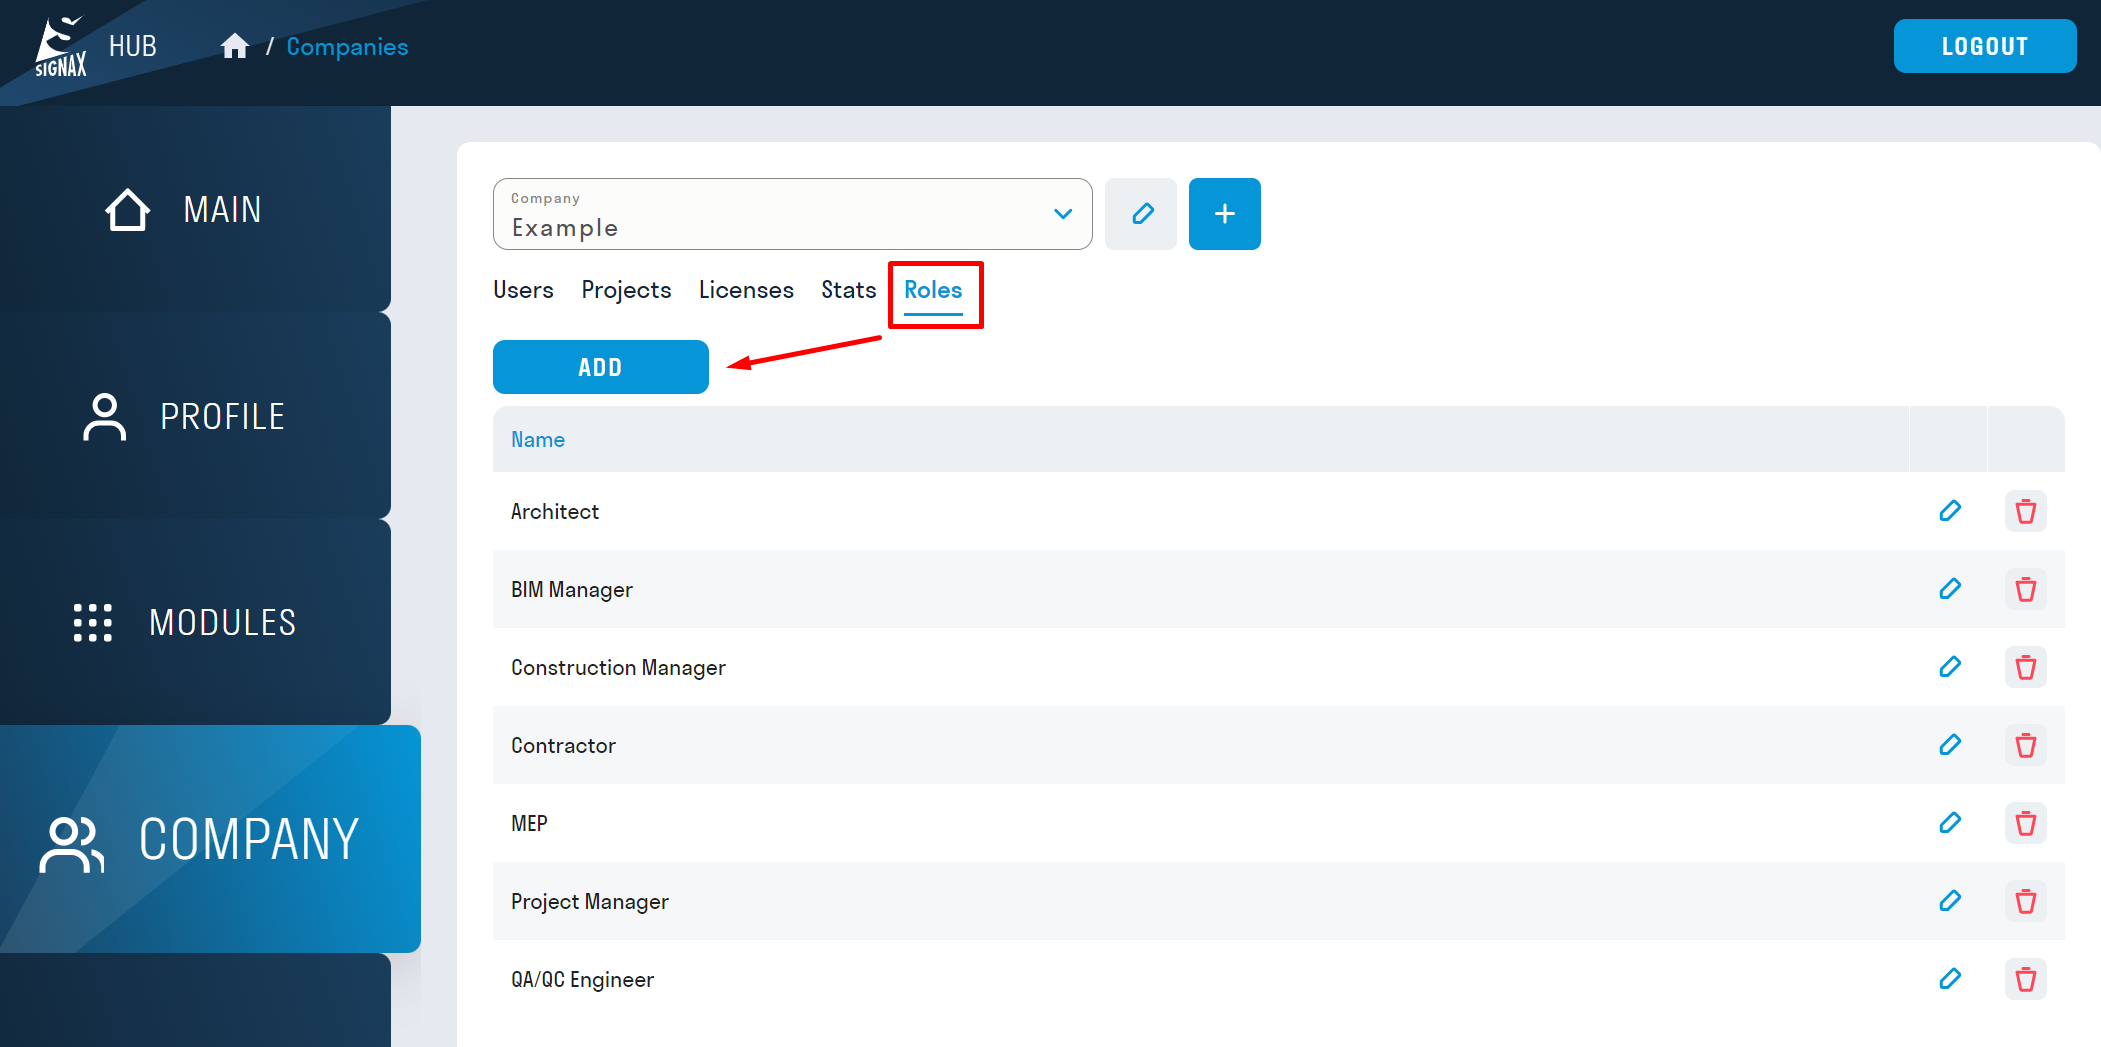
1. To create a role, go to the hub.signax.io website ➤ COMPANY section ➤ ROLES tab and click "Add"
2. In the pop-up window, specify the role name and click "Add"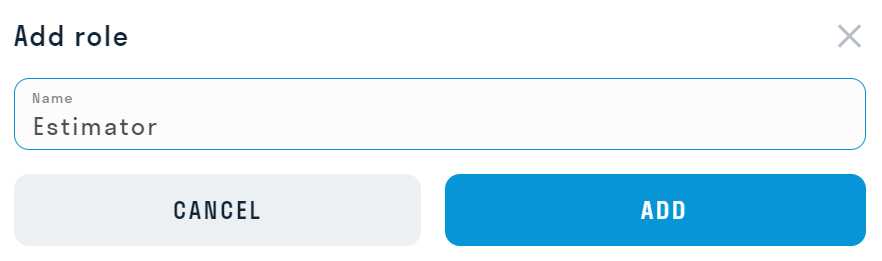
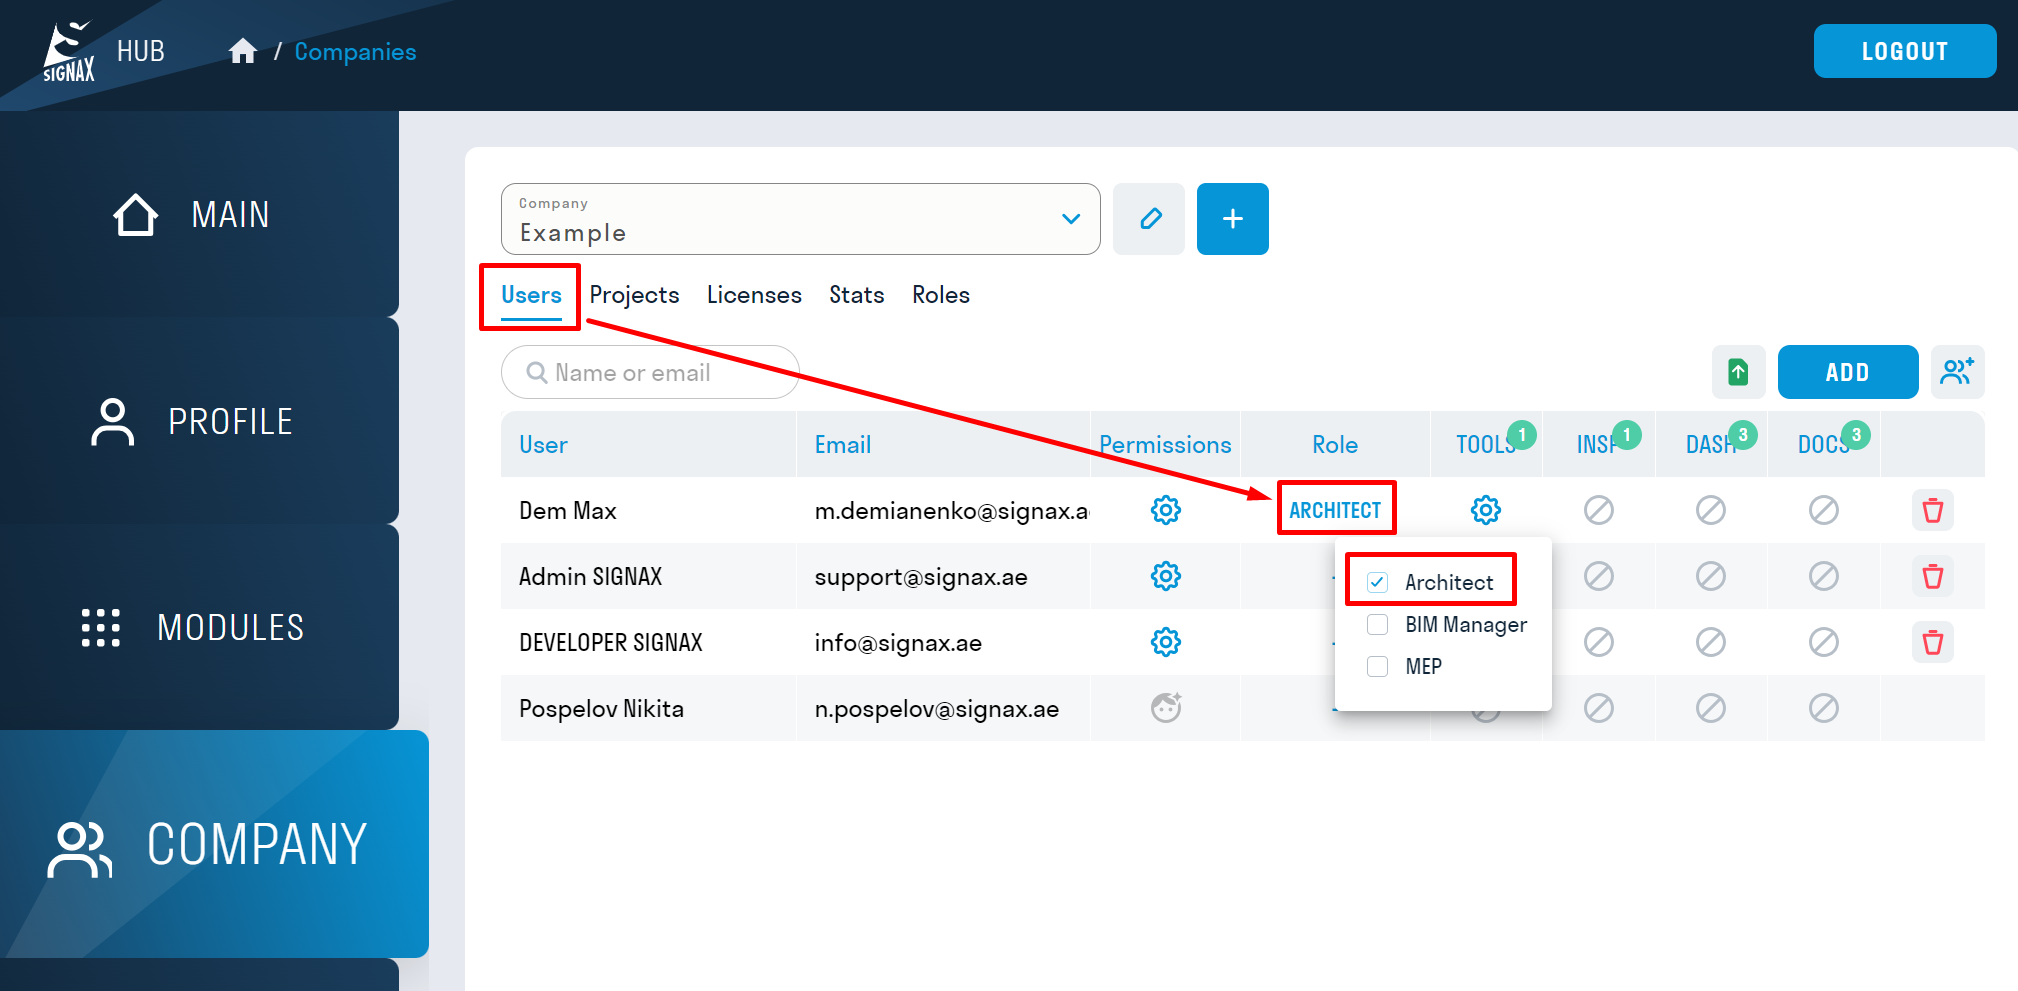
3. After creating all the necessary roles, go to the USERS tab, click on the three dots in the "Role" column, and assign the corresponding role to the user. Now the user will automatically be assigned the role when added to a new project. The same role can be assigned to different users, for example, Architect.
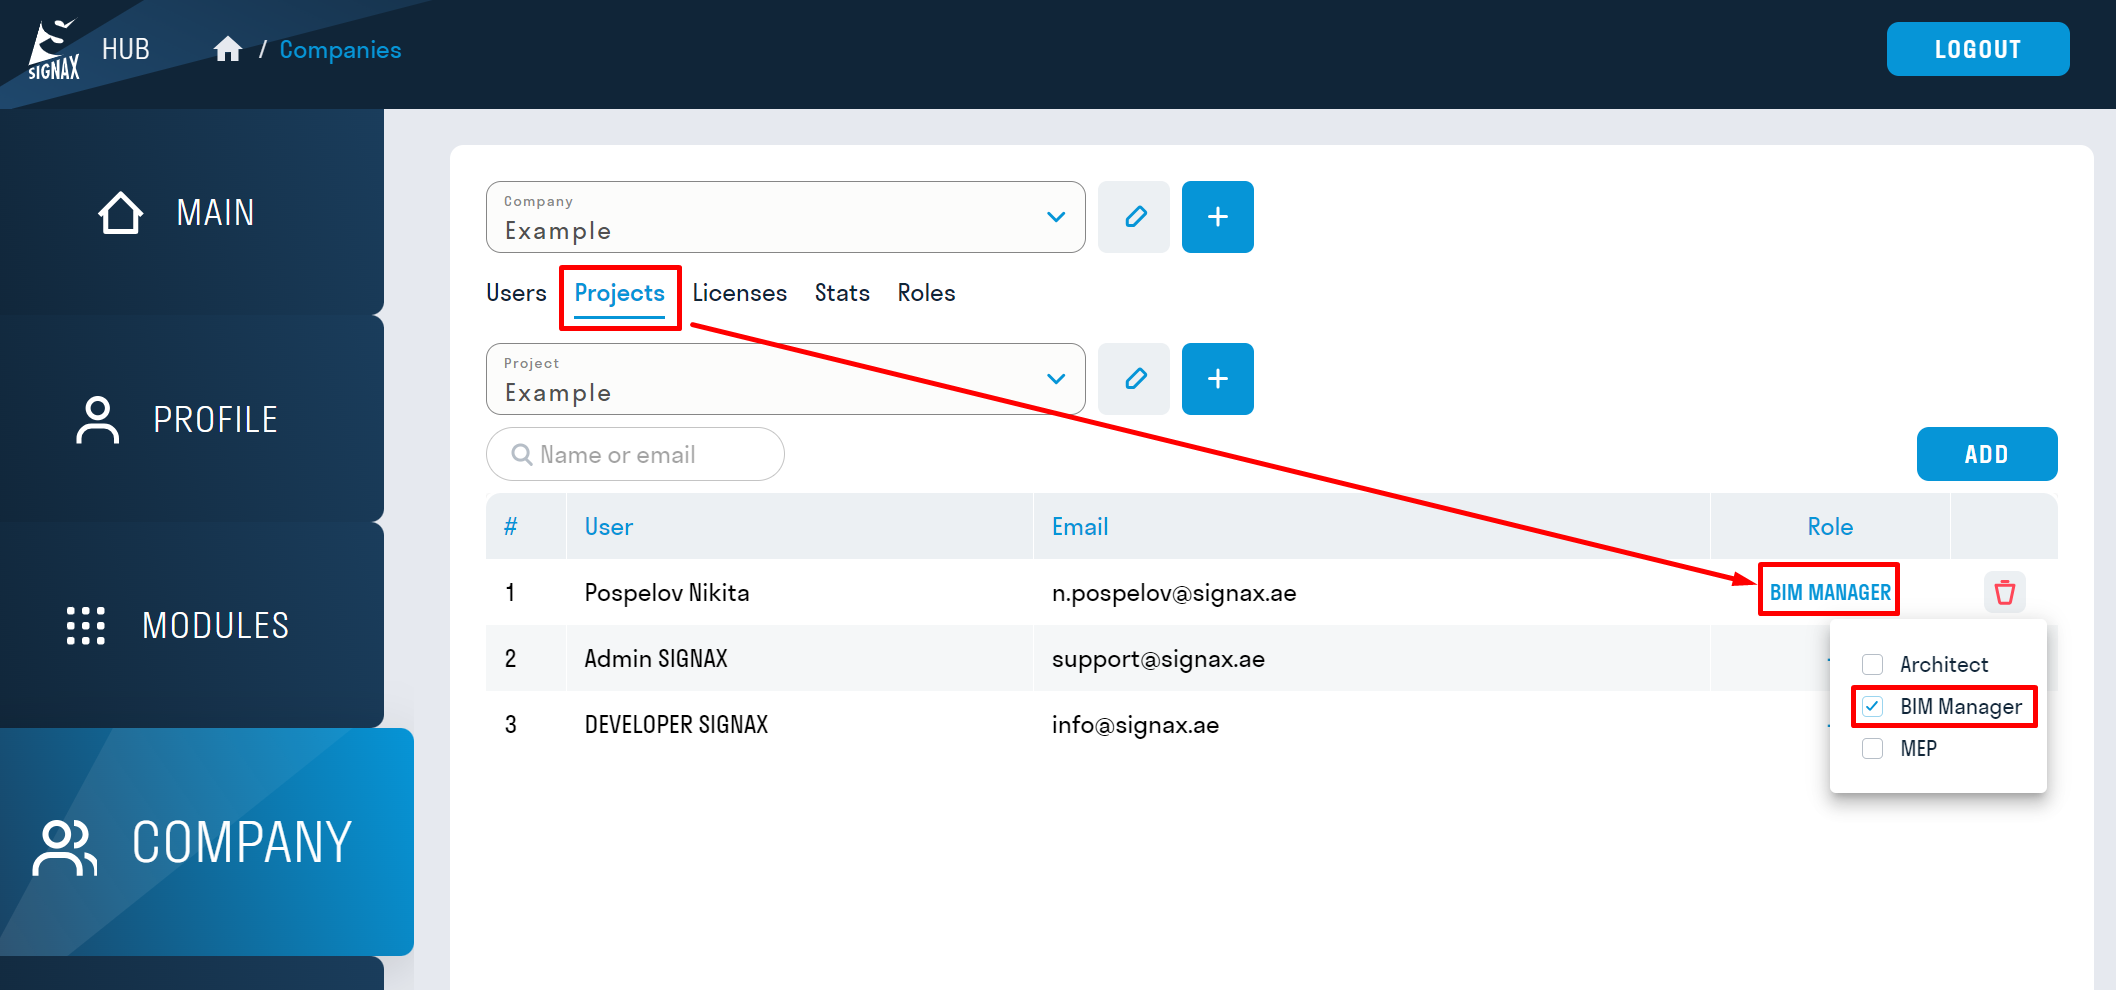
To change a user's role in an existing project, go to the PROJECTS tab, click on the three dots in the "Role" column, and assign the corresponding role to the user on that project.
4. After this, Roles will be available in the access permissions settings in SIGNAX DOCS.
Creating Project Folder Structure
There are several ways to create a folder structure in your project:
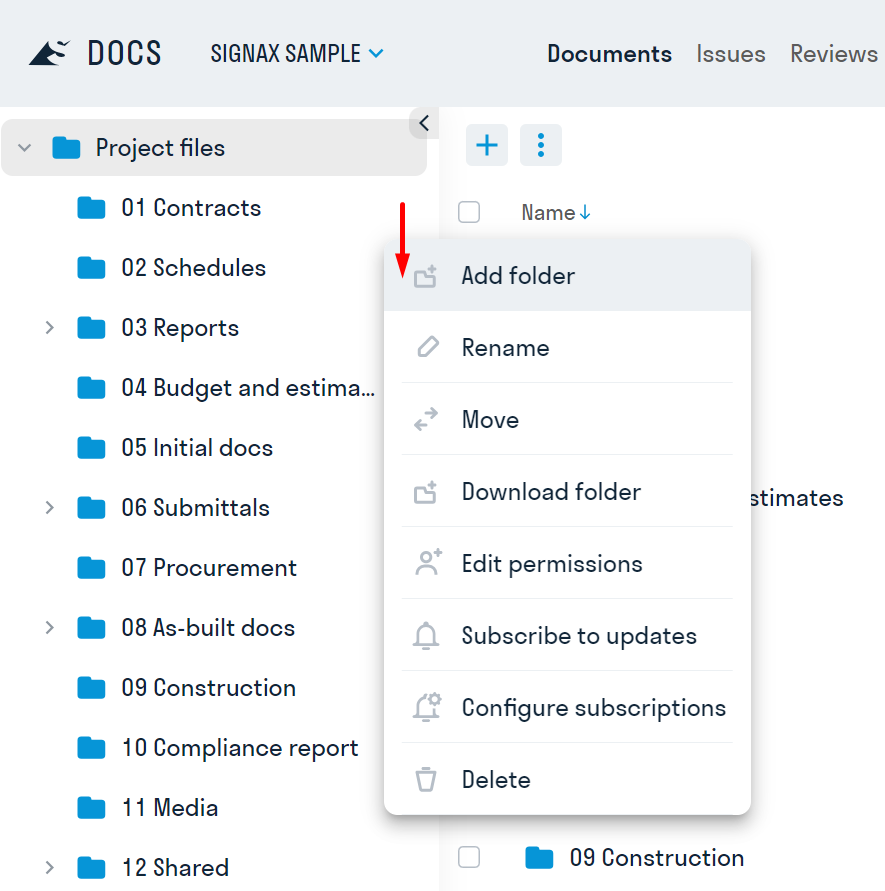
Method 1. You can create folders manually. To do this, right-click next to the folder ➤ "Add Folder"
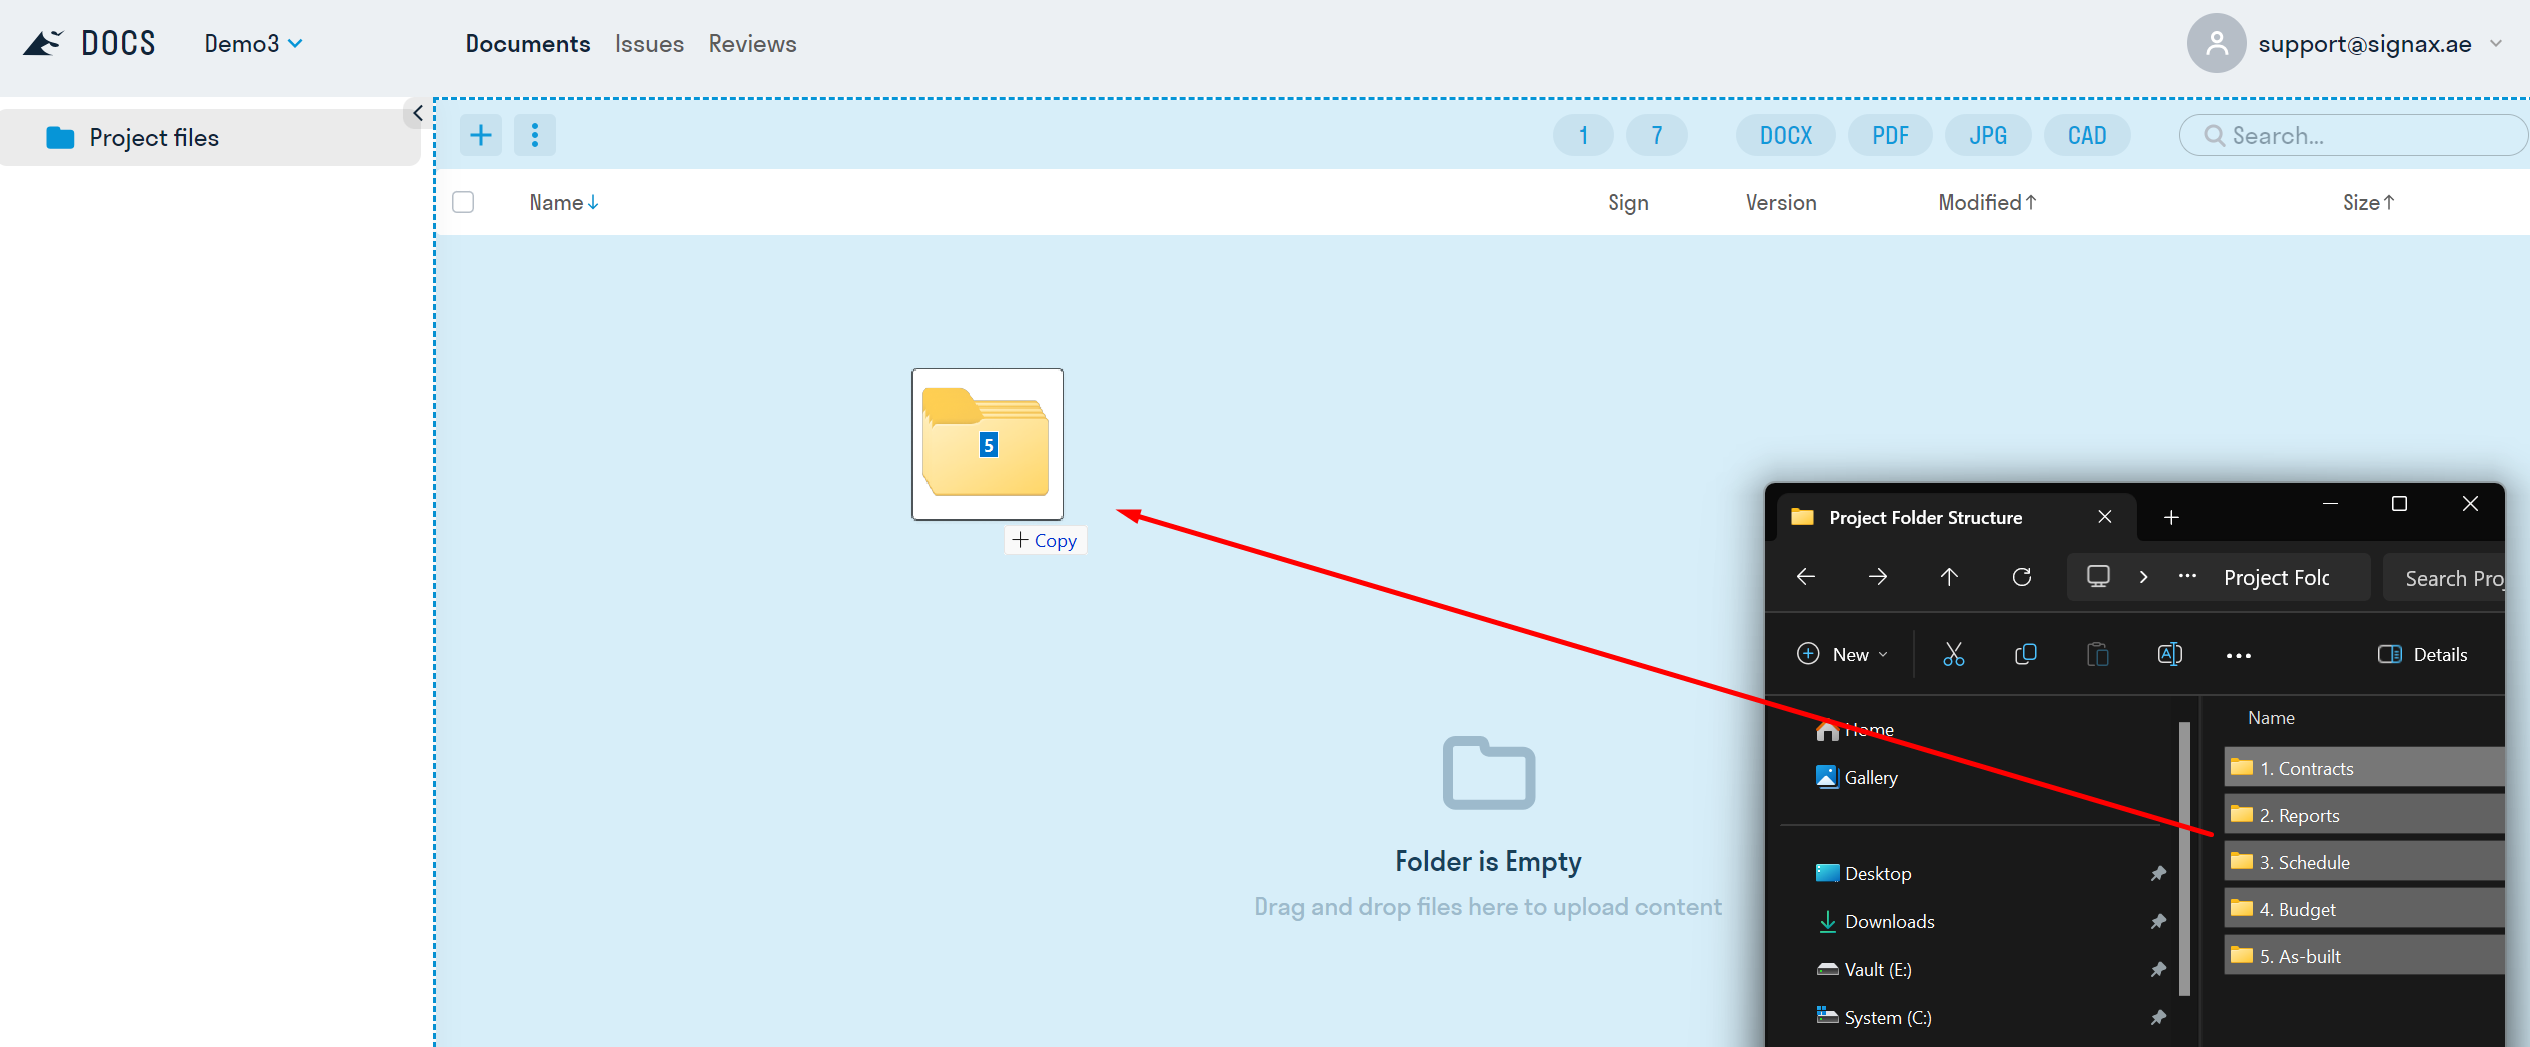
Method 2. If you have a project structure on your computer, you can transfer it to DOCS. For a successful transfer, each folder must contain files, i.e., folders must not be empty. Otherwise, they will not be transferred.
Drag your structure from the file explorer to the DOCS area
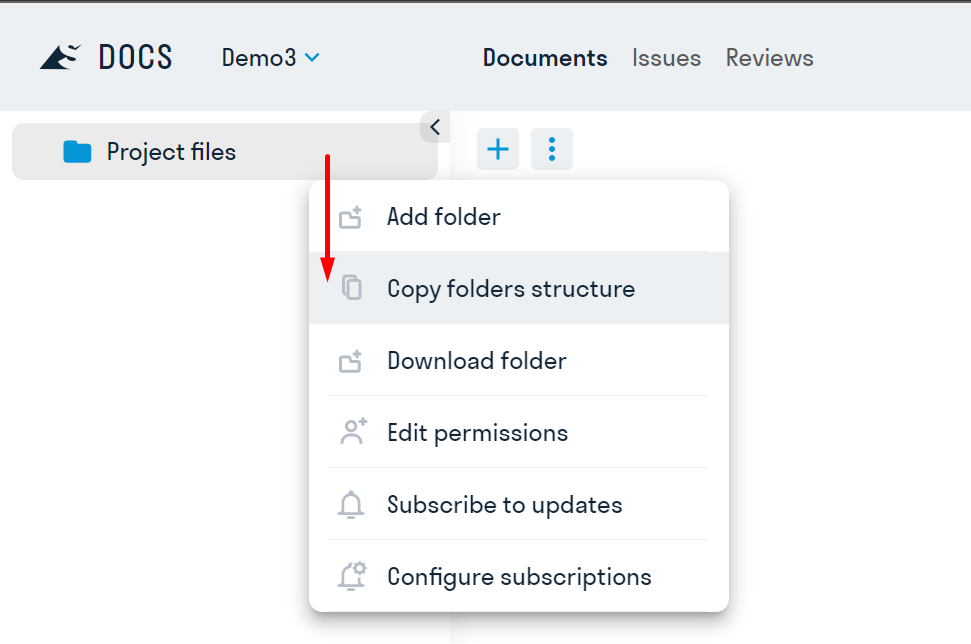
Method 3. You can also transfer the folder structure to a new project from a previous or template project.
To do this, delete all folders in your new project. Then, right-click on the "Project Files" folder ➤ "Copy Folder Structure".
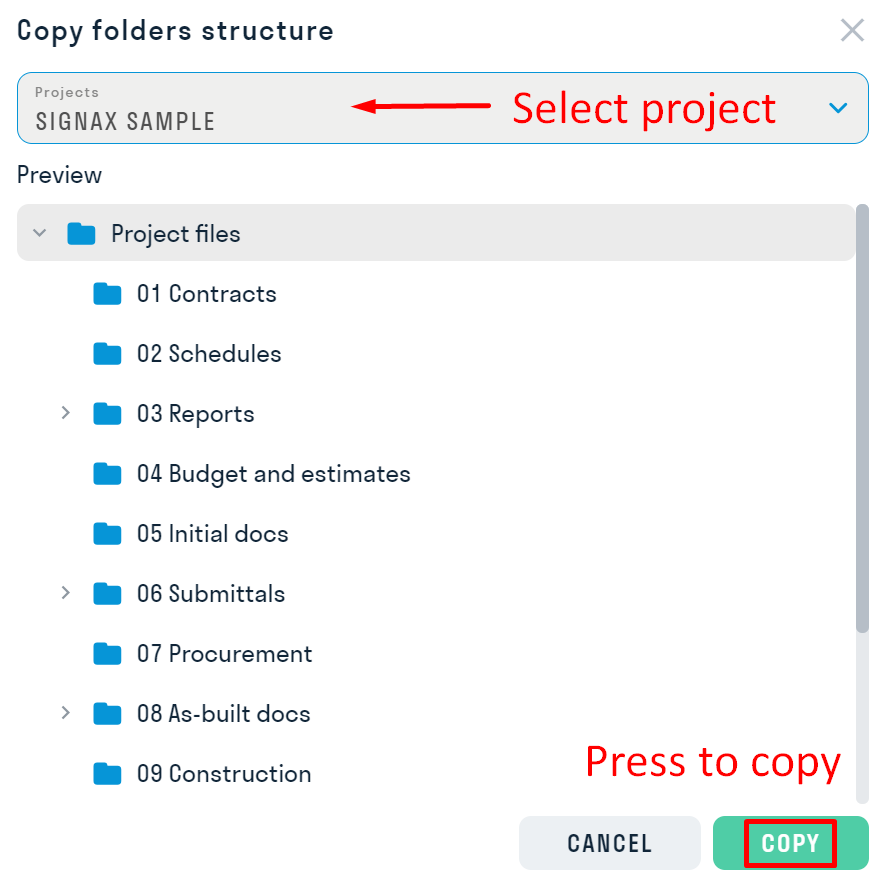
In the opened window, select the template project from which the folders will be copied and click "Copy." Thus, the folder structure will be copied from the template project to your new project.
Setting Folder Access Permissions
In SIGNAX DOCS, project administrators can grant various access permissions to users and roles for specific folders.
Go to docs.signax.io
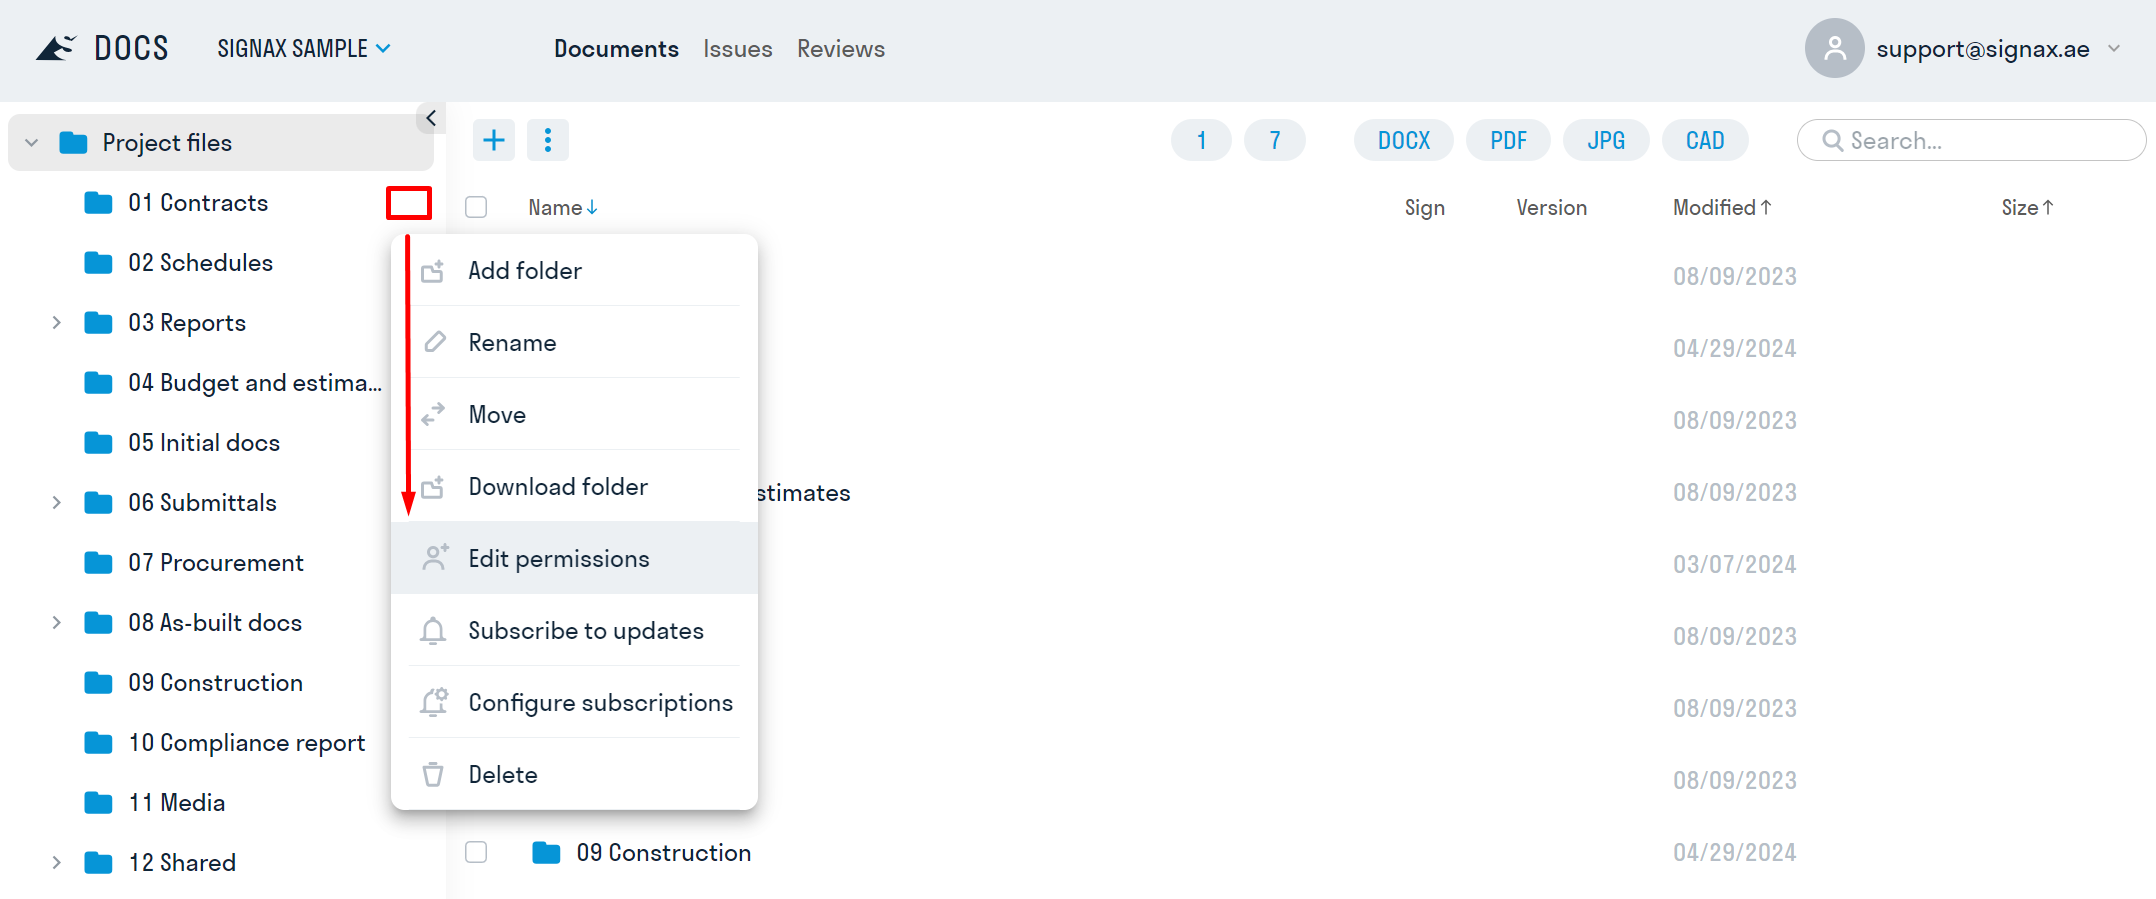
- To access the access settings, right-click on the folder ➤ "Edit permissions"
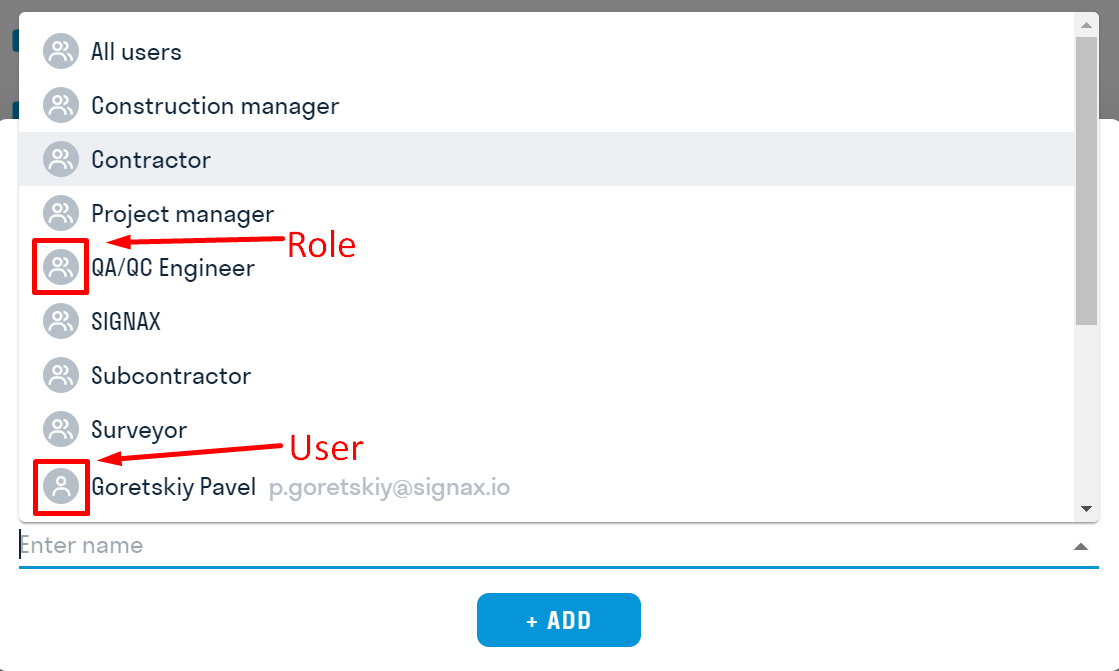
- In the opened window, click "Add." Then select the user or role from the list and click "Add." Multiple users can be in one role, for example, Designers. (see Role Creation)
- After adding users, assign them specific access permissions to the folder in the PERMISSIONS column. Subfolders inherit access permissions from the parent folder.
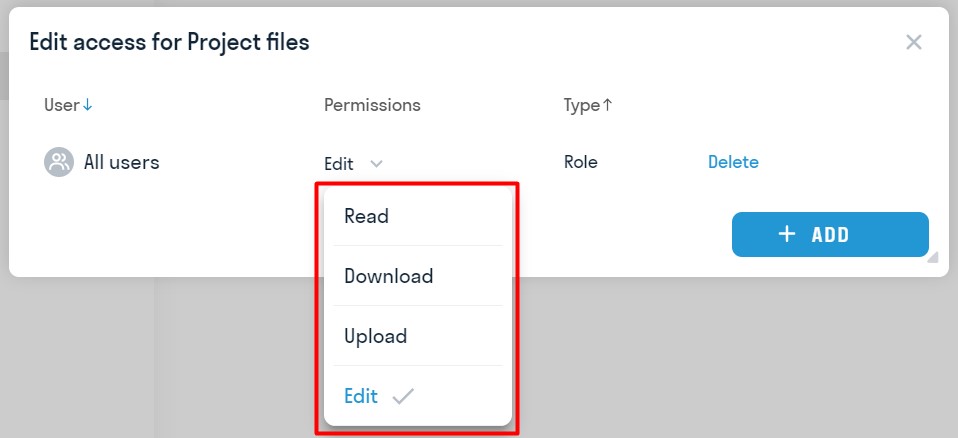
There are several levels of folder access permissions:
- Read - users can only open and view files
- Download - users can only open, view, and download files in folders
- Upload - users can upload their files to the folder
- Edit - users have full editing access to files in the folder (delete, rename, etc.)
| Actions | Access permissions | Read | Download | Upload | Edit |
| View files | ➕ | ➕ | ➕ | ➕ |
| Copy file link | ➖ | ➕ | ➕ | ➕ |
| Download | ➖ | ➕ | ➕ | ➕ |
| Publish files | ➖ | ➕ | ➕ | ➕ |
| Sign files | ➖ | ➕ | ➕ | ➕ |
| Create comments | ➖ | ➕ | ➕ | ➕ |
| Upload file/link | ➖ | ➖ | ➕ | ➕ |
| Add nested folder | ➖ | ➖ | ➕ | ➕ |
| Copy file/folder | ➖ | ➖ | ➕ | ➕ |
| Move file/folder | ➖ | ➖ | ➖ | ➕ |
| Rename file/folder | ➖ | ➖ | ➖ | ➕ |
| Delete file/folder | ➖ | ➖ | ➖ | ➕ |
| Restore file/folder | ➖ | ➖ | ➖ | ➕ |
Uploading Documents
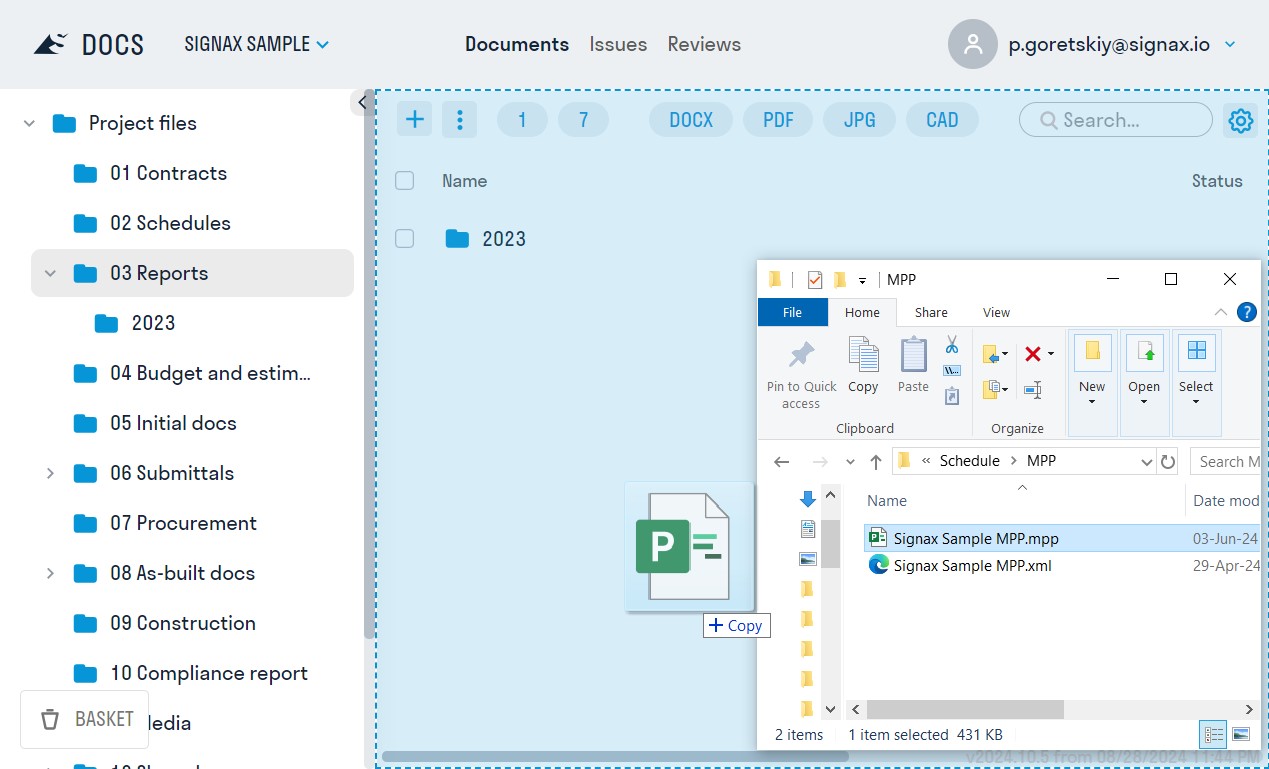
Method 1: Files can be uploaded by “Dragging and Dropping” files from the file explorer into SIGNAX DOCS.
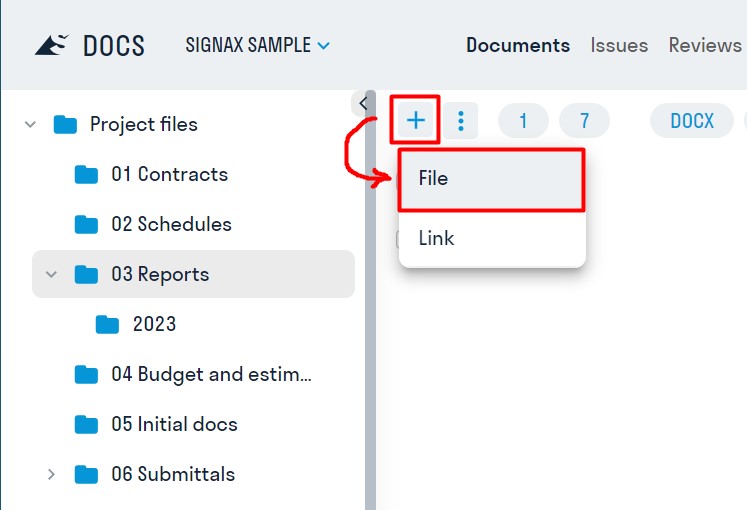
Method 2: In the desired folder, click “+” ➤ select the file ➤ in the window that opens, choose the file to upload.
Method 3: If a previous version of the file has already been uploaded to the system, the next version can be uploaded by right-clicking on the file ➤ Upload Version.
This method works even if the file name on the computer does not match the file name in the SIGNAX DOCS system.

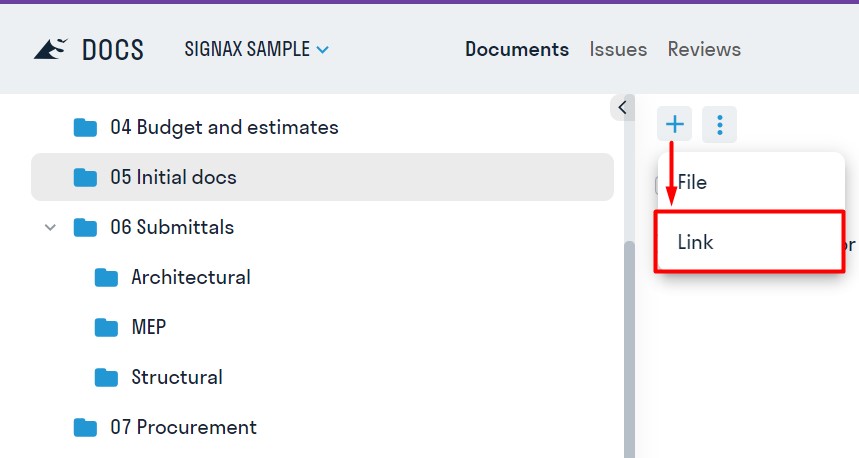
Adding Links to Google Docs and Google Sheets
In the SIGNAX DOCS service, it is possible to add links to Google Docs and Google Sheets.
1. Click + and select "Link"
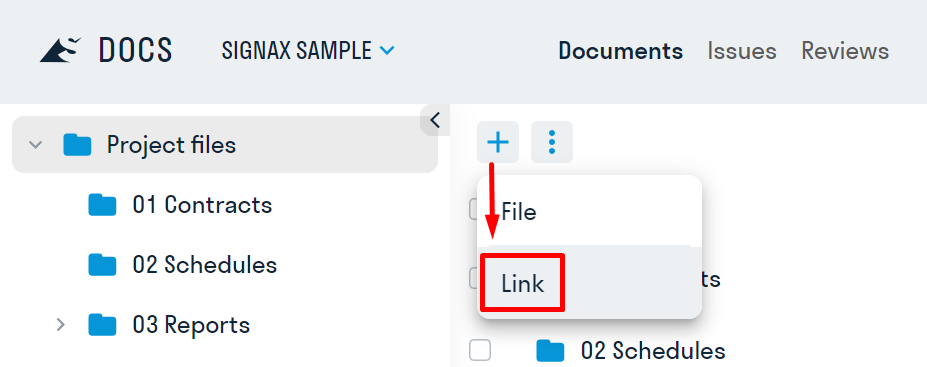
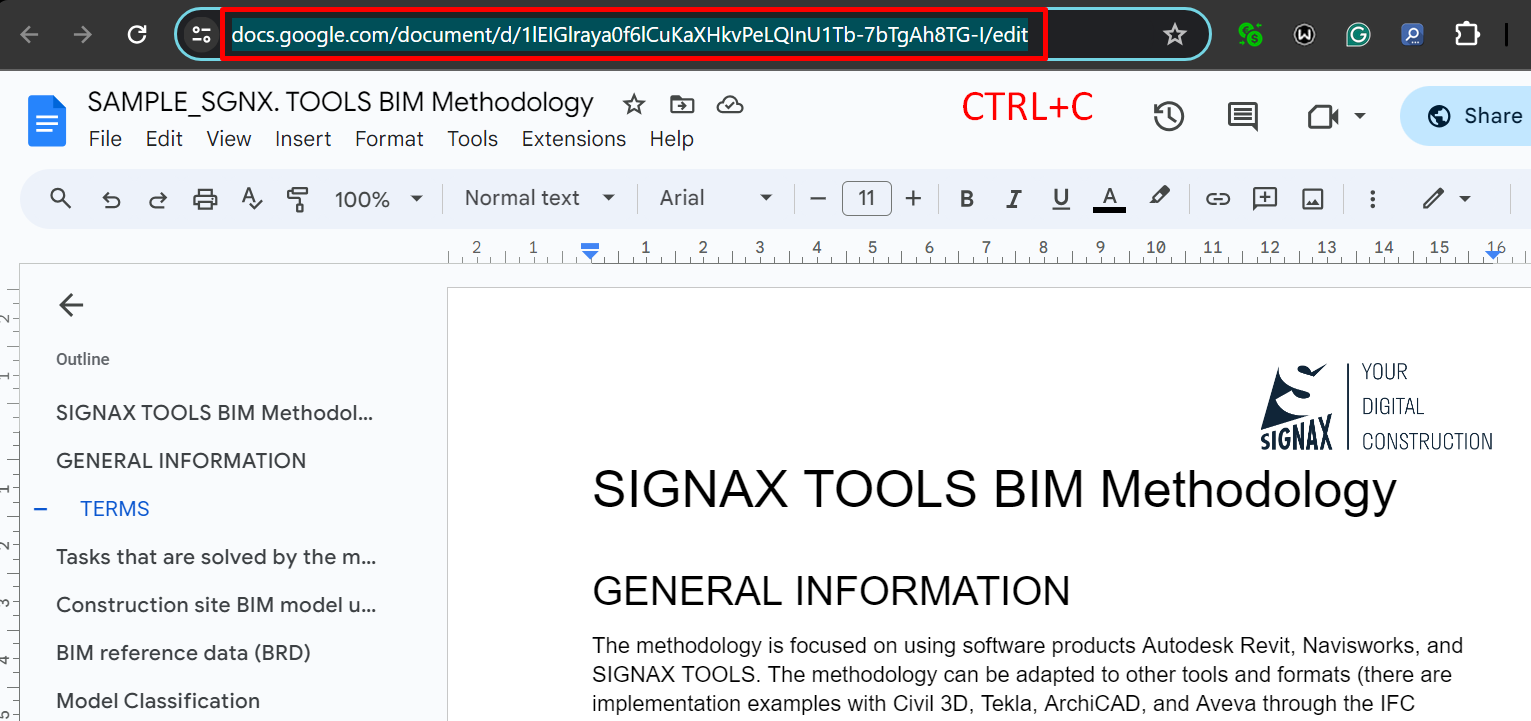
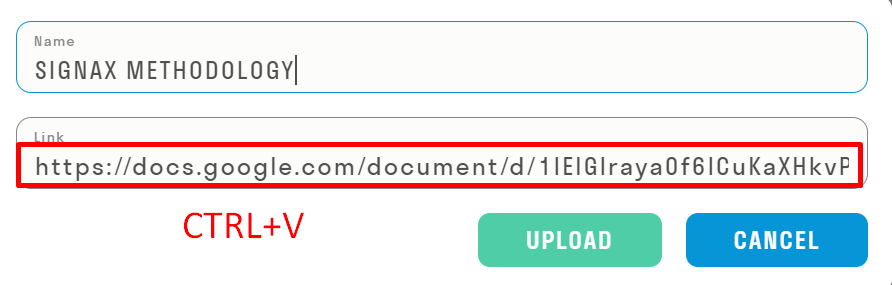
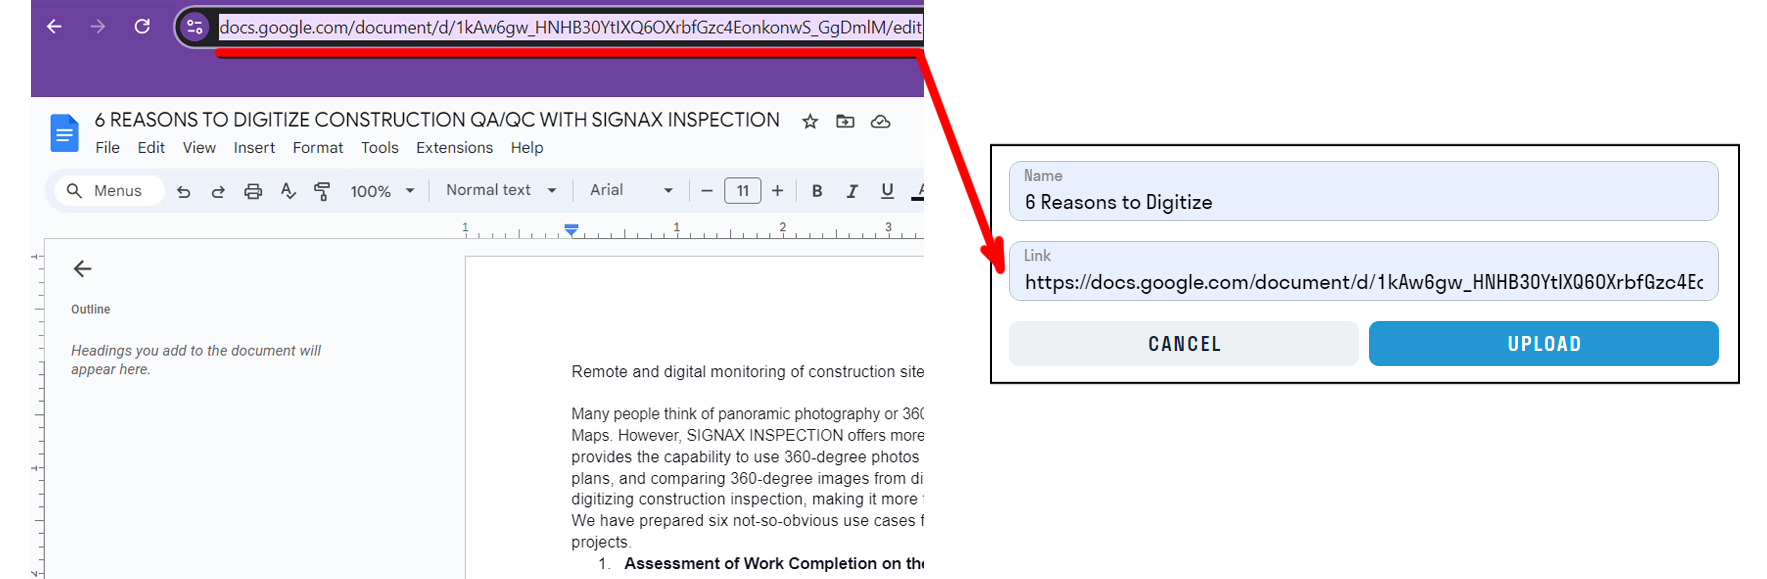
2. In the pop-up window, enter the file name and paste the copied link to the Google Docs into the "File Link" field. Click "Upload"
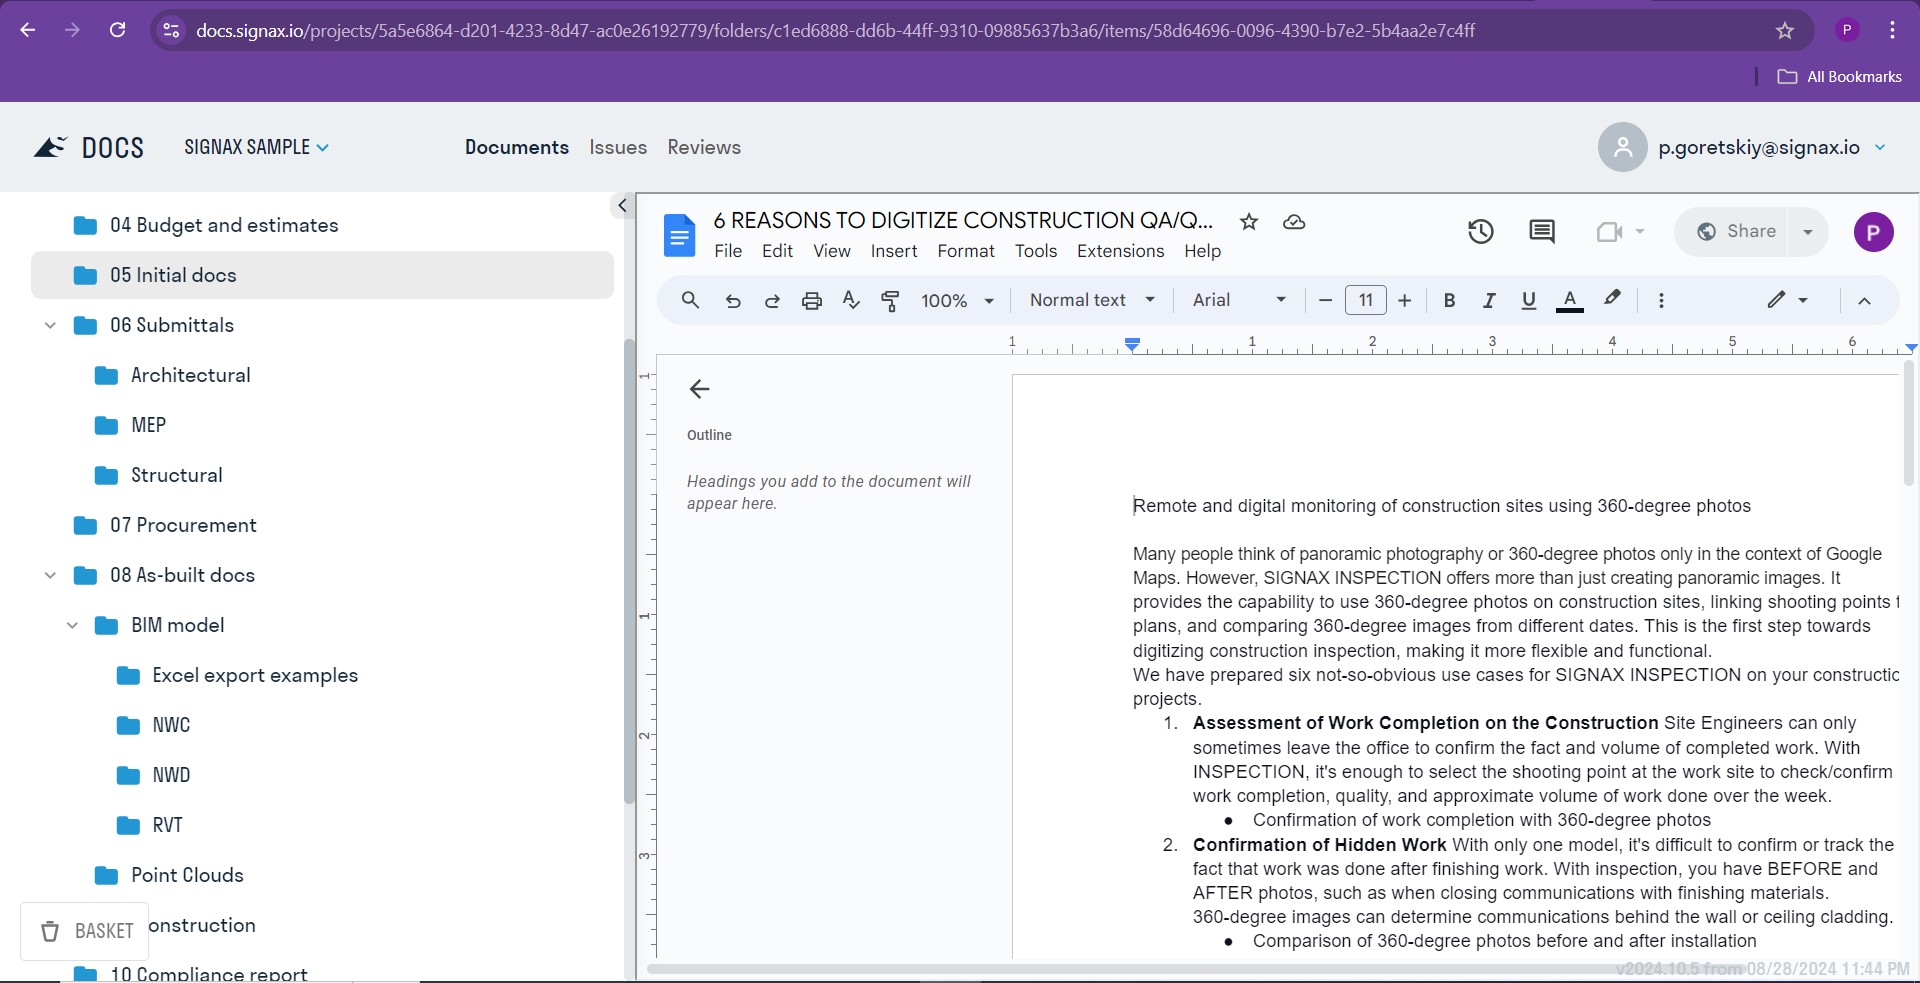
3. A file will be created, clicking on which will open Google Docs and Google Sheets within the SIGNAX DOCS.
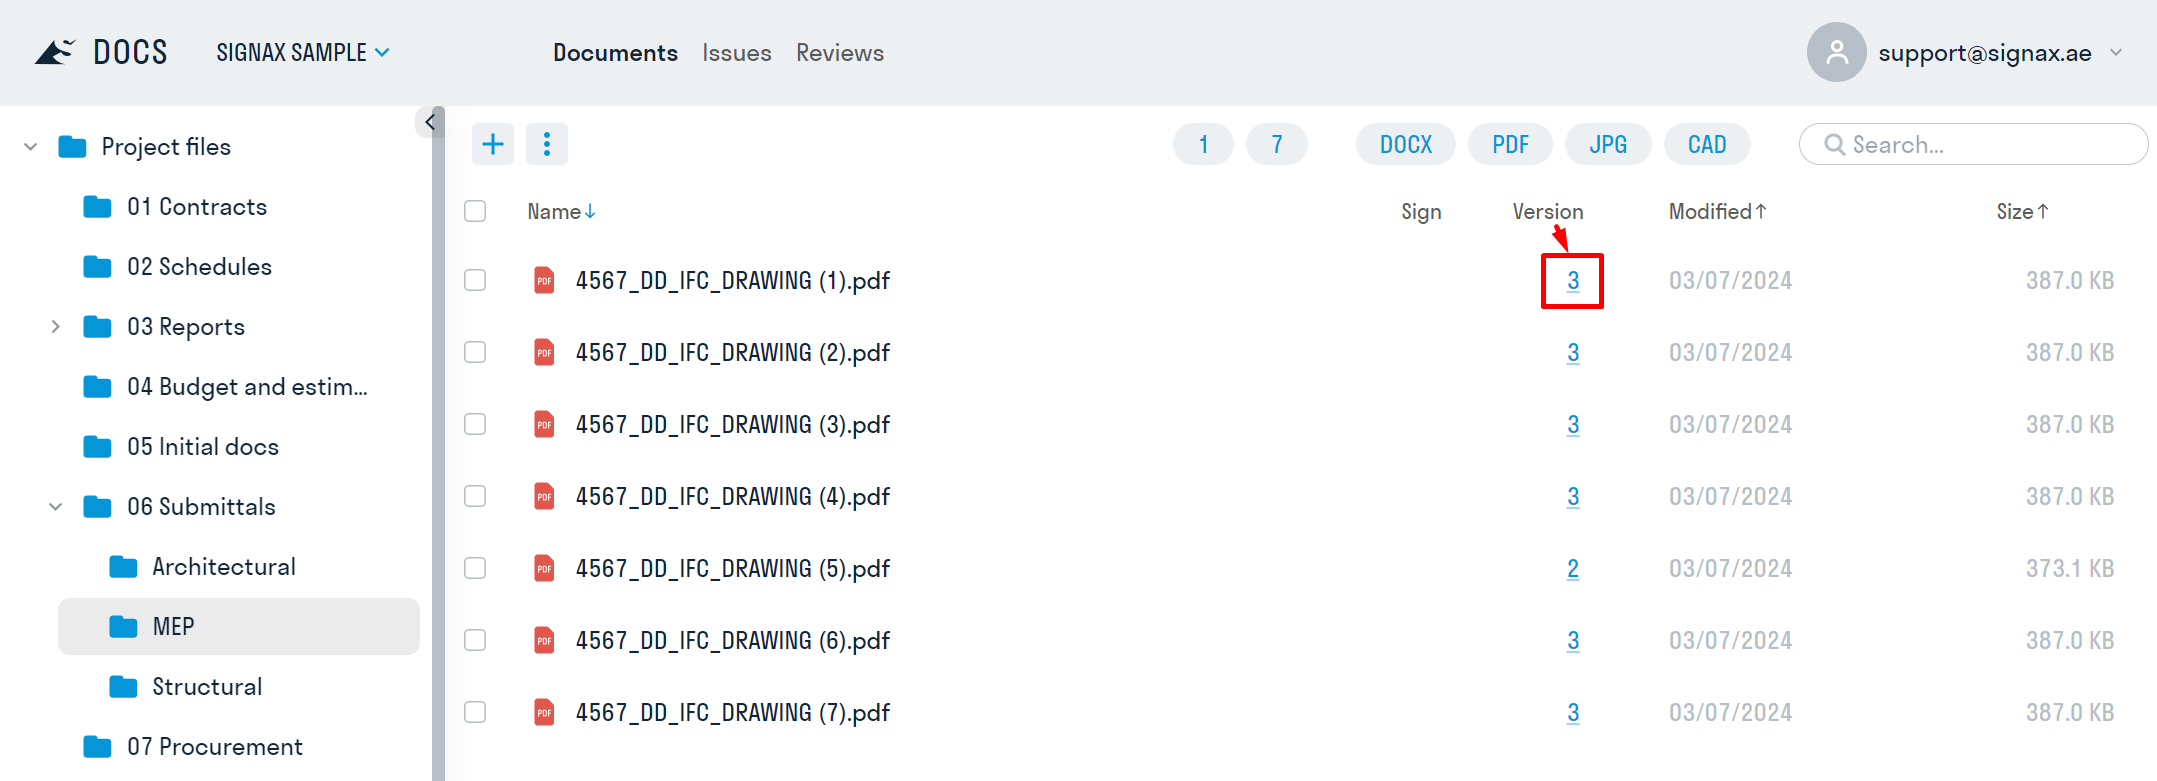
File versions
In SIGNAX DOCS, working with file versions is available. The previous version of the file is saved in the history when uploading a new file with the same name. Thus, versioning allows tracking different file versions and reverting to previous versions if needed.
1. To open the file history, click on the file version number in the "Version" column.
2. A window will open with a list of all file versions along with information about who and when added the document. The current version of the file is marked as "Set actual".
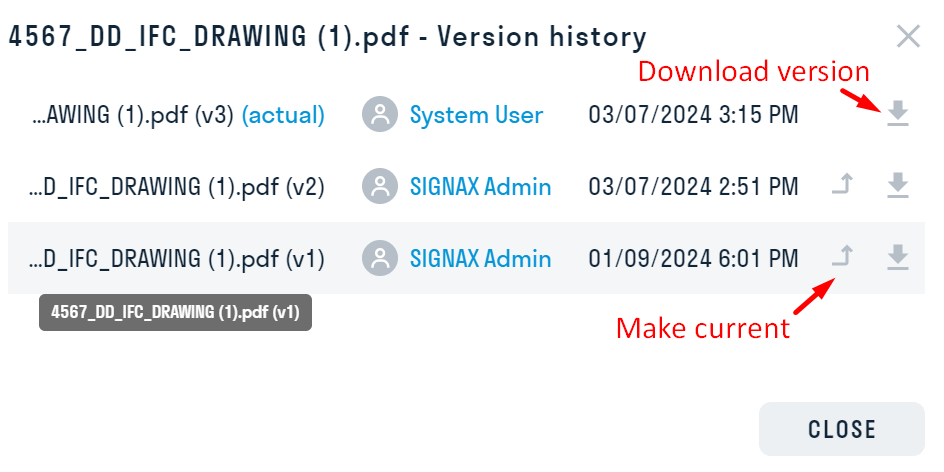
- Users with editing access permissions can make an old version current. To do this, click

- To download any version of the file, click

Basket. Restoring Deleted Files
All deleted files are stored in the trash. Only the project administrator can restore files.
1. Go to the folder where the file was deleted, and in the bottom left corner, click "BASKET".

2. A list of files in the trash will appear, along with information about who and when deleted the file. To restore, check the boxes next to the files and click "Restore". To restore a single file, right-click ➤ Restore.
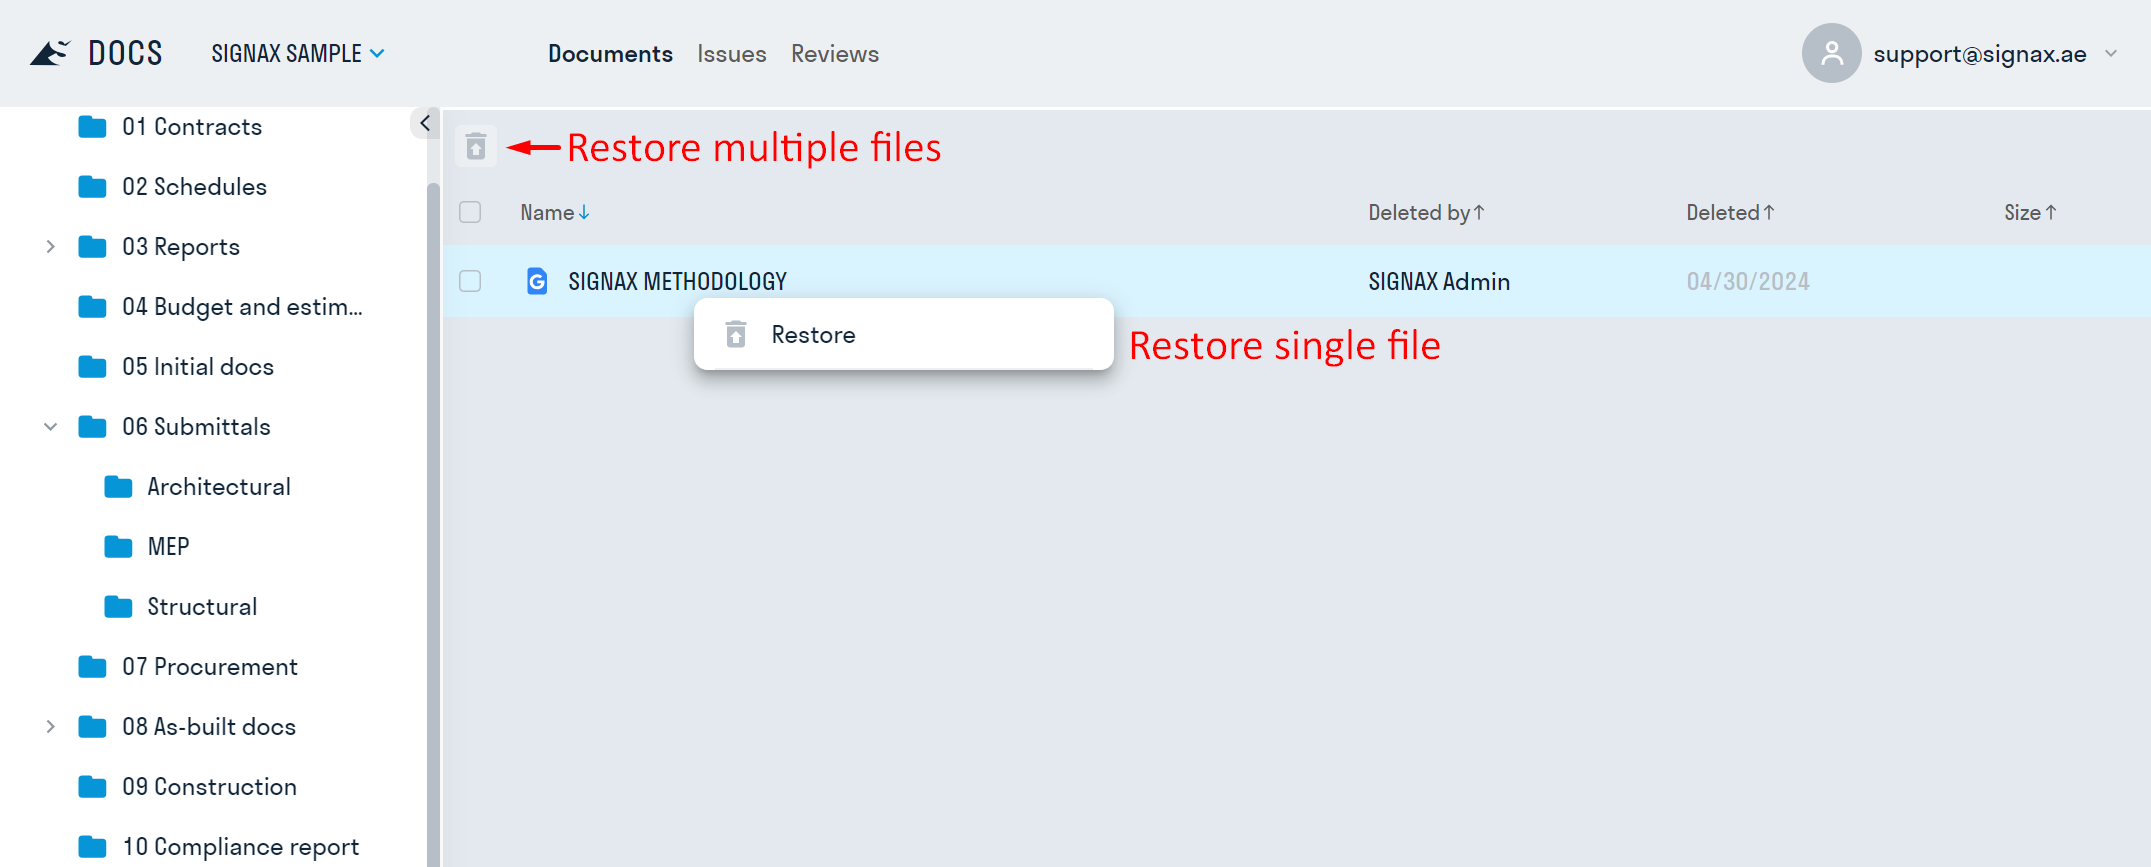
3. To exit the trash, click "BASKET" again.
Comparing PDF documents
A compare feature is available while viewing PDF documents with more than 1 version uploaded.
1. Select "Compare" in the top right corner.
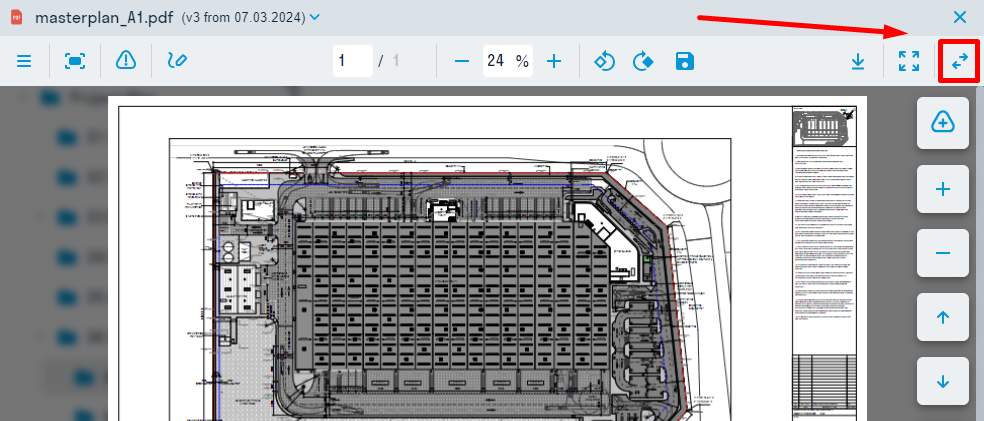
2. You have an option to compare current document versions or select external file from other directory.
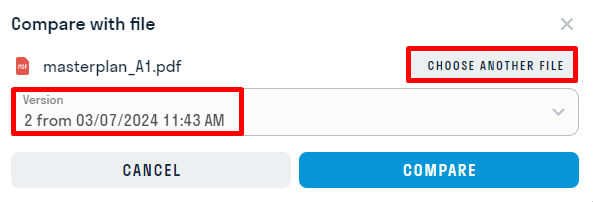
That can be useful when designer uploads drawings with different file names or creates submittal packages in separate folders.
3. After comparison process you can switch between version with "A" and "B" buttons, as well as return to comparison "Result". Use rotate buttons to rotate document.
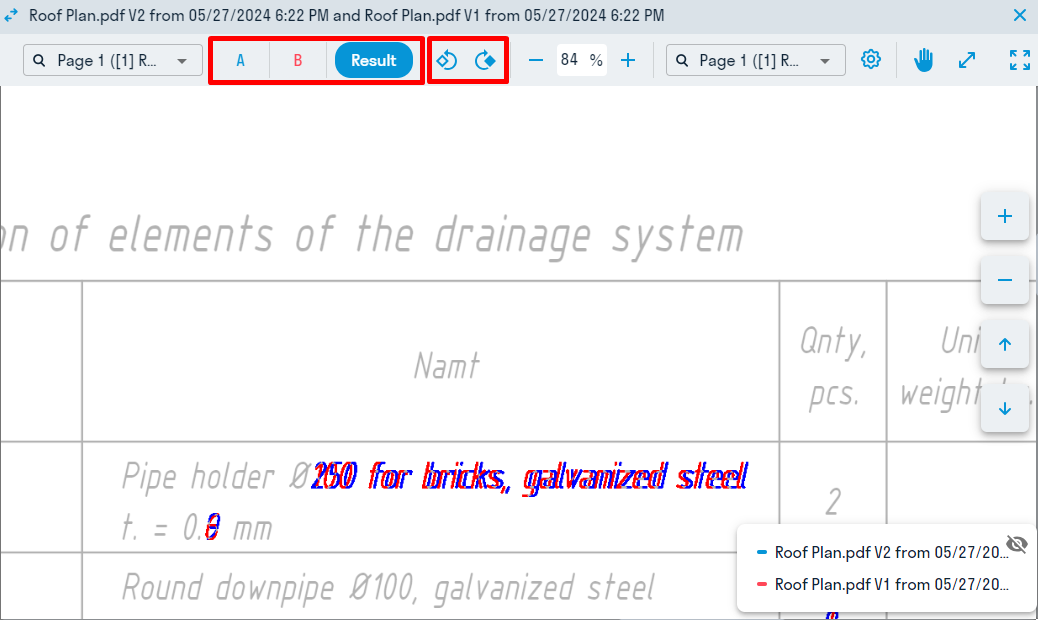
PDF Comparison settings
 and
and  buttons allow you to scale and move one version against a comparable one. This may be needed if the document format (size/scale/section) is changed. Press back arrow to revert changes.
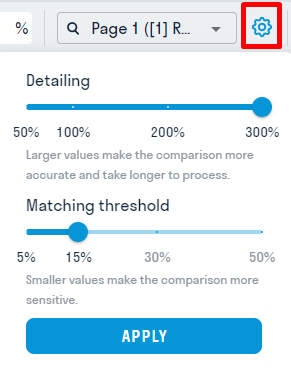
Press settings for detailed comparison settings.
- Change the "Detailing" value for larger documents comparison.
- A larger "Matching threshold" value will filter small deviations between documents.
Viewing BIM Models
Autodesk Forge Viewer is used to view 3D models in SIGNAX DOCS.
Forge Viewer allows viewing the following file formats:
| Description |
Format |
| AutoCAD | .cad .dwg .dfx |
| Revit | .rvt .rfa .rte |
| Navisworks | .nwc .nwd |
| Industry Foundation Classes | .ifc |
| ArchiCAD | .pln |
| DWF Viewer | .dwf |
| AutoCAD, SolidWorks | .dxf |
| 3ds Max | .fbx .3ds |
| Rhino | .3dm .rng |
| SketchUp | .skp |
| MicroStation | .dgn |
| Wavefront OBJ | .obj |
| Collada | .dae |
| Stereolithography | .stl |
| ACIS | .sat |
| Standard for the Exchange of Product Data | .step .stp |
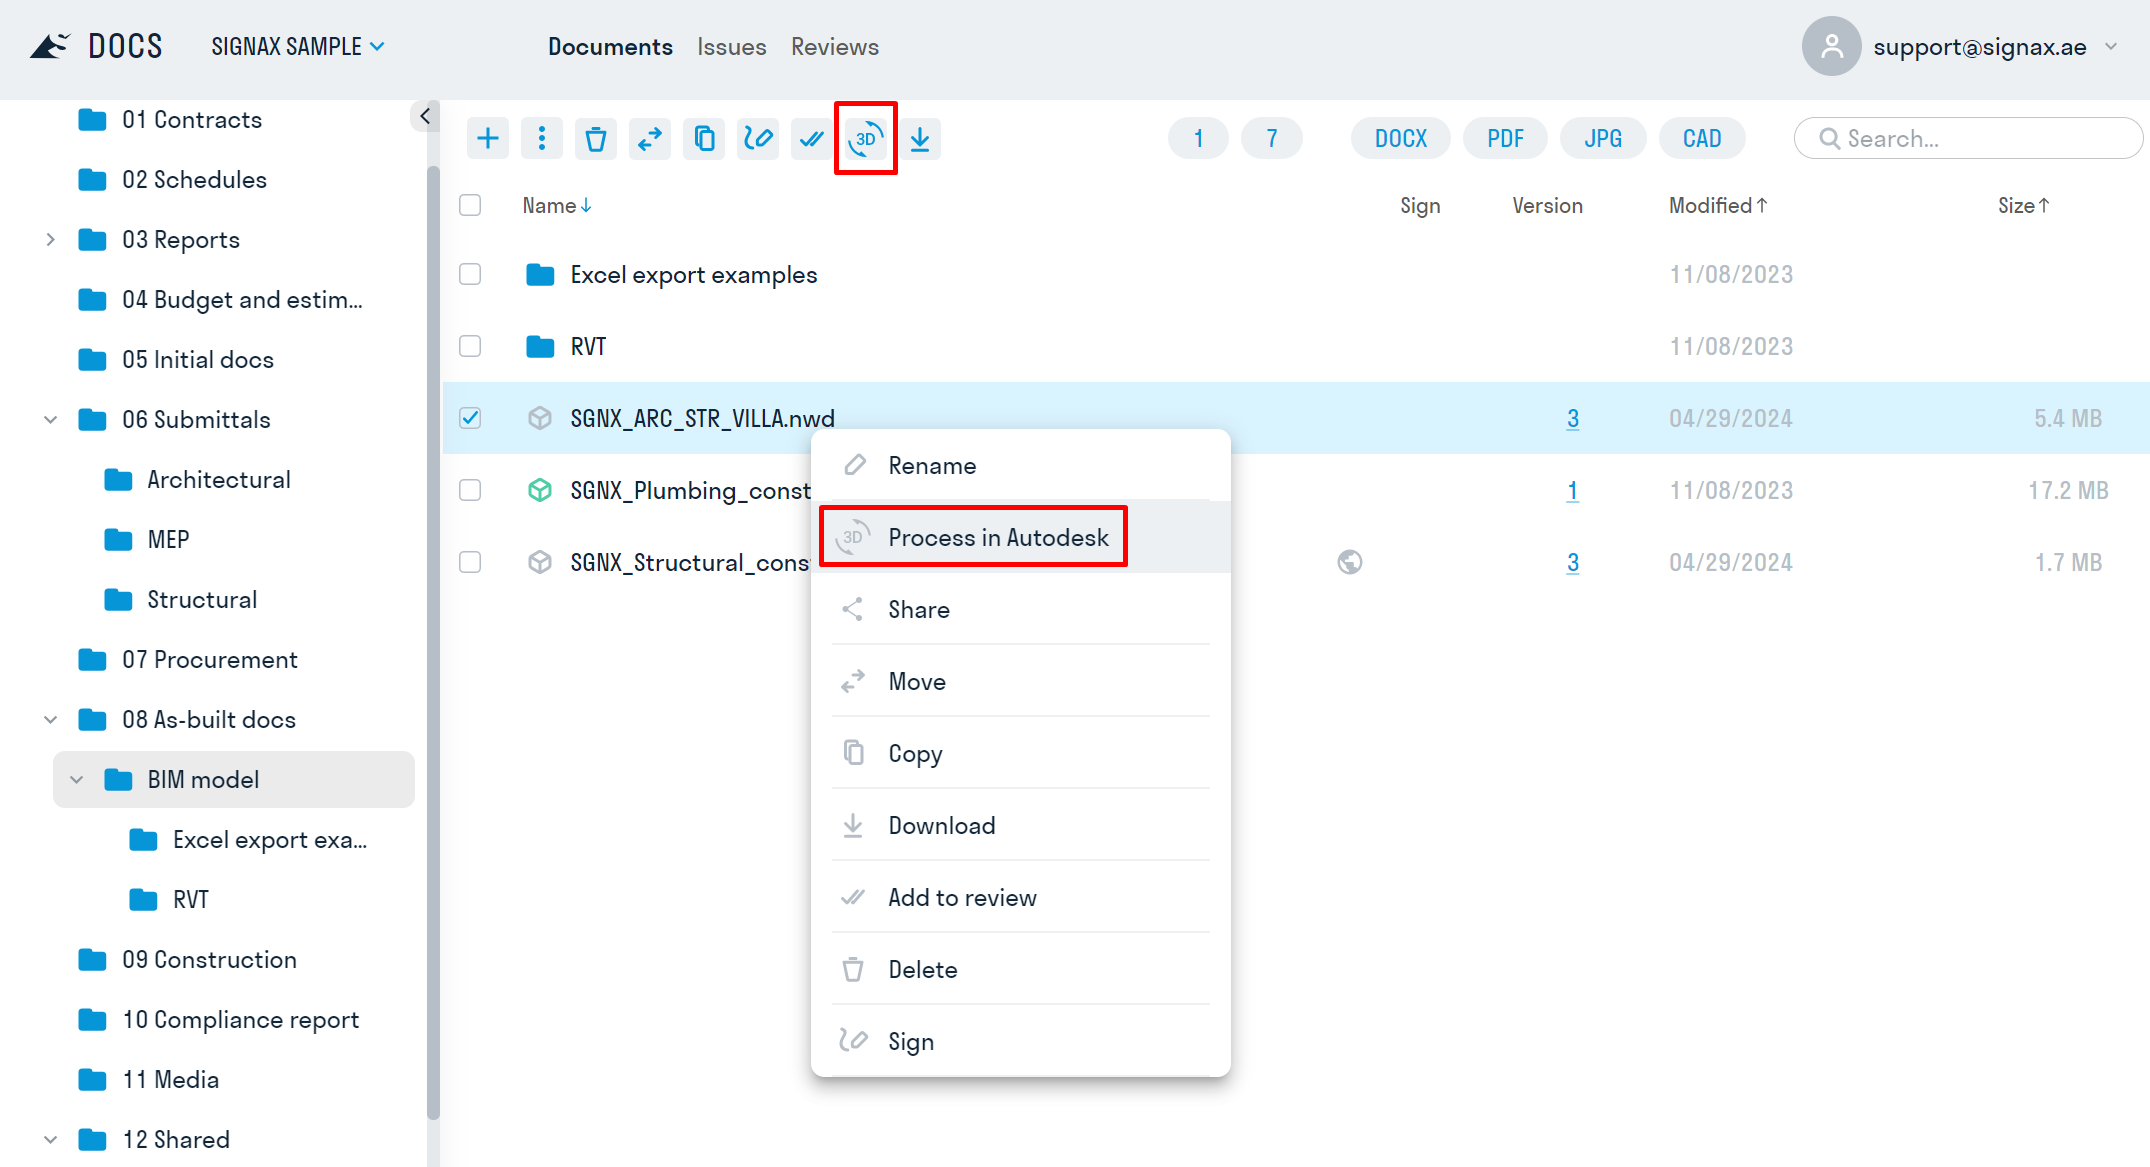
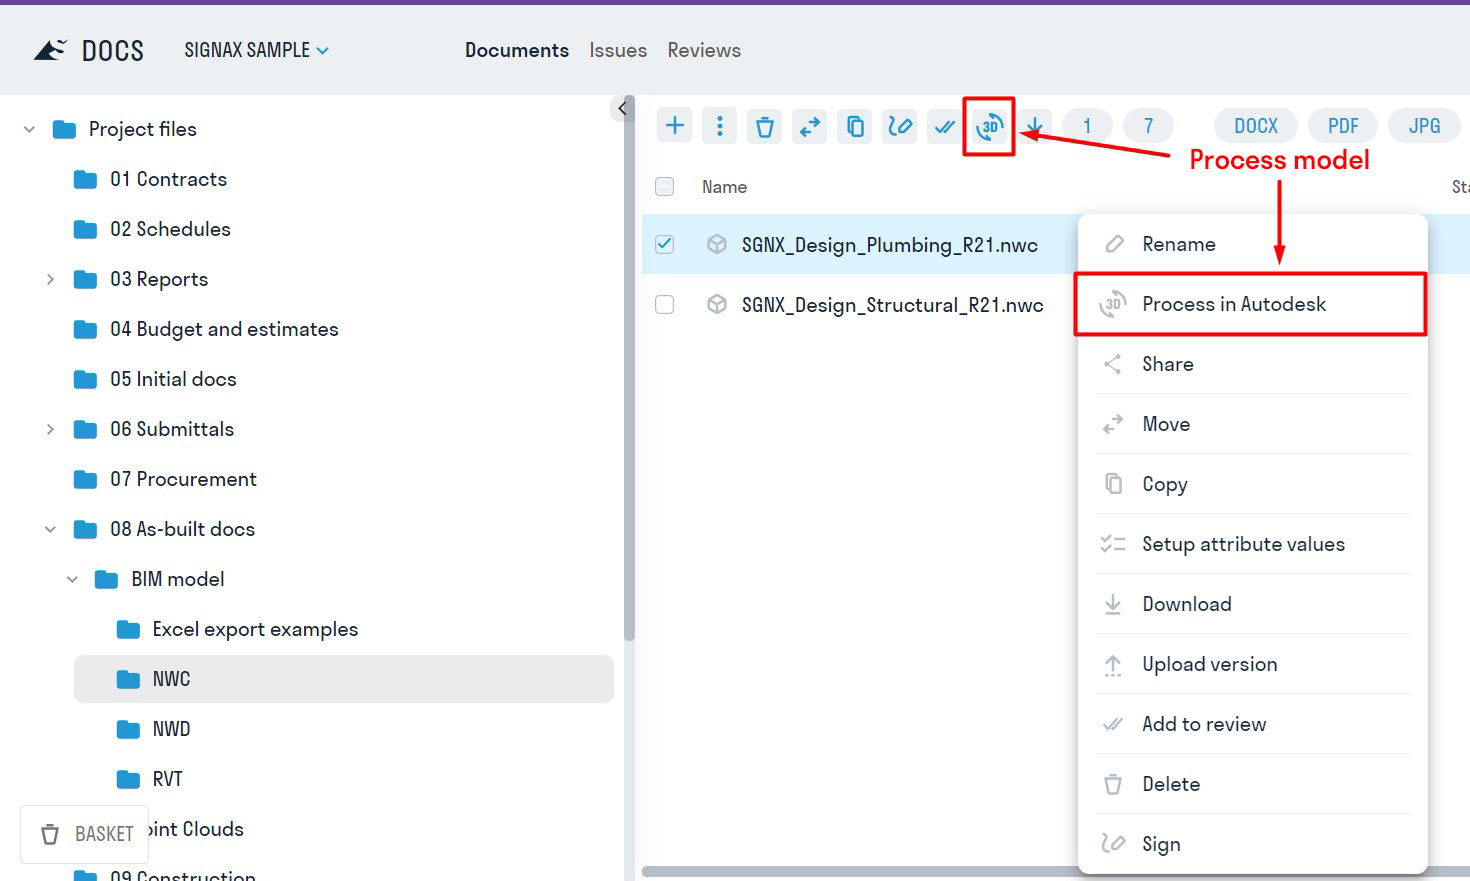
To open the model, process it once in Forge Viewer. Right-click on the file ➤ "Process in Autodesk." To process multiple models, use the corresponding buttons on the toolbar.
After processing the model, it can be opened for viewing.
File sharing
In SIGNAX DOCS, there is an option to open shared access to any files and folders and share them with all participants of the construction process, even those without DOCS licenses.
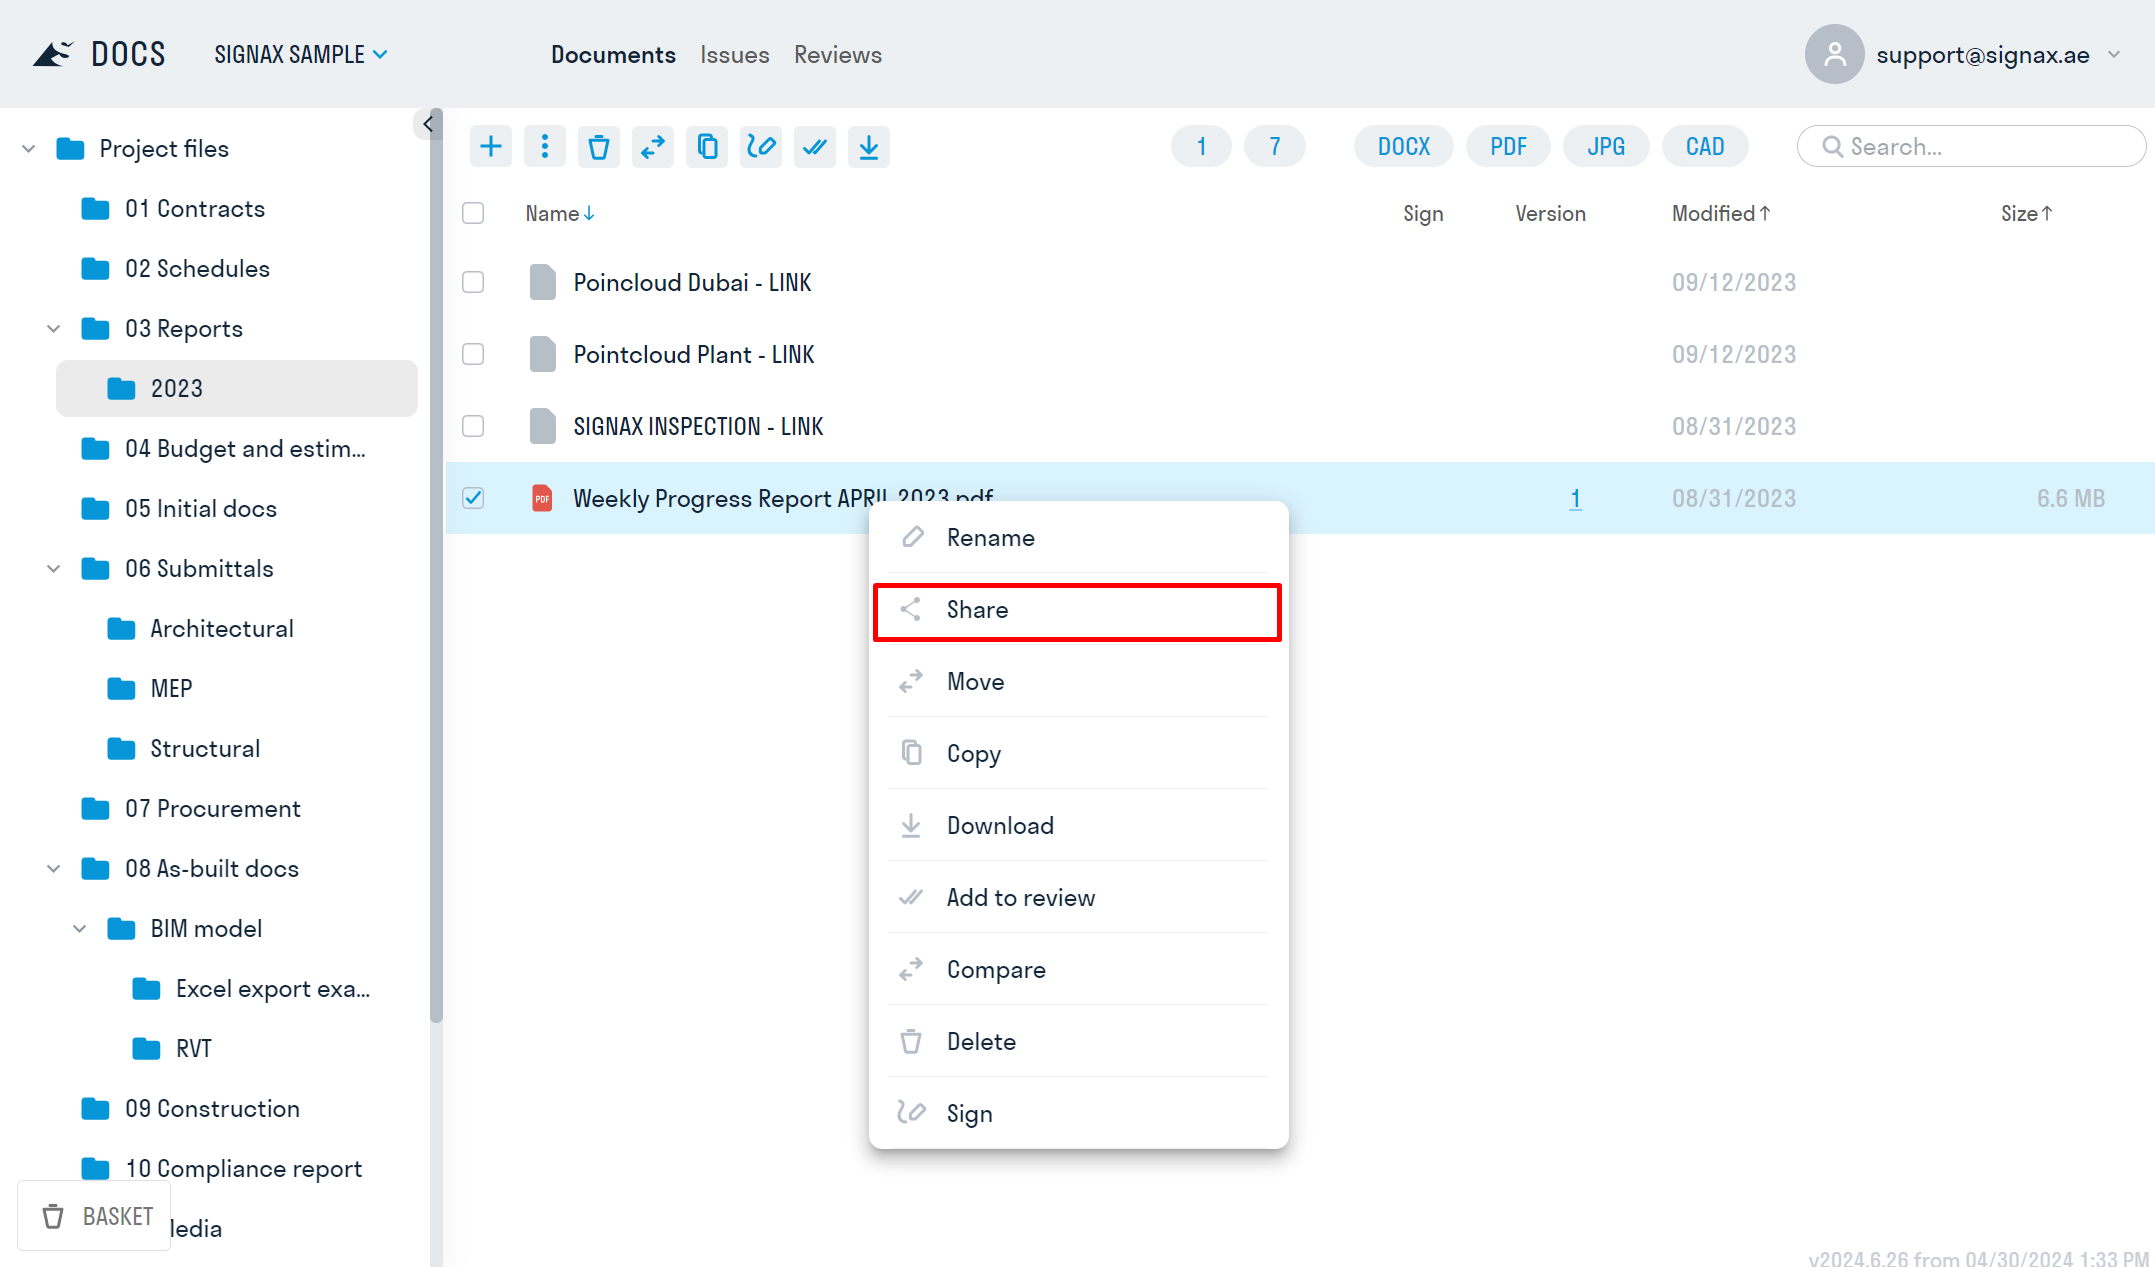
2. In the opened window, select the Publication Type from the list and click "Open Access". The link to the published file will be automatically copied to the clipboard.
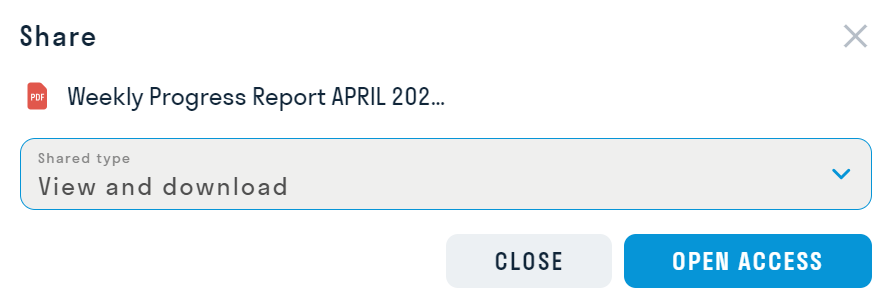
Publication Types:
- "View" - allows users only to view the published document without the ability to download it.
- "View and Download" - allows users to view and download the document.
3. When opening the published link to a folder, the user will see all files and subfolders included in the folder with shared access.
By clicking on any file, it can be opened for viewing and downloading, depending on the selected Publication Type.

4. All published files and folders are marked with the![]() icon. By clicking on it, a window will open with the option to recopy the published file, change the publication type, or disable shared access for the file.
icon. By clicking on it, a window will open with the option to recopy the published file, change the publication type, or disable shared access for the file.
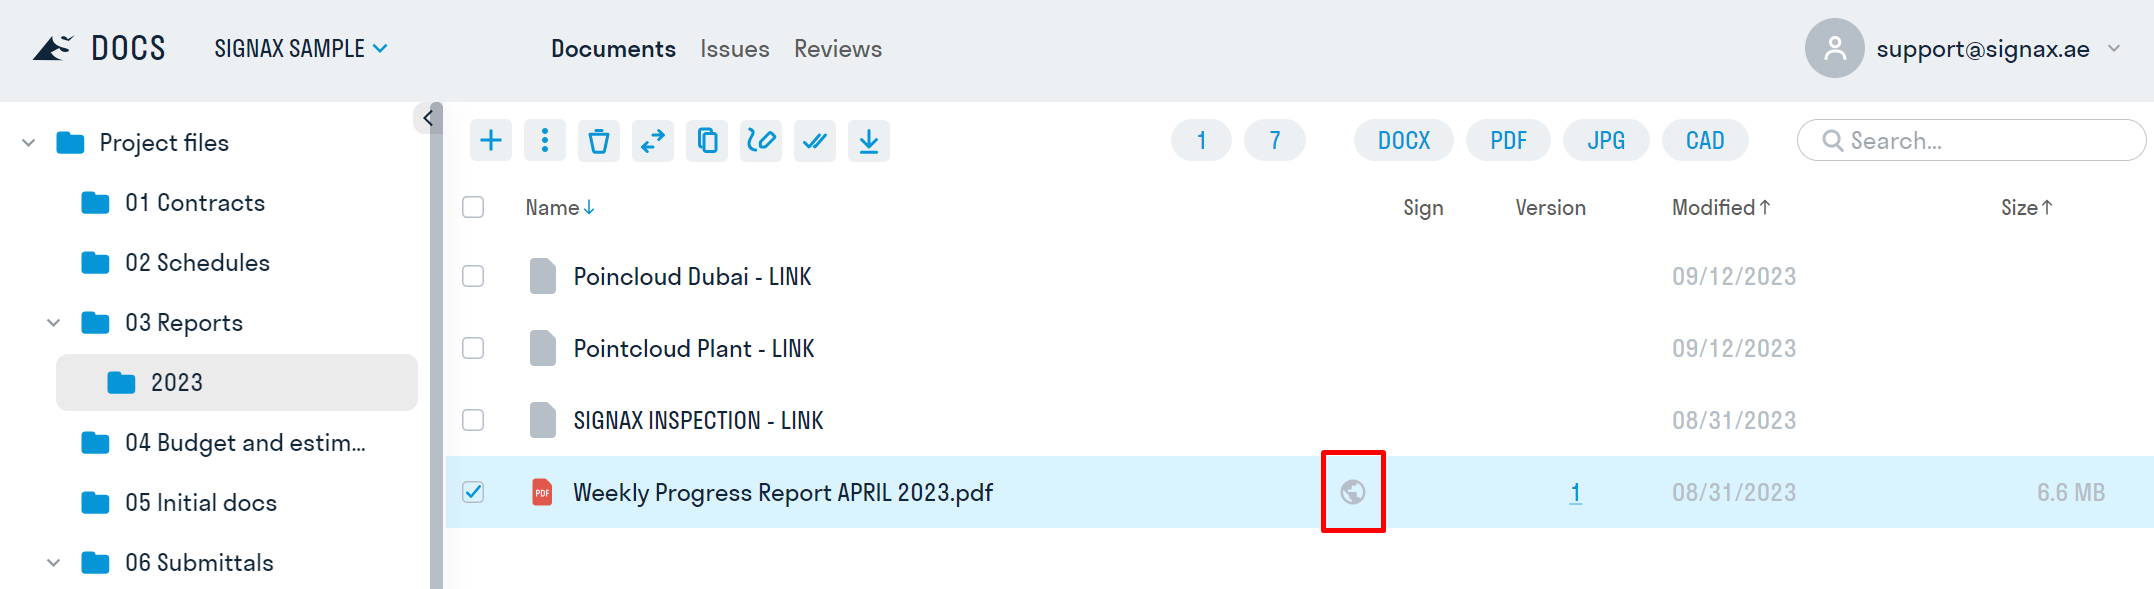
5. The project administrator can access all published links stored in tabular form in the Public Links section.
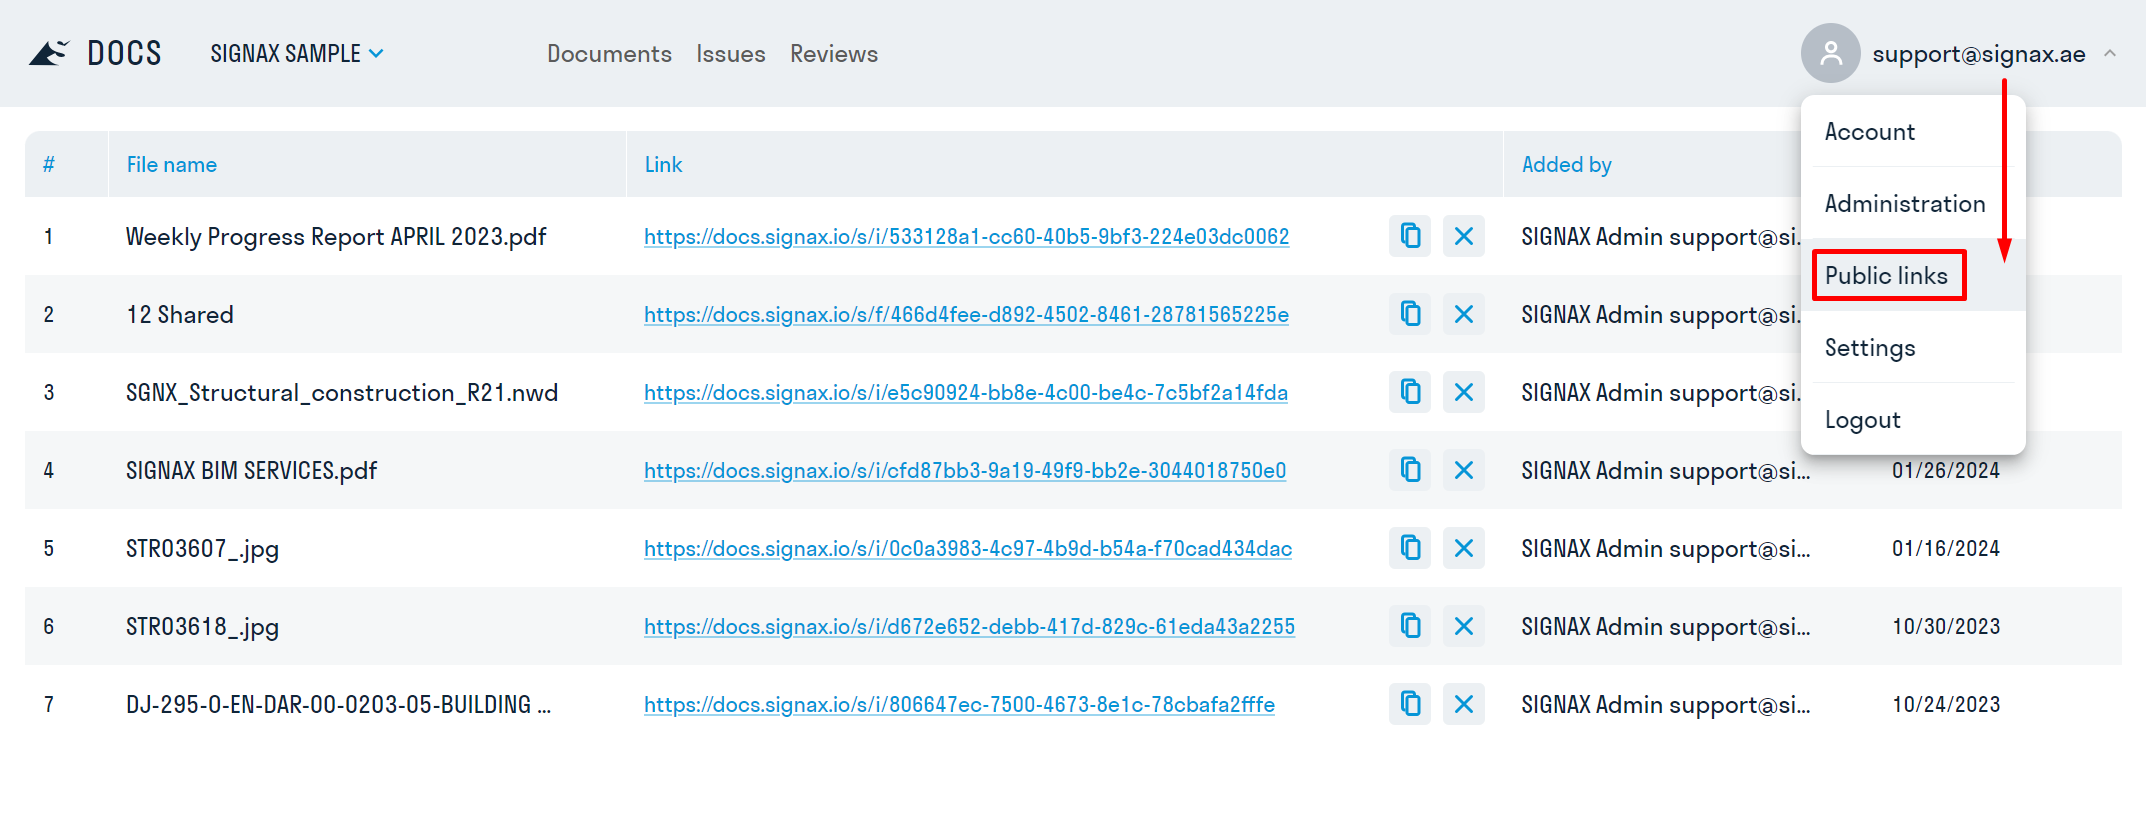
This section displays the following information:
- Link number in the list;
- Name of the published file or folder;
- Link to the published file or folder, which can be copied or deleted, thereby disabling shared access;
- Who added the link;
- Date the link was added.
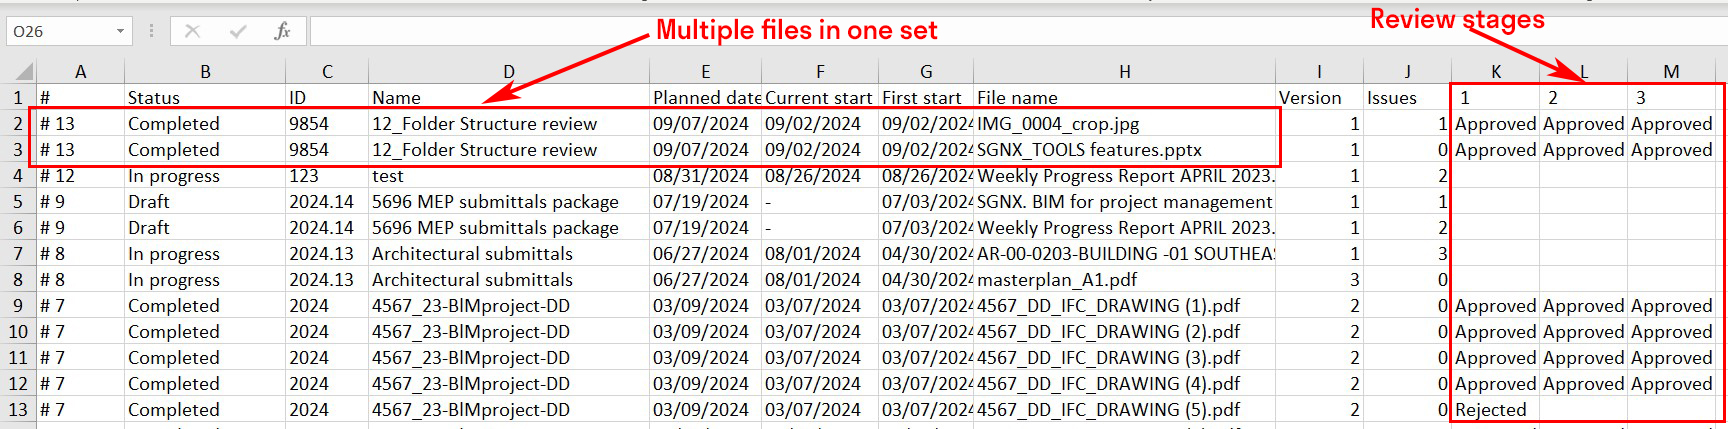
Issues
In SIGNAX DOCS, issues can be created for files of any format. Issues can be created both in the document itself and from the issues registry without attaching to a document.
Issue Settings
The project administrator has access to Project Settings, as well as full access to edit any issue.
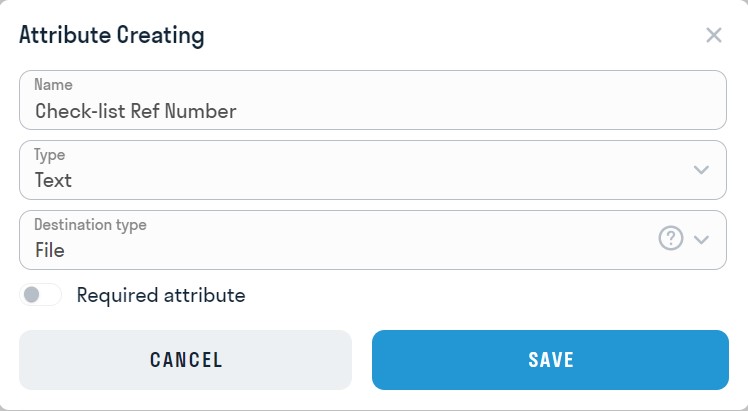
In project settings, the administrator creates issue types for the current project. Each type can have custom attributes where the user can provide additional information about the issue.
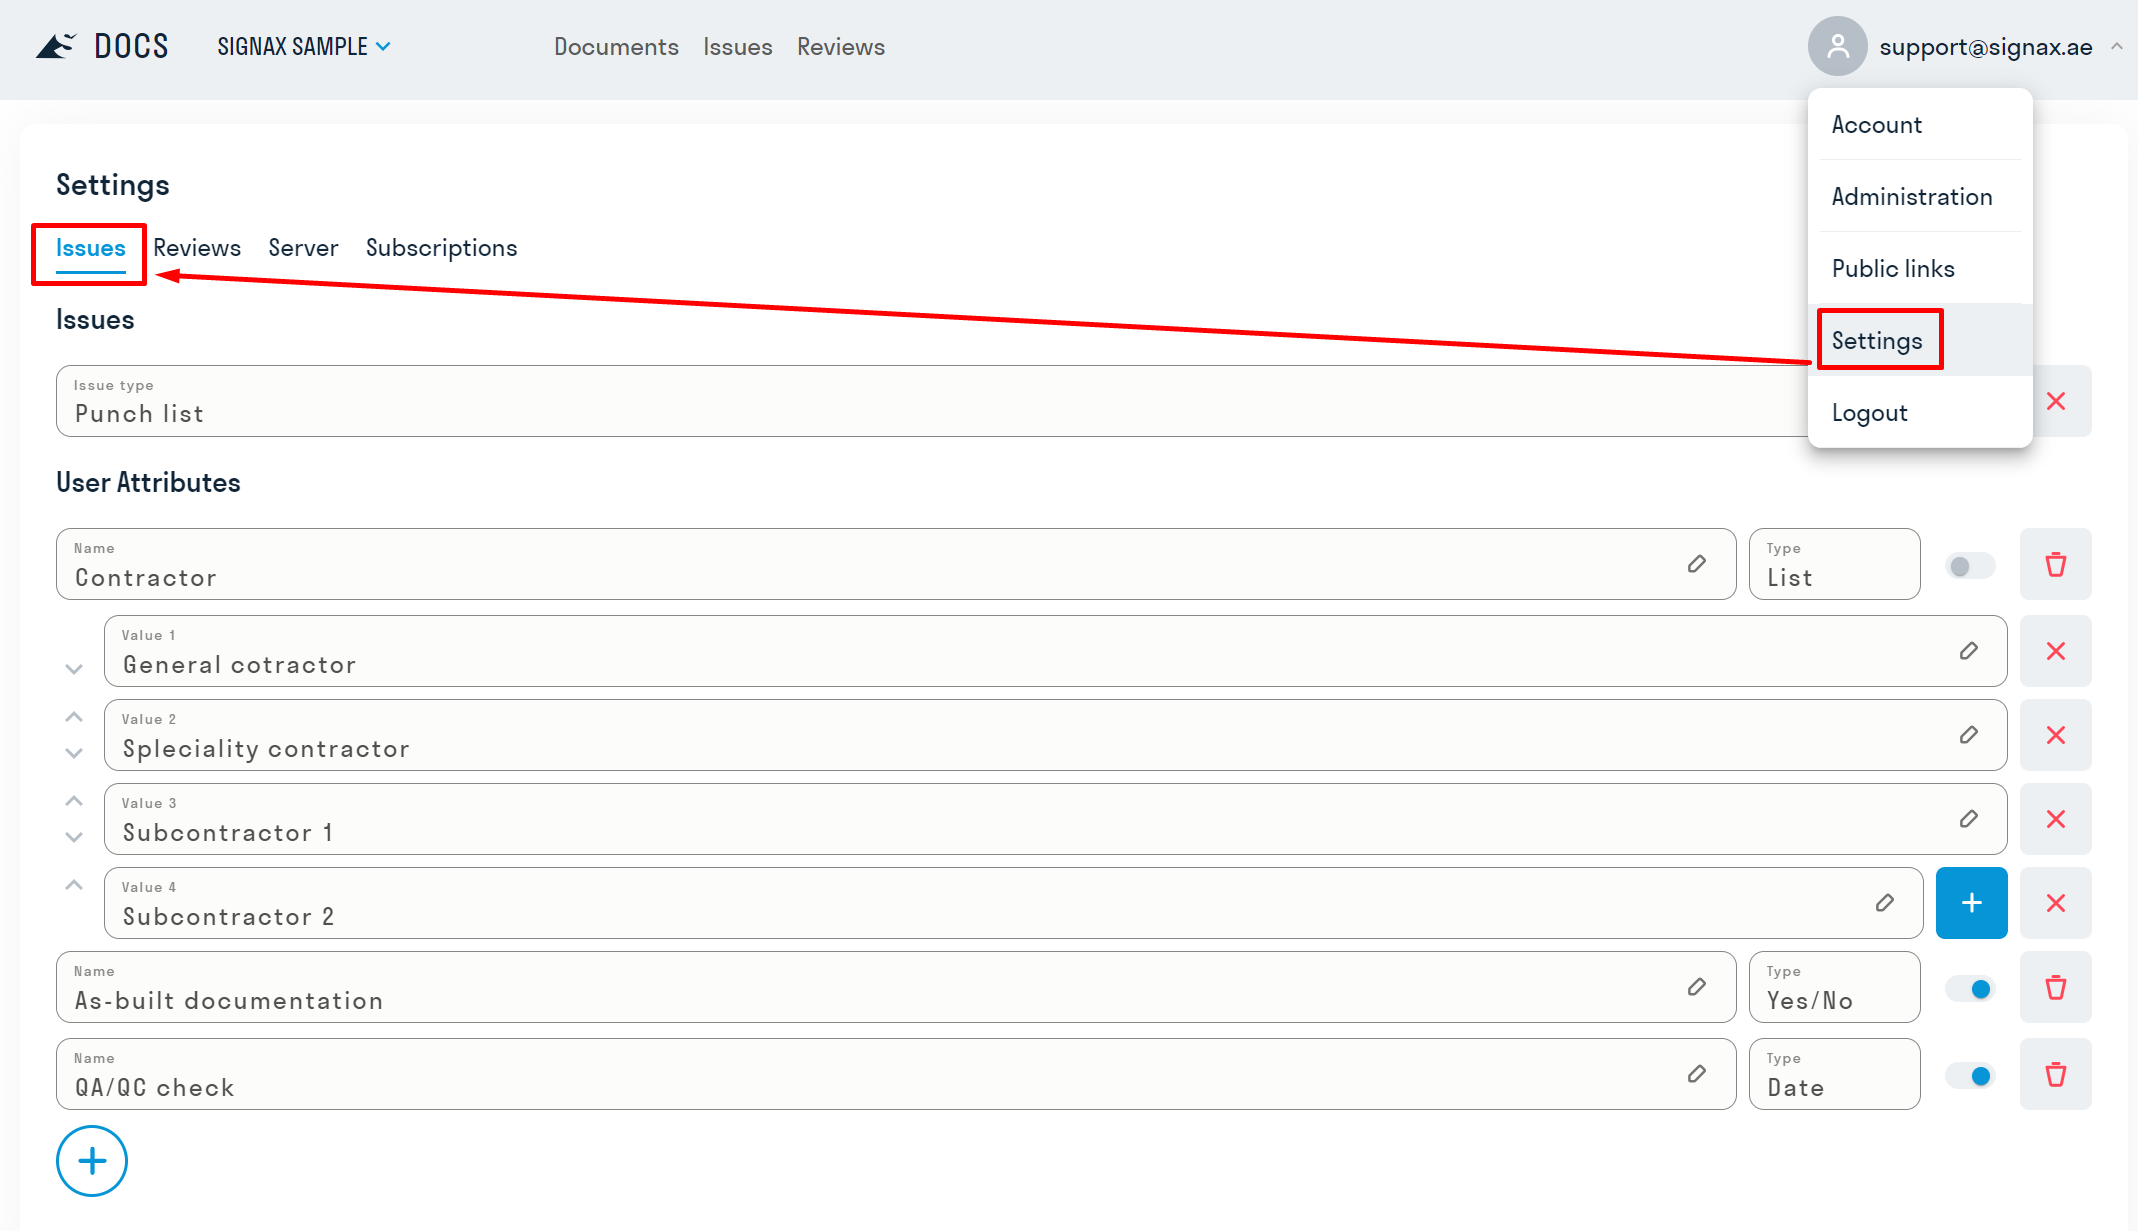
To add a Custom Attribute, click +
Types of Custom Attributes:
- The "Text" attribute allows users to enter arbitrary text to provide additional information, explanations, or comments on the issue.
- The "Yes/No" attribute represents a logical value that allows the user to choose one of two response options: "Yes" or "No." It is used to obtain a simple answer to a question.
- The "List" attribute is used to provide the user with a list of predefined response options, for example, to select the type of work, type of violation, etc.
- The "Date" attribute allows users to select or manually enter a date. It is used to specify timestamps or deadlines associated with the issue.
- Each attribute can be mandatory or optional. This is controlled by the switch.
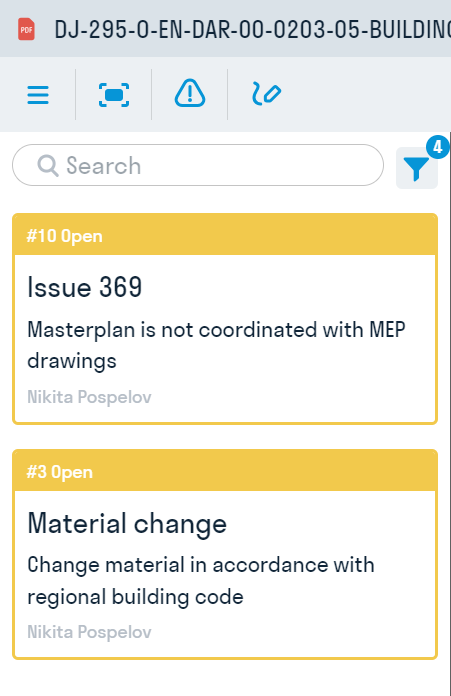
Issues Registry
All issues created in the project are stored in tabular form in the "Issues" section.
The registry displays the necessary information about the issues:
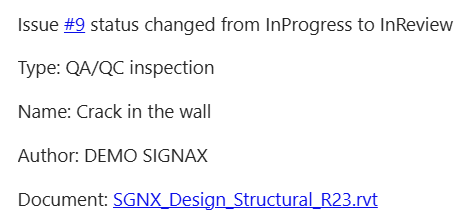
- issue number and status
- issue type
- Title
- Description
- Responsible for addressing the issue
- File - clicking on the field opens the document to which the issue is assigned
- Date of the last issue modification
To view and edit an issue, click on the issue row in the registry.
To open the document where the issue was created, click on the file path in the "Document" field.
All issues can be exported in Excel format by clicking ![]()
Creating issues
Any SIGNAX DOCS user can create an issue. The issue Author, the person Responsible for addressing the issue, and the Project Administrator have editing access to the issue.
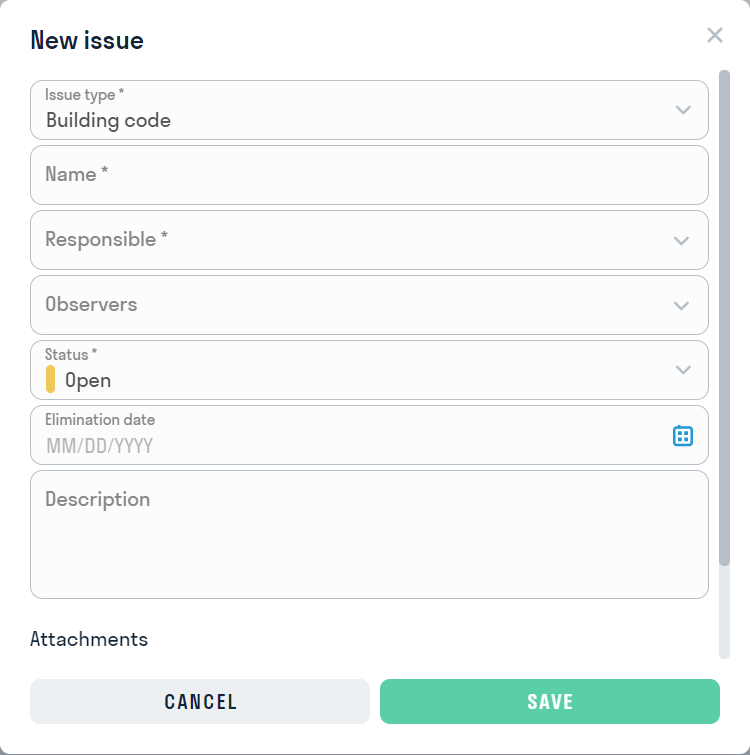
To create an issue without attaching it to a document, go to the "issues" section and click ![]() in the upper left corner. In the opened window, fill out the issue form.
in the upper left corner. In the opened window, fill out the issue form.
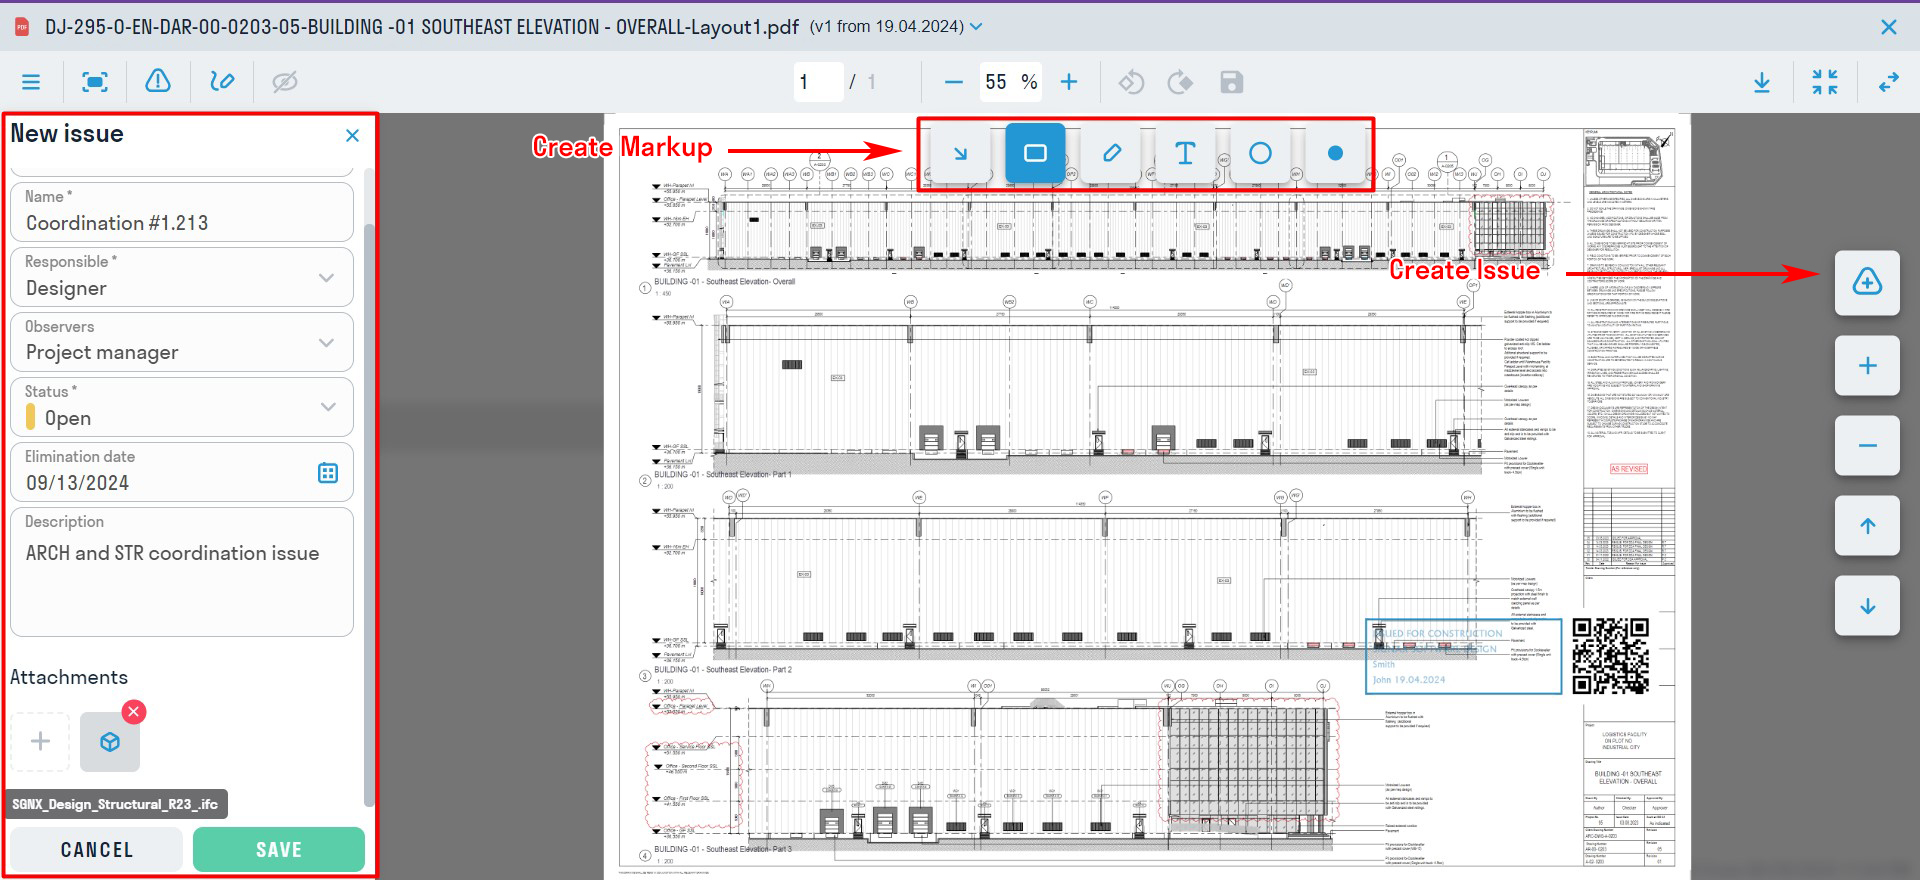
To create an issue attached to a document, open any file, and in the right part of the screen, click ![]()
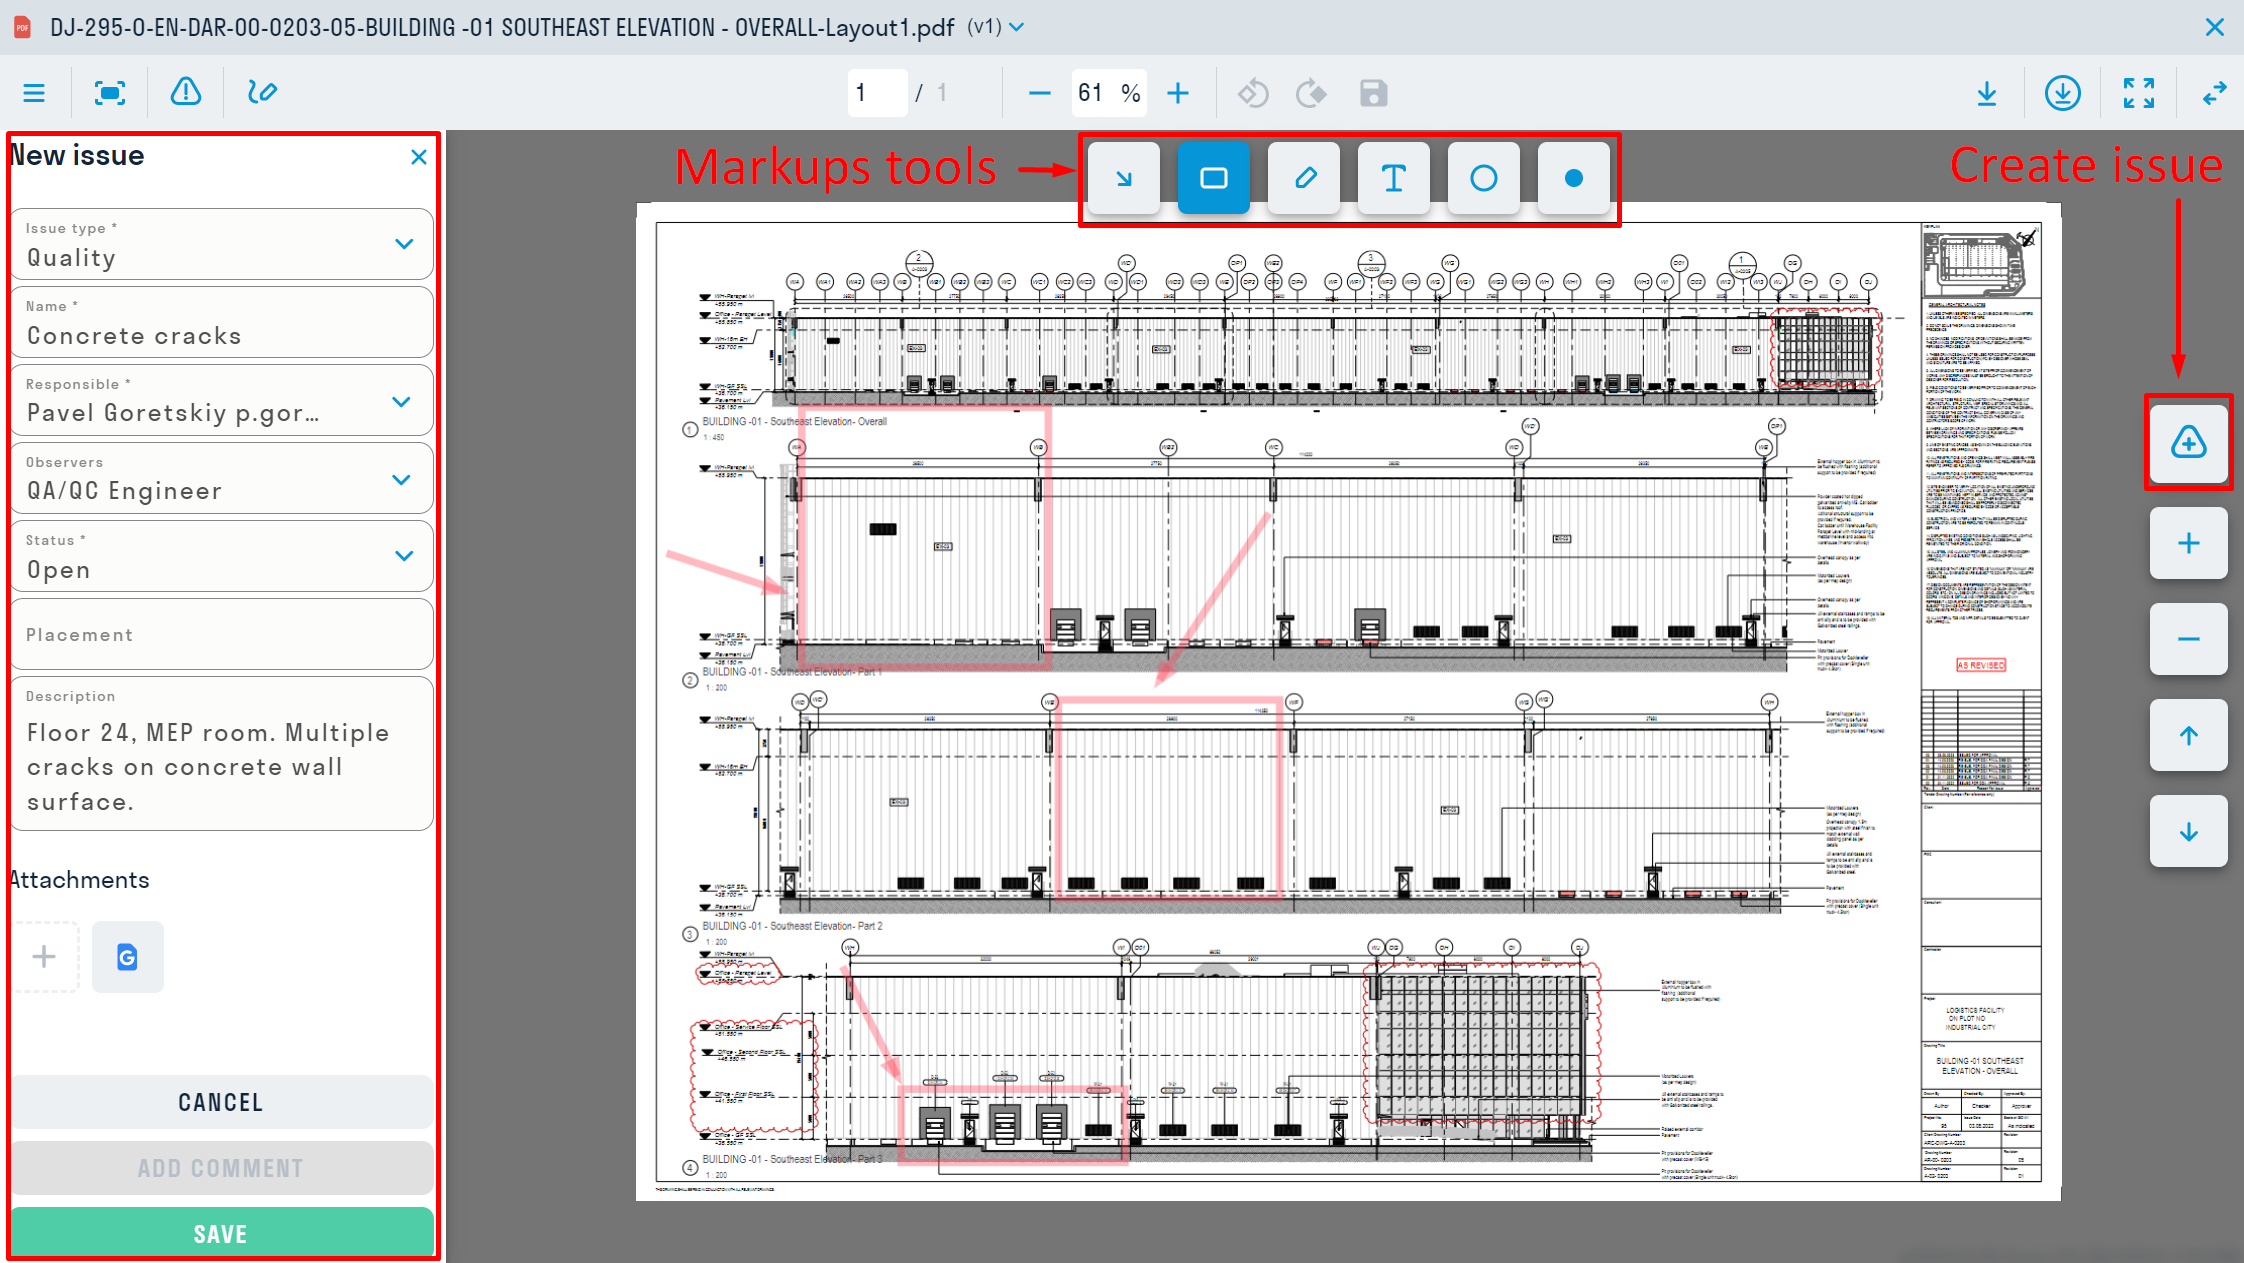
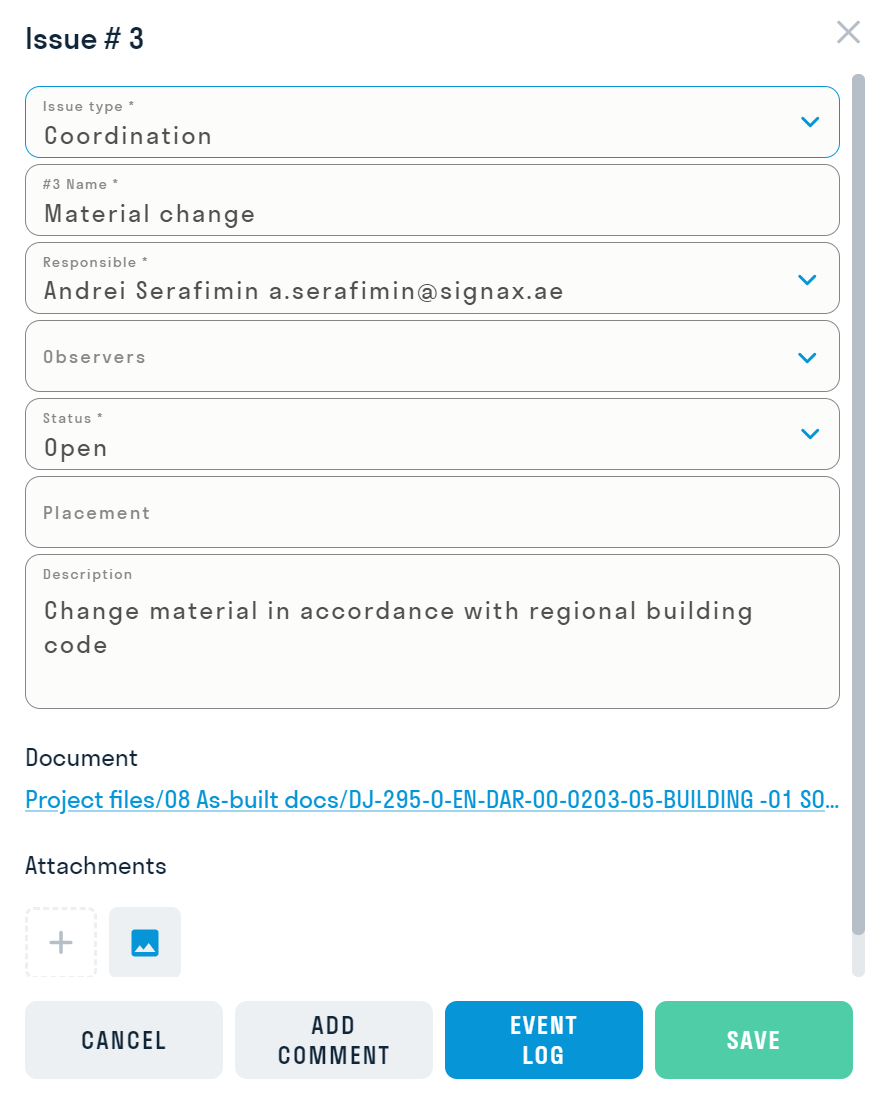
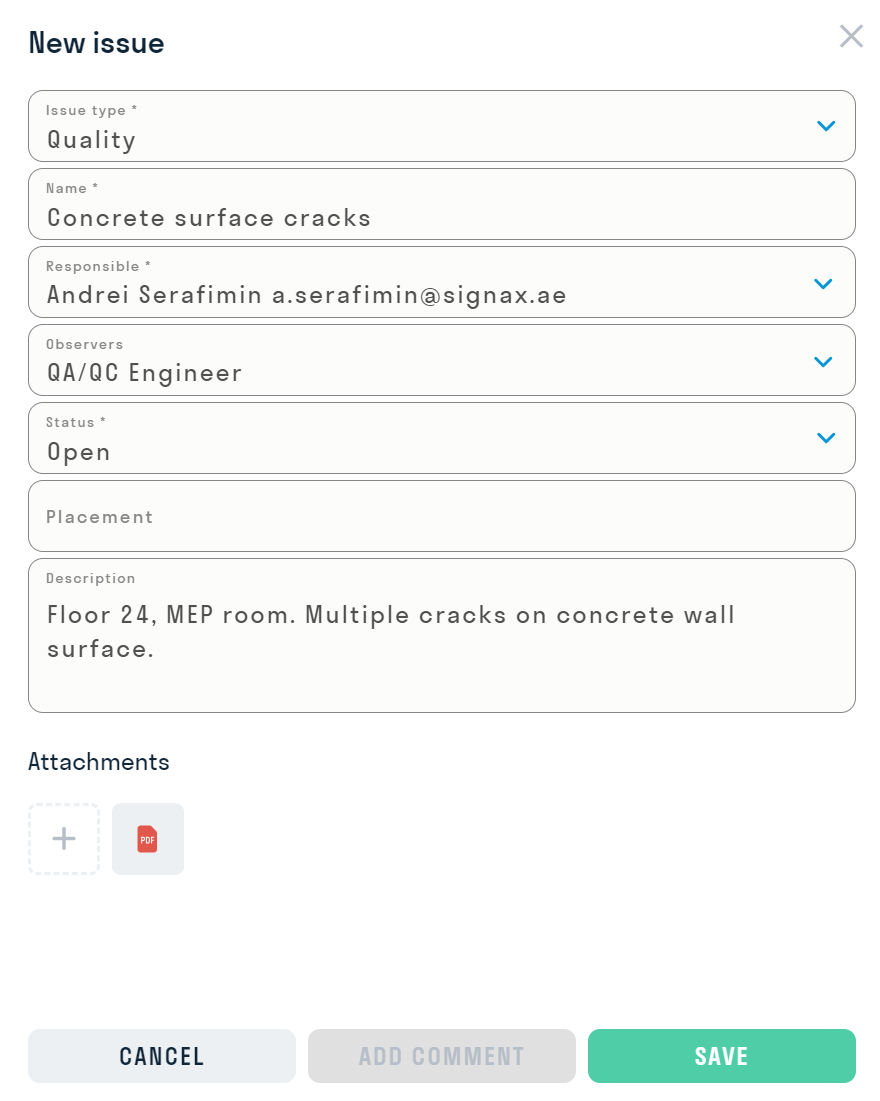
The issue form will open in the left part of the screen, which needs to be filled out:
- Issue type - types are configured by the project administrator. Each type has its own purpose and custom attributes.
- Title - a brief name of the issue, displayed in the issues registry and relevant to the type.
- Responsible - specifies the users or roles responsible for addressing the issue and who are project participants. The responsible person will receive an email notification about the issue creation.
- Status - one of the issue statuses is selected: "Draft," "Open," "Answered," "Closed," and "Deleted." When selecting the "Draft" status, no email will be sent to the responsible person.
- Placement - specifies the issue's location on the drawing. For example, Axes A-B/1-2.
- Description - filled in for a more detailed description of the issue.
- Files - adding additional files from the project to the issue.
- Custom Attributes (if available) - created by the project administrator and used to add additional information to the issue, such as Violation Type, Work Type, Category, etc.
Required fields are marked with an asterisk "*".
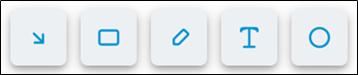
Issues can be left for each issue in PDF and image documents. Five types of marks are available: Arrow, Rectangle, Pencil, Text, and Ellipse. The issues left are saved in all document versions.

After creating or changing the issue status, the responsible user and the issue author will receive an email notification.
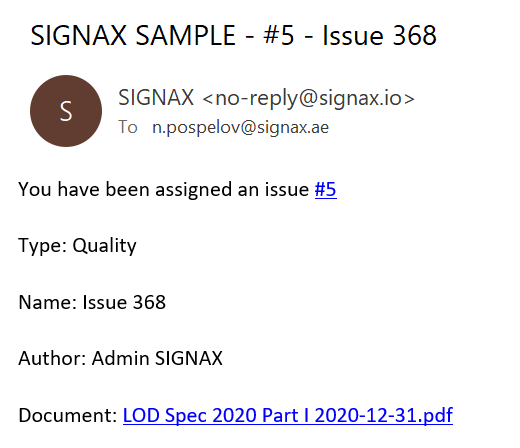
By following the link in the email, the user can open the document and get more information about the assigned issue.
To open or close the issues list in the current document, click ![]() in the top part of the document.
in the top part of the document.
Reviews Workflow
Review settings
In the review settings, the Administrator establishes review types for the current project. These types include assigning review stages to users responsible for document verification. Additionally, configurations for statuses, stamping, signing, copying, and notifications are made.
Review settings are located within the Project Settings.
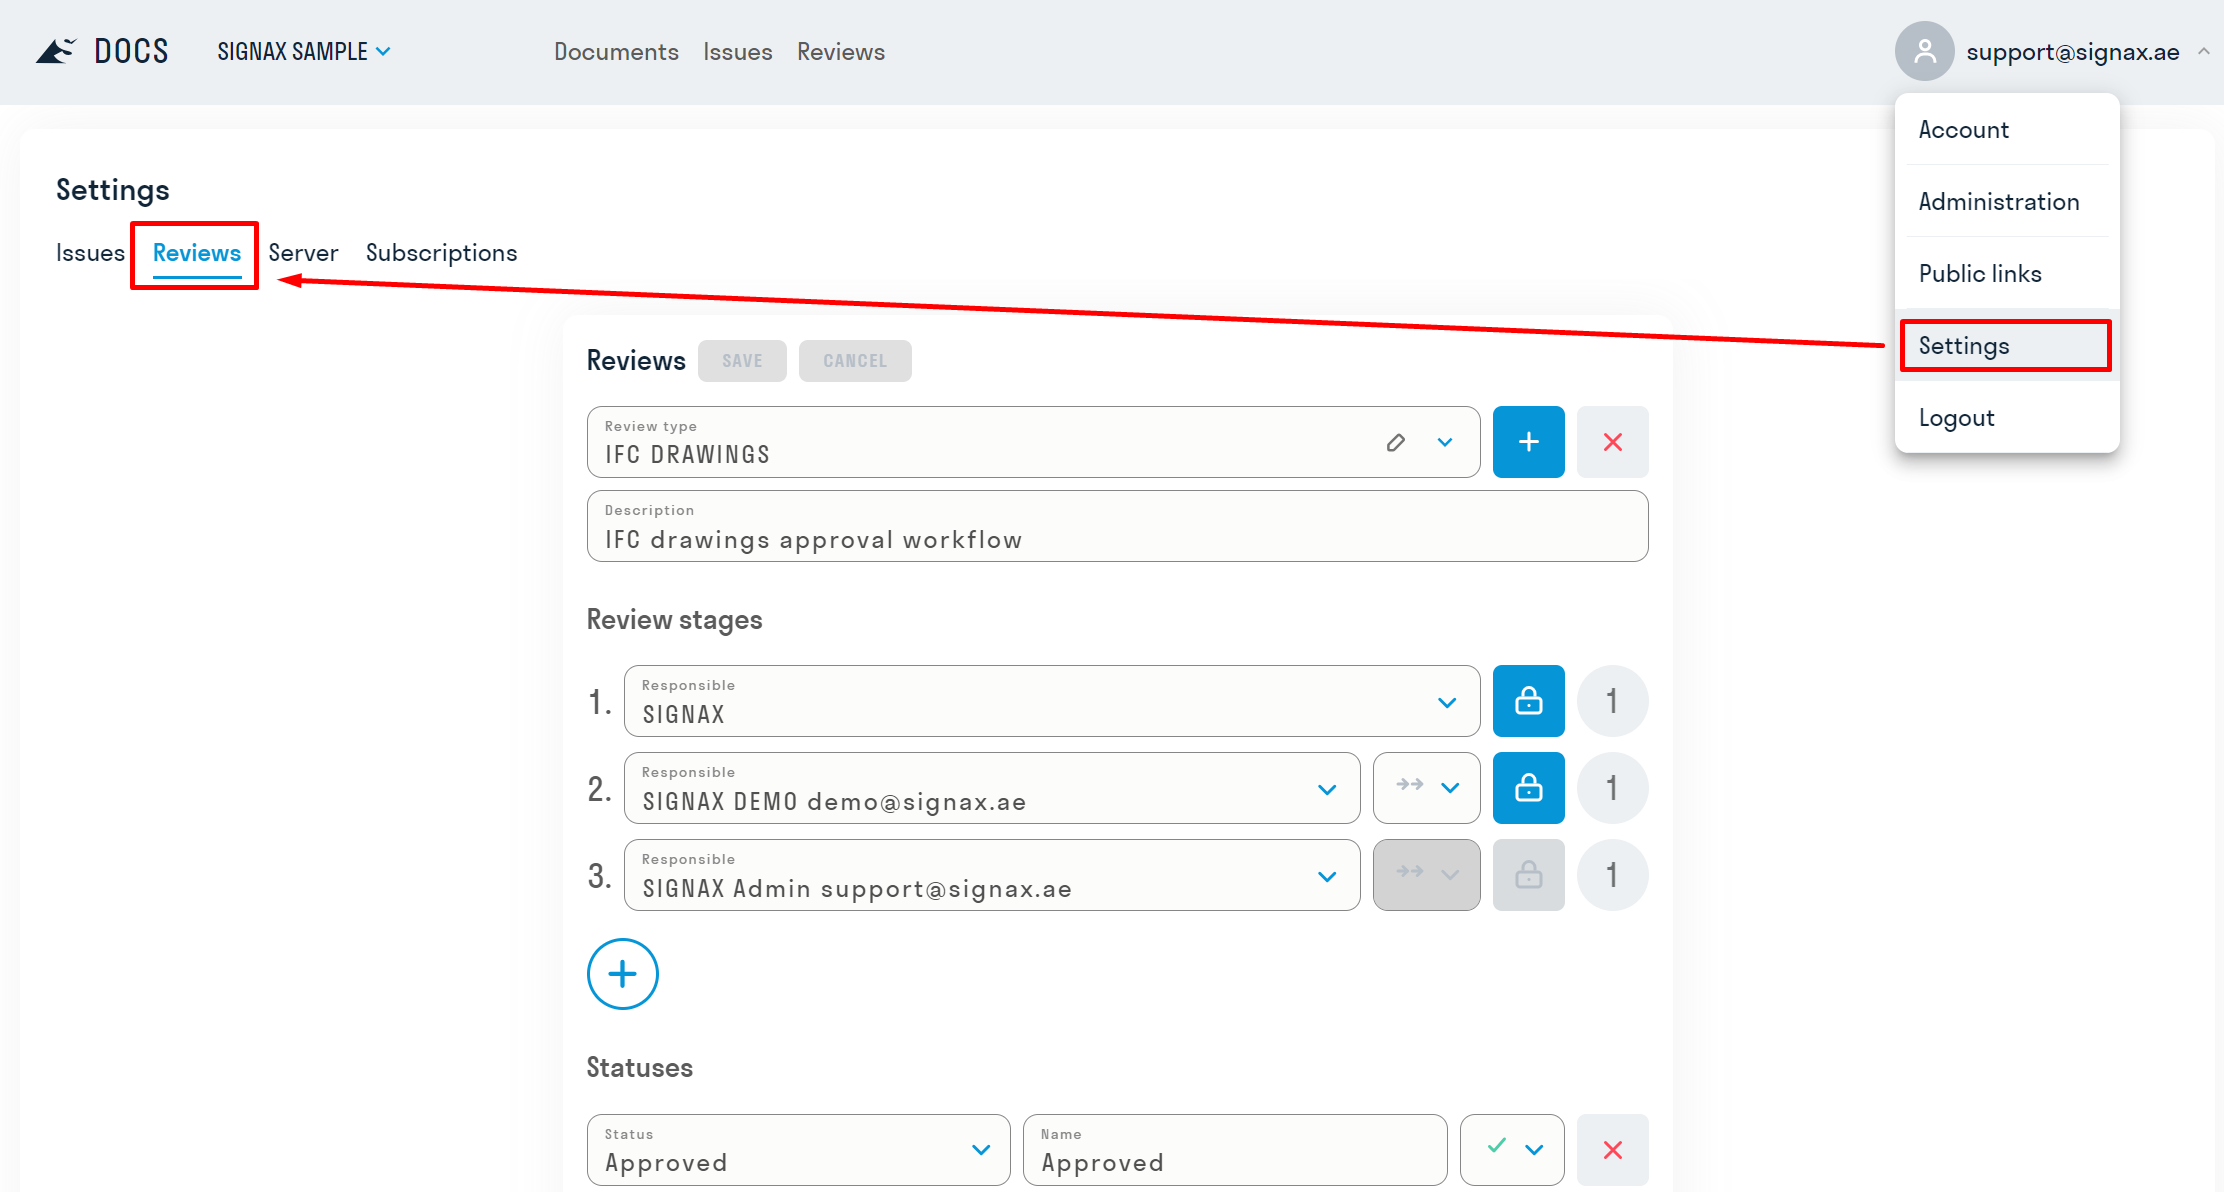
Let's delve into each setting in detail:
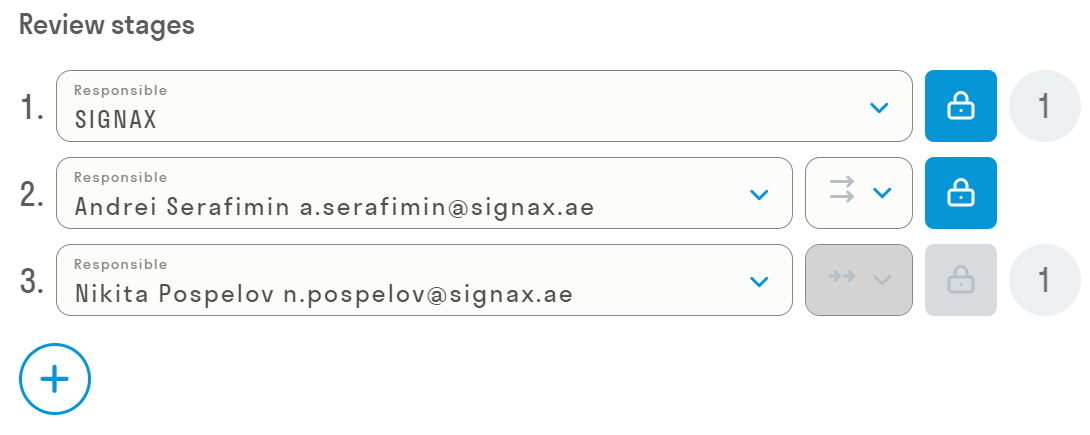
Review Stages
Here, users or roles responsible for document verification are assigned. During the review process, each designated approver checks documents from the set and assigns them corresponding statuses. Up to 10 approvers can be specified.
The review period is set beside each approver (up to 31 days).
If an approver with the enabled lock icon![]() rejects a document in the set as not meeting the verification criteria, the document will be blocked, and subsequent approvers won't be able to assign a status to it. If the lock is disabled, then in case of file rejection, it will still move to the next approver for verification.
rejects a document in the set as not meeting the verification criteria, the document will be blocked, and subsequent approvers won't be able to assign a status to it. If the lock is disabled, then in case of file rejection, it will still move to the next approver for verification.
By default, the review process proceeds sequentially![]() , but starting from three users, it's possible to choose a parallel
, but starting from three users, it's possible to choose a parallel
![]() review order. In this way, the parallel stage starts and becomes active alongside the previous one.
review order. In this way, the parallel stage starts and becomes active alongside the previous one.
For example, in this scenario, Stage 2 will proceed concurrently with Stage 1.
Statuses
In the "Status" field, a status type is selected, serving as a logical option responsible for advancing the document to the next review stage: Approved or Rejected. Thus, an approved document moves to the next review stage, while a rejected document does not.
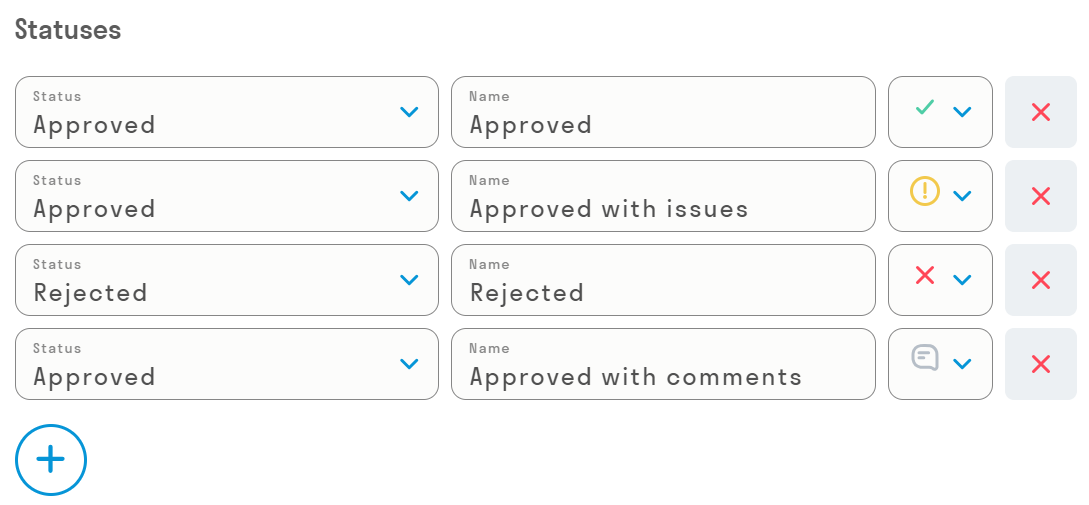
In the subsequent fields, the name and icon of the status are specified, which will be displayed to users during the review process. Up to 10 statuses can be added.
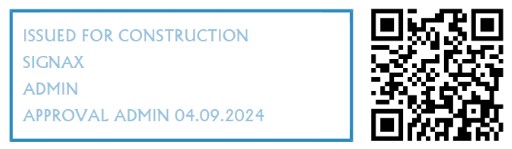
Stamping
During the "Stamping" stage, stamps and QR codes are applied to documents from the set.
First, the stamping type is selected from the list:
- Stamp: Only a Stamp will be applied.
- QR Code: Only a QR code will be applied.
- Stamp and QR Code: Both a Stamp and QR code will be applied.
- Do Not Stamp
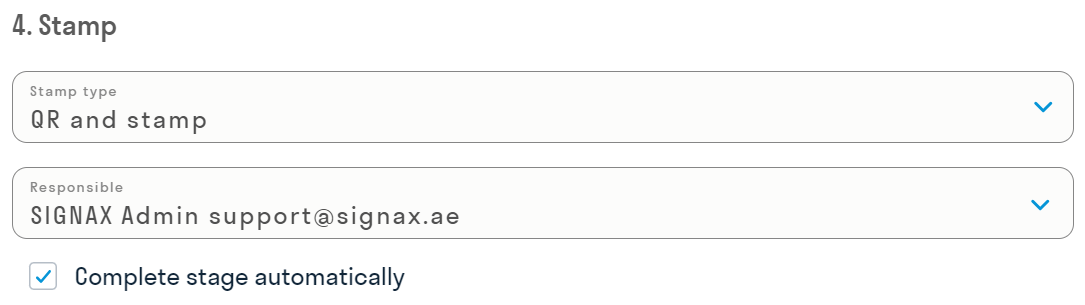
Then, the Responsible for the stamping stage is selected, who verifies the correctness of stamping the documents.
- If the option "Complete stage automatically" is selected, then upon successful processing of all files (stamping), the stage automatically advances to the next one. However, if an error occurs with at least one file, the Responsible receives a notification via email about the error. In this case, the Responsible needs to take appropriate actions: either resend the file for stamping or continue the review without this file.
- If the option "Complete stage automatically" is not selected, then after stamping the files, the Responsible always receives an email notification about the completion of the stage. They verify the correctness of stamp placement and decide whether to continue the review process. If everything is in order, they can move to the next stage. If there are errors, the Responsible either resends the files for stamping or continues the review process without them.
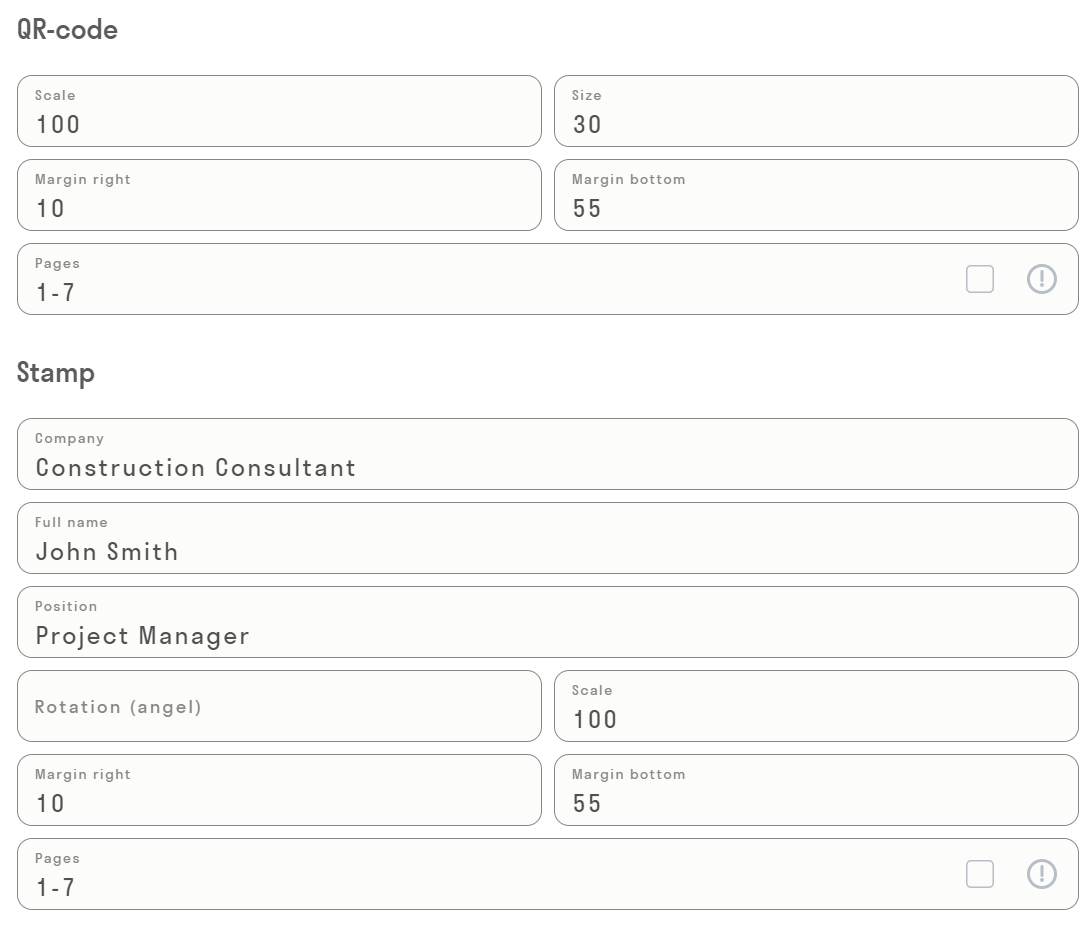
For QR and Stamp, fill in the overlay pages (pages where the stamp and QR code will be applied). For the Stamp, also fill in the Company, Full Name, and Position fields.
By default, the "Scale," "Indent," and "Size" fields are filled with optimal values for stamp and QR placement. If necessary, replace these values.
Copying
In this stage, the folder where stamped documents from the set should be copied is specified.
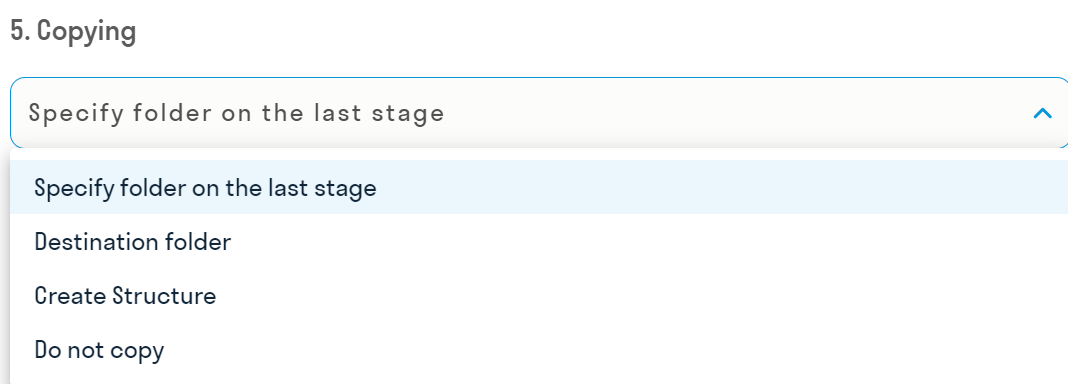
Multiple copying options are available:
- Do not copy
- Copy to a specific folder - The folder for copying is specified in the review settings.
- Create a structure - Two folders are specified: the outgoing folder (from which the path to the approved and copied file is read) and the incoming folder (where a similar folder structure is duplicated for storing copied files).
- Specify a folder at the final review stage - The Responsible at the final review stage specifies the folder where files from the set will be copied.
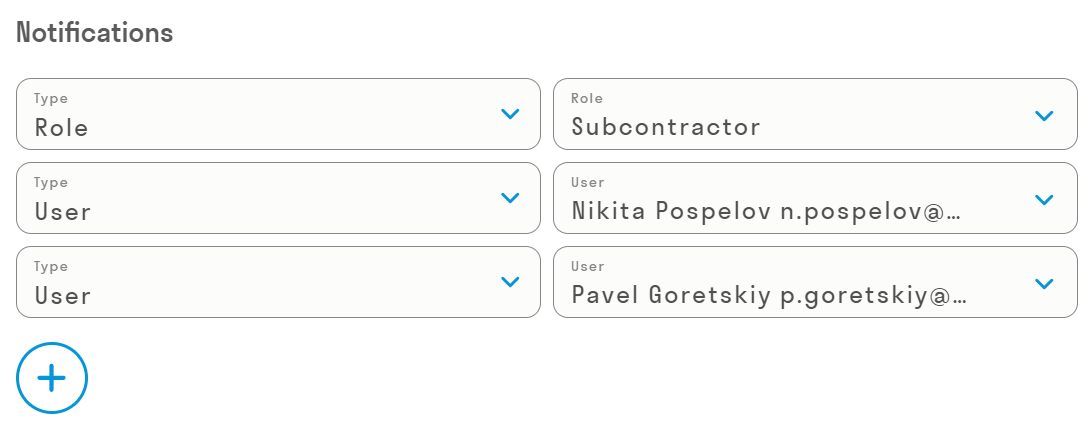
Notifications
The Notifications option allows specifying users, roles, or email addresses to whom a full review report will be sent after it is completed.
Review Creation
All project users can create review sets and submit them for review.
To create a review set, go to the "Reviews" section, click on the "+" button, and in the pop-up window, fill in the following fields:
- "Name" of the set.
- "Code" of the set.
- "Planned date" for the completion of the review process.
- Select a predefined "Review Type".

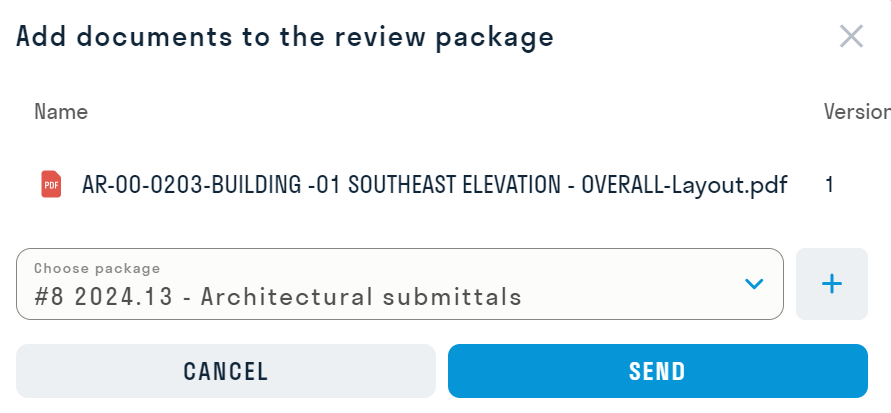
Next, open the newly created review set by clicking on its row in the registry and adding files to it. You can add files to the set from both within the review set and from the "Documents" section.
- To add files directly from the review set, click on the "+" button and select the necessary documents in the pop-up window.
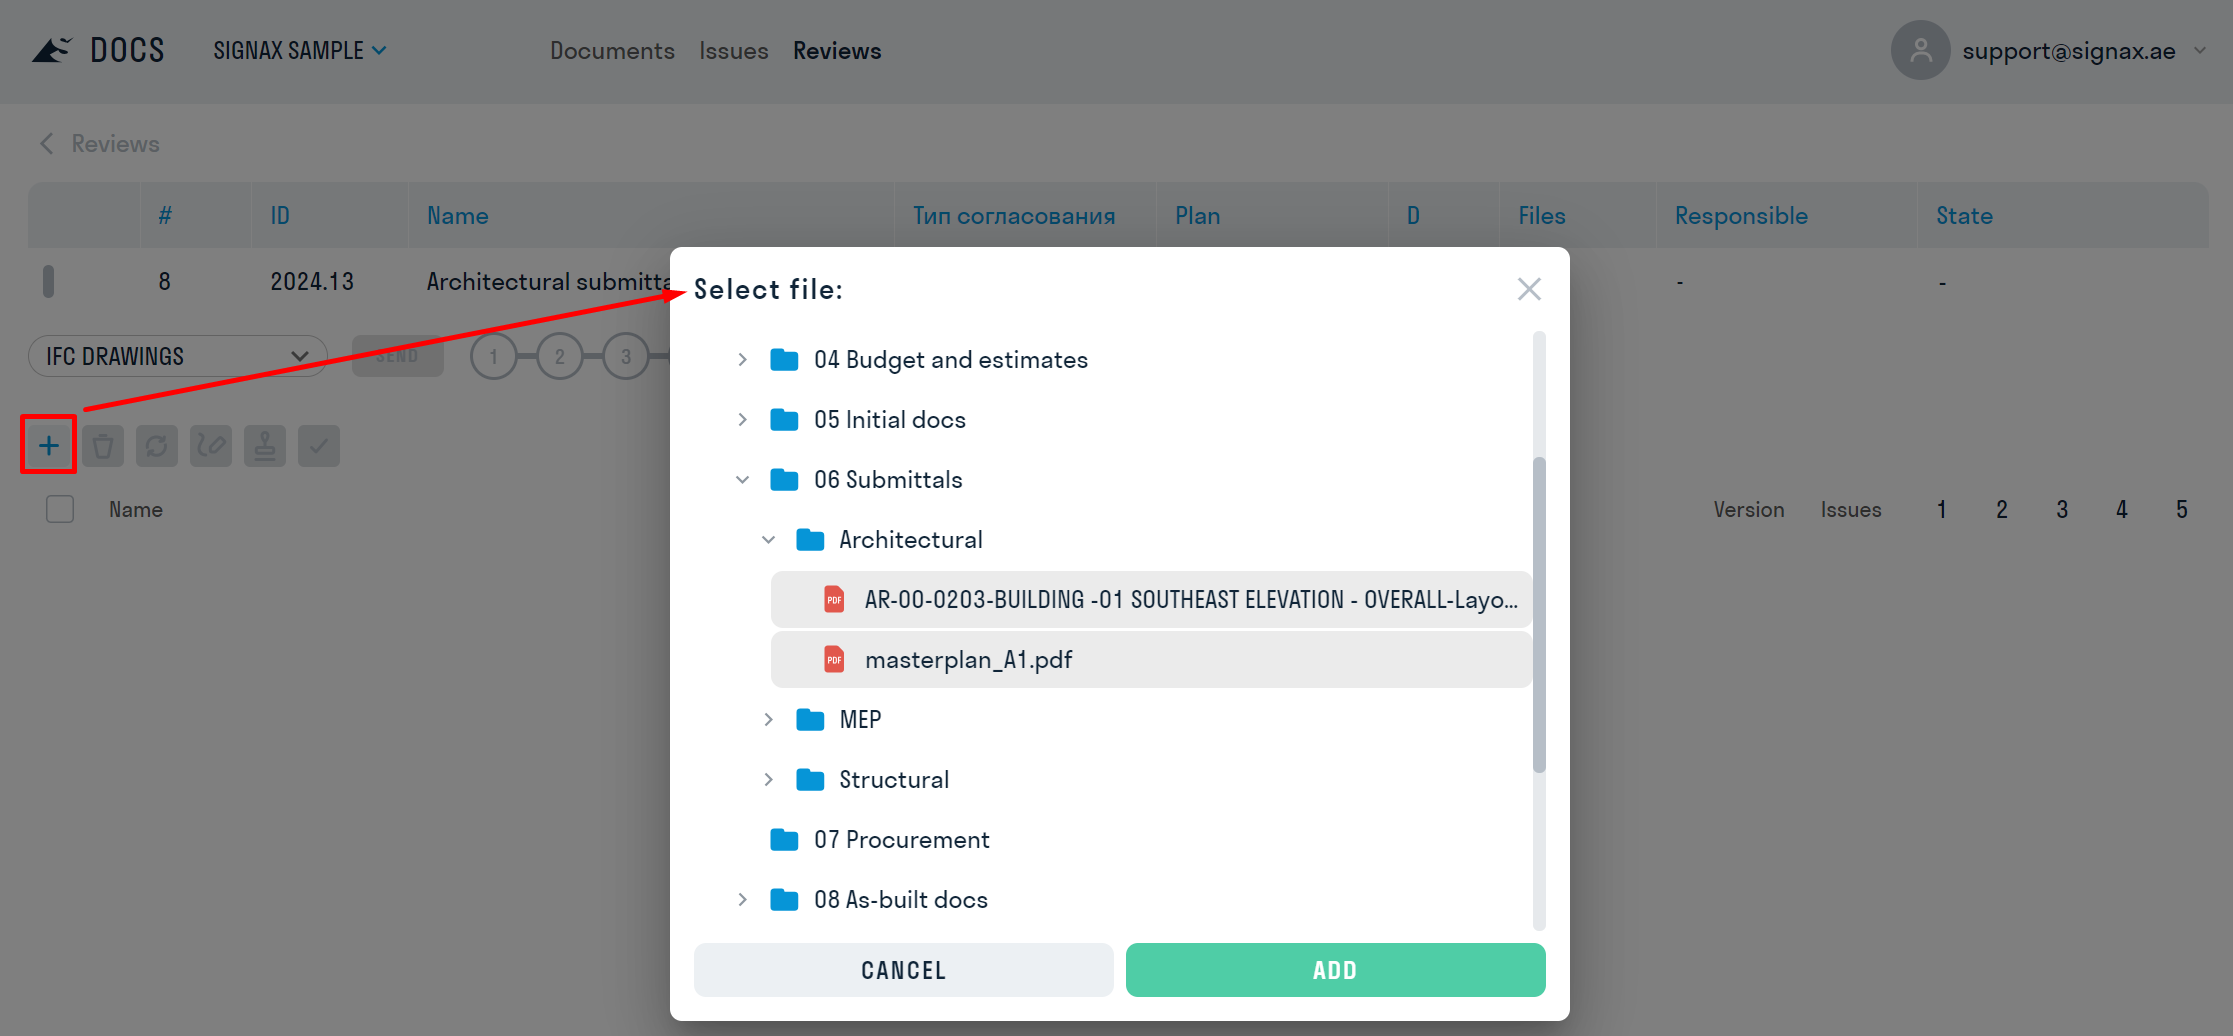
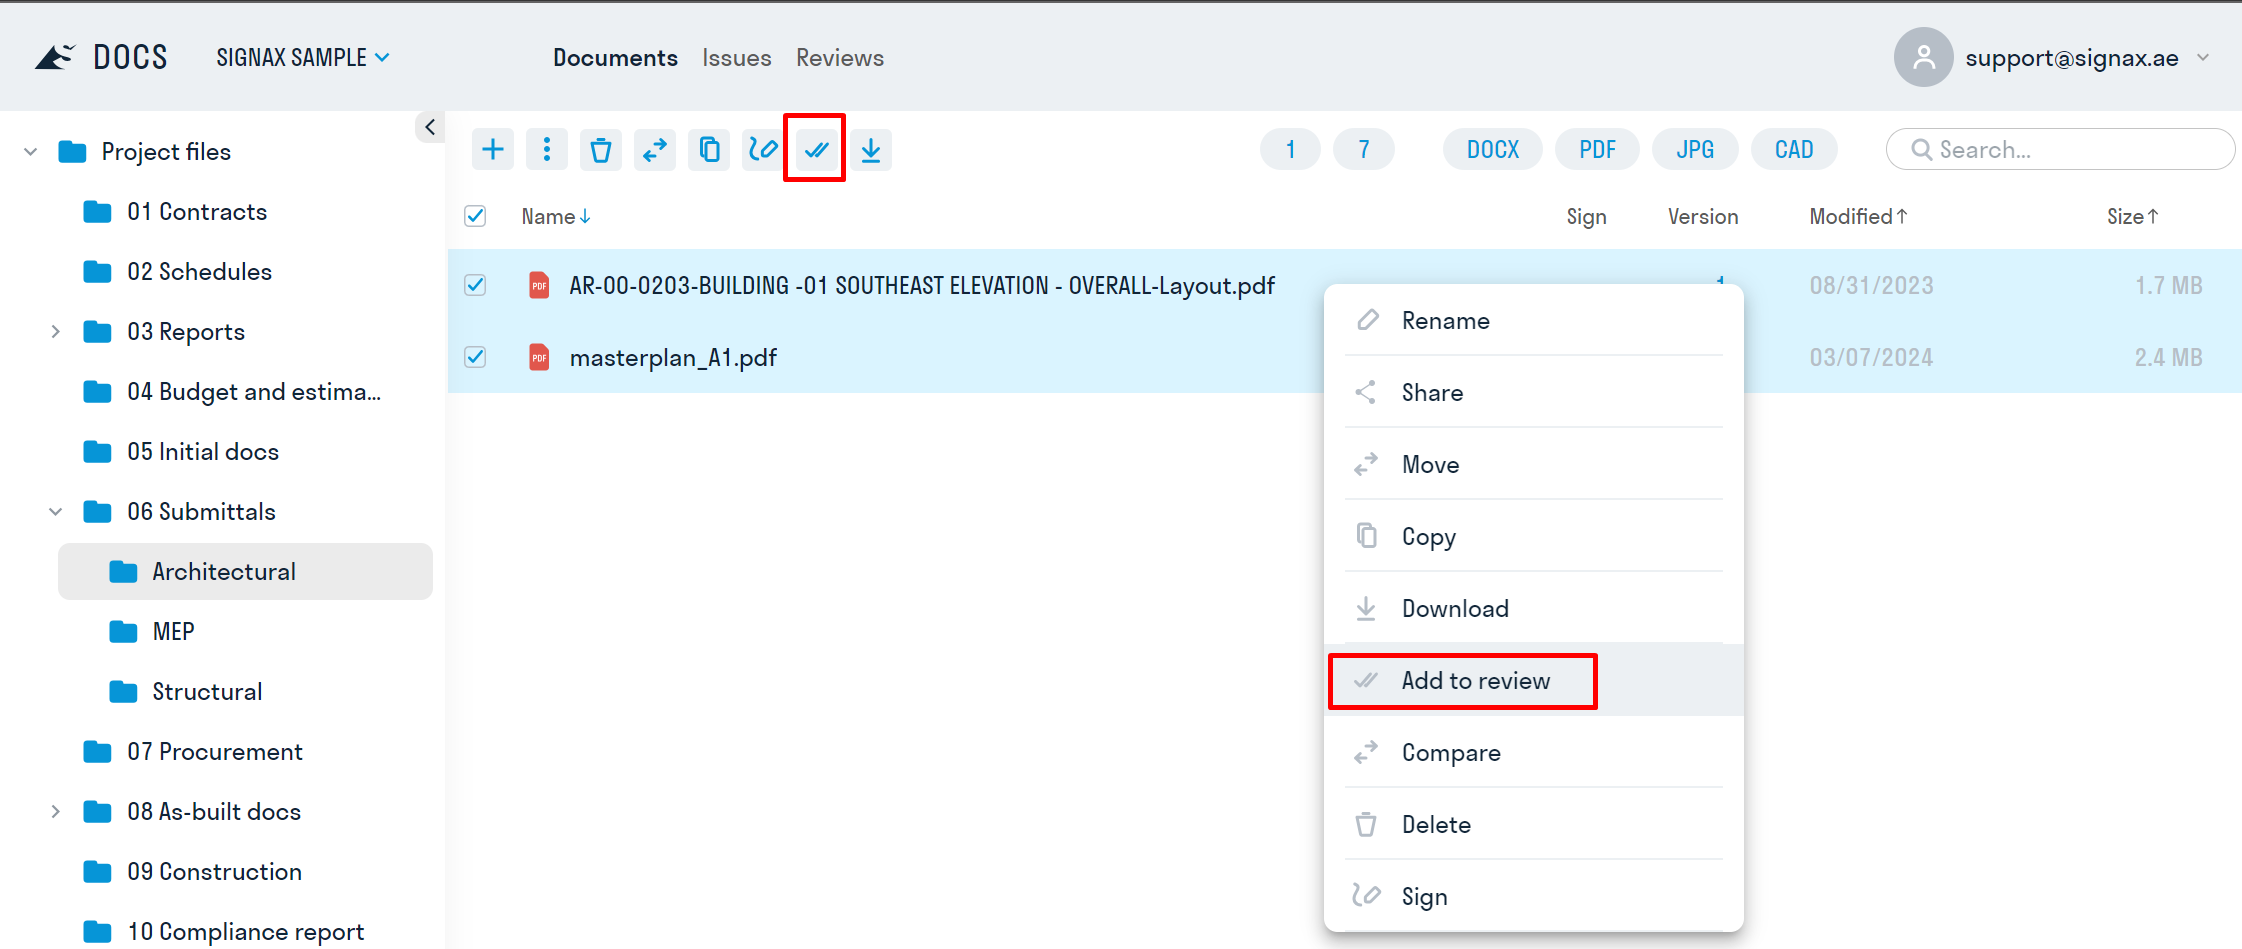
- To add files from the "Documents" section, right-click ➔ "Add to Reviews".
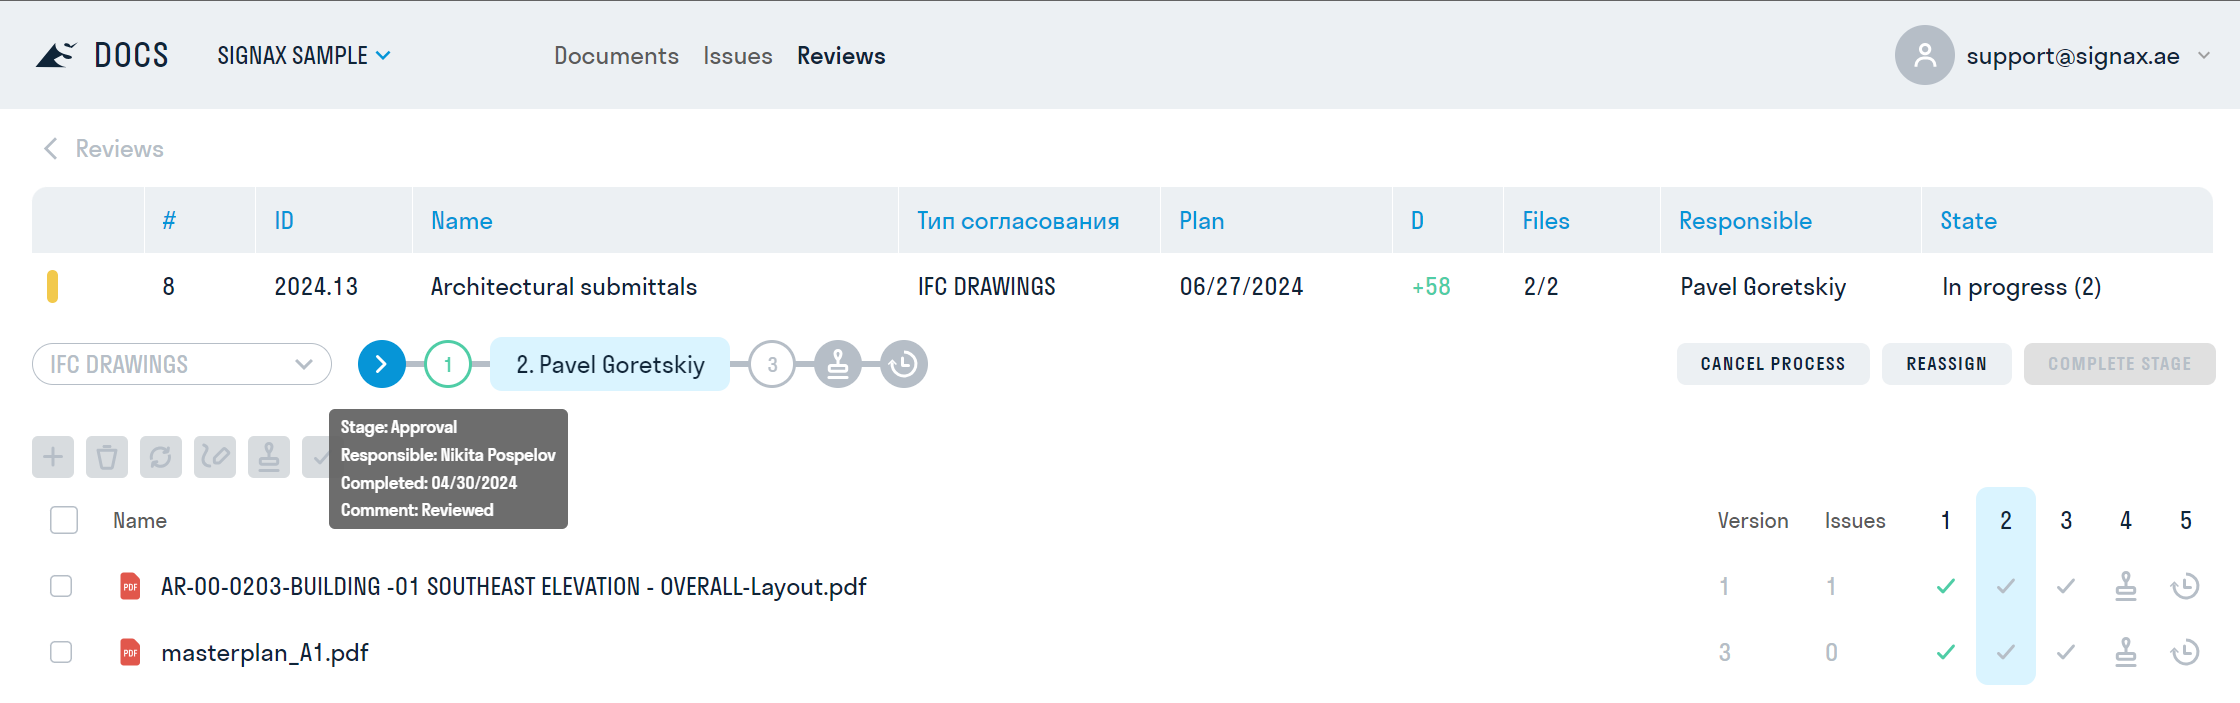
At the top are the review stages. Hovering over each stage displays information about it. On the right side, you can see the status of each file at the stage.
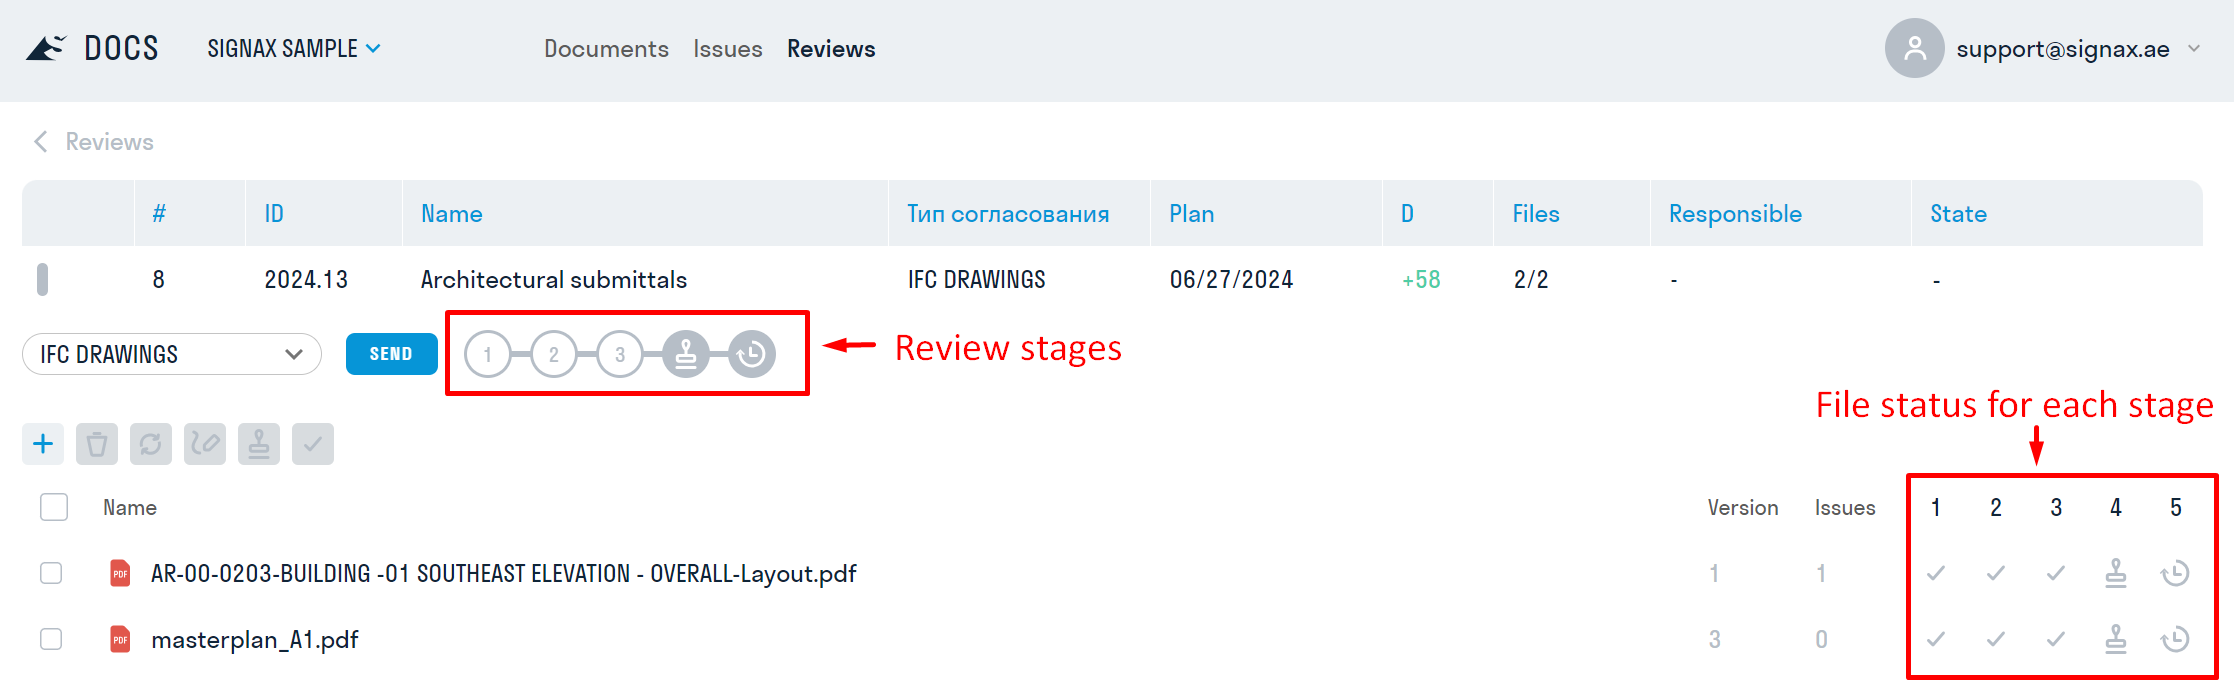
Key:
 |
Review stage with a responsible reviewer. |
 |
Document signing stage. |
 |
Stamping and adding QR codes to files stage. |
 |
Document copying stage from the set to the specified folder. |
Starting Review
Clicking the "Send" button initiates the review process.
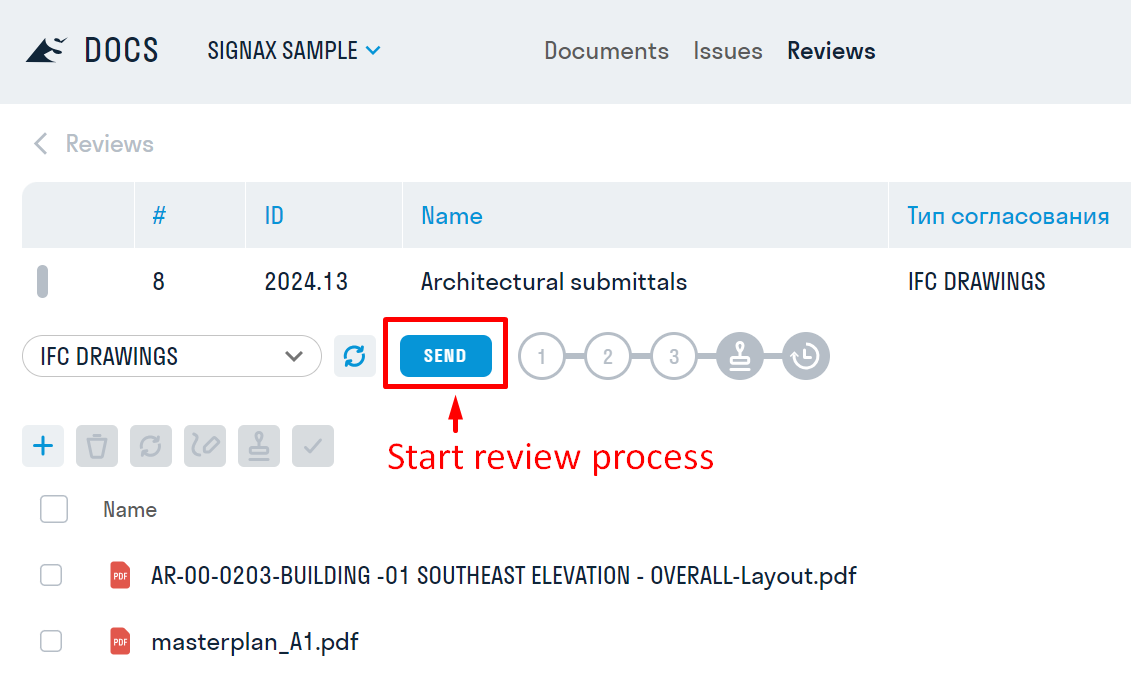
At the first stage, the responsible person receives an email notification indicating that they have been assigned a set for review and with deadlines for checking the set. Clicking the link in the email opens the review set directly.

All participants in the review process have read-only access to files. The responsible person reviews the documents in the set, adds comments if necessary, and then assigns the corresponding predefined statuses to each file.
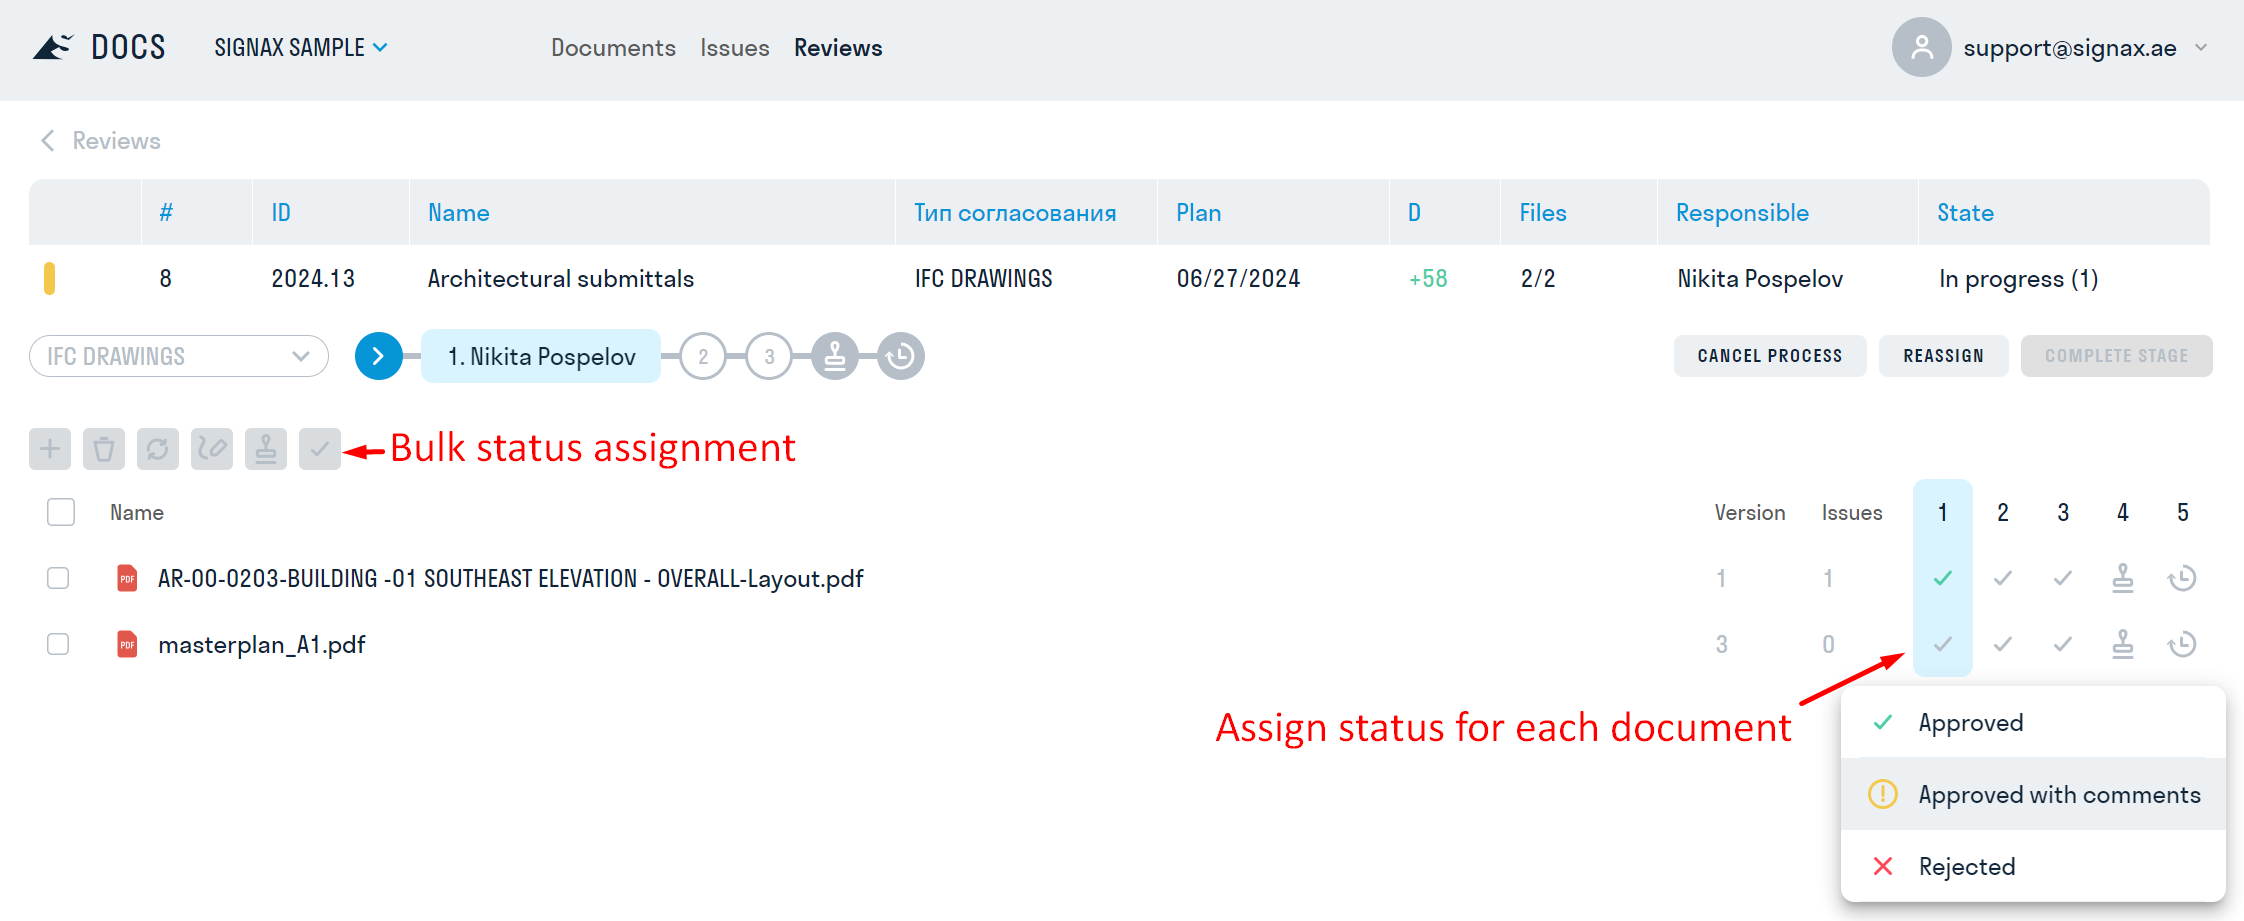
- To set a status for multiple files, select them using checkboxes, then assign the status in the toolbar.
- To set a status for a single file, select the status on the right side of the screen.
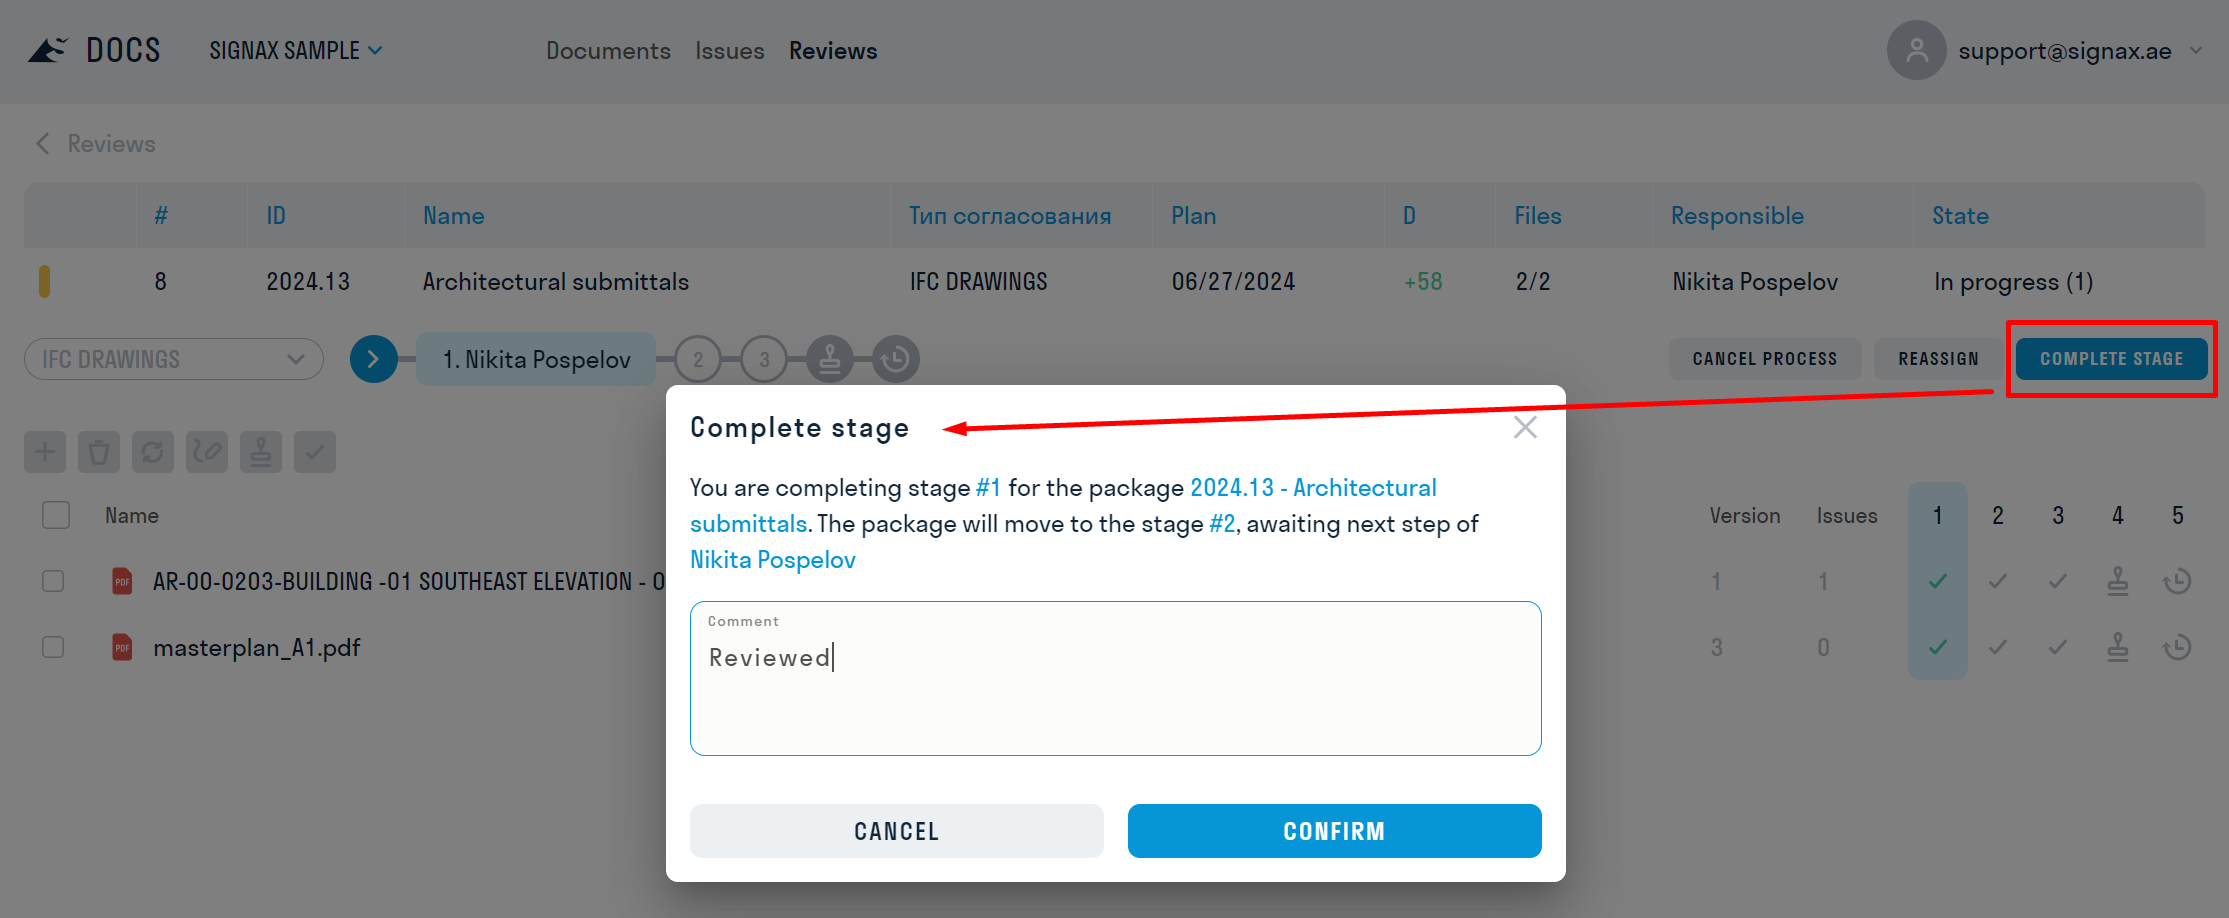
After assigning statuses, click "Complete Stage" in the upper right corner of the screen and leave a comment for the stage, for example, if the file was approved with comments.
After completing the stage, the set moves to another review stage with the next responsible person. For detailed information about the previous stage, hover over the stage icon.
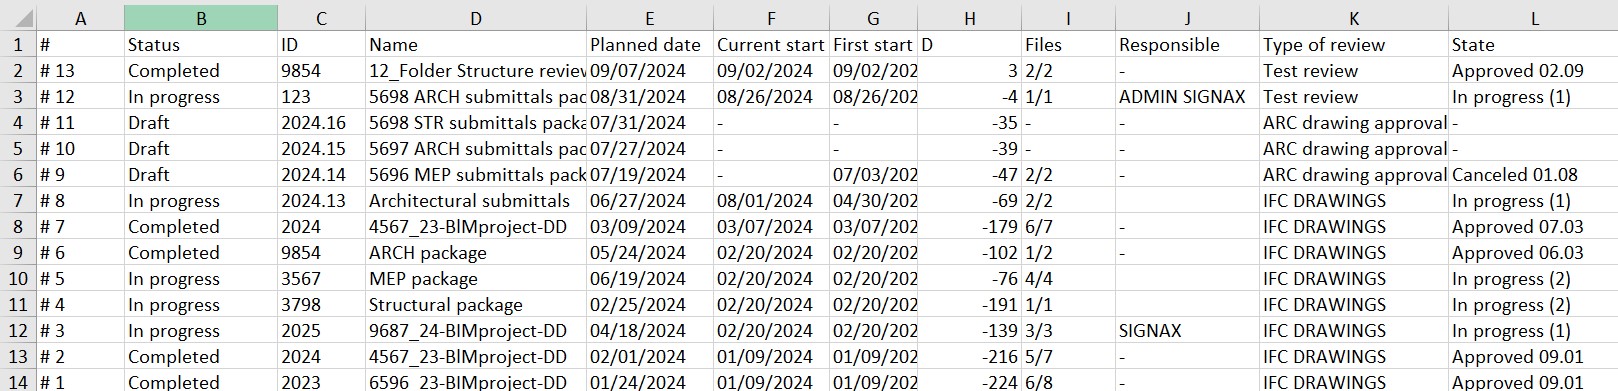
Review Registry
All review sets created in the project are stored in tabular form in the "Reviews" section.
The registry displays the necessary information about the packages:
- Package number and status.
- Package ID.
- Package name.
- Planned completion date of the review.
- Difference between the current date and the planned completion date of review.
- Number of approved files in the package.
- The responsible person at the current review stage.
- Review process status.
To view or edit review package, select row in review register.
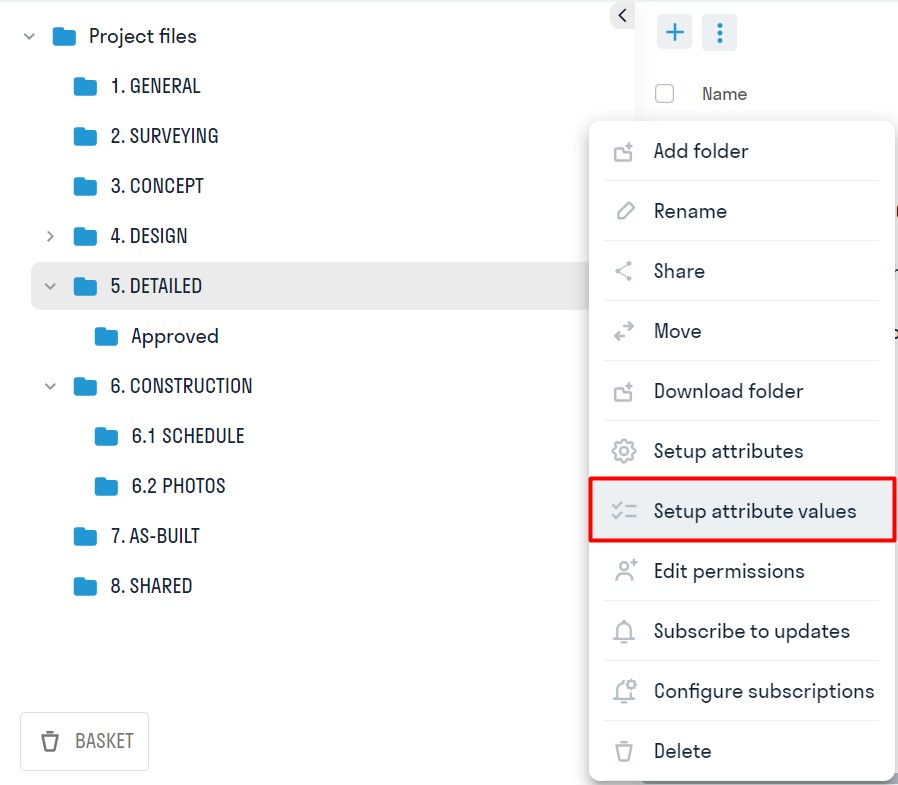
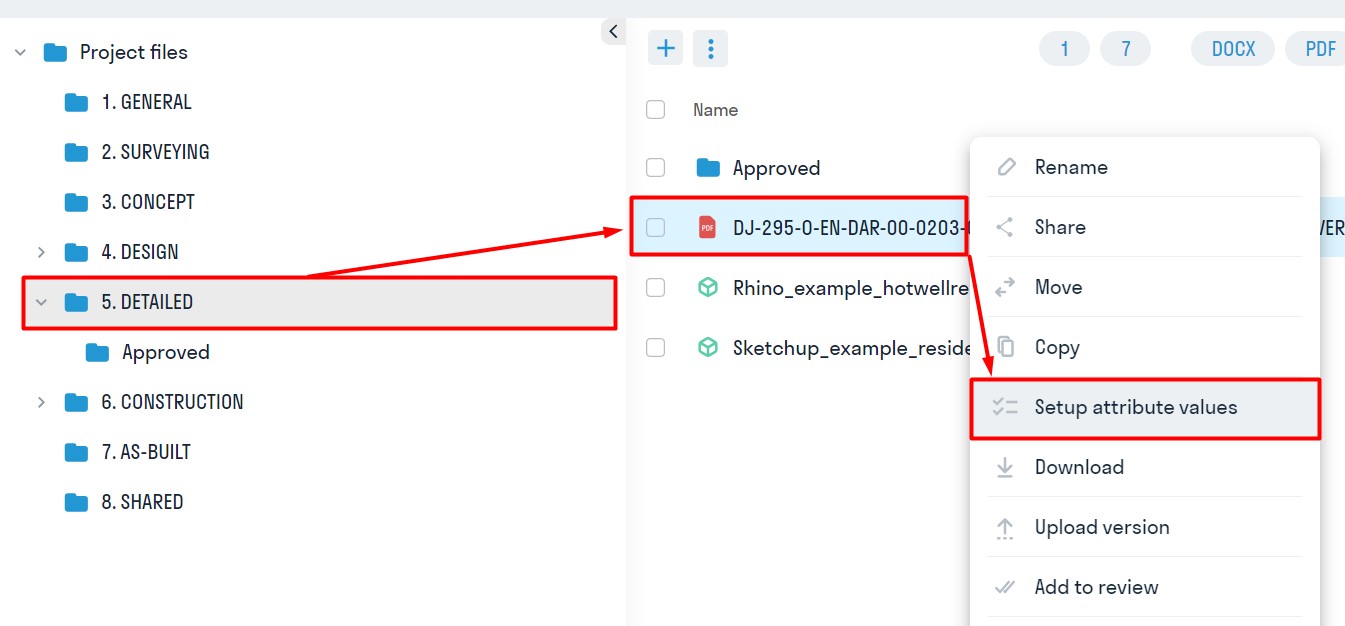
Attributes
Attributes are additional fields for filling in information related to issues, folders, and files.
Attributes are created by the administrator.
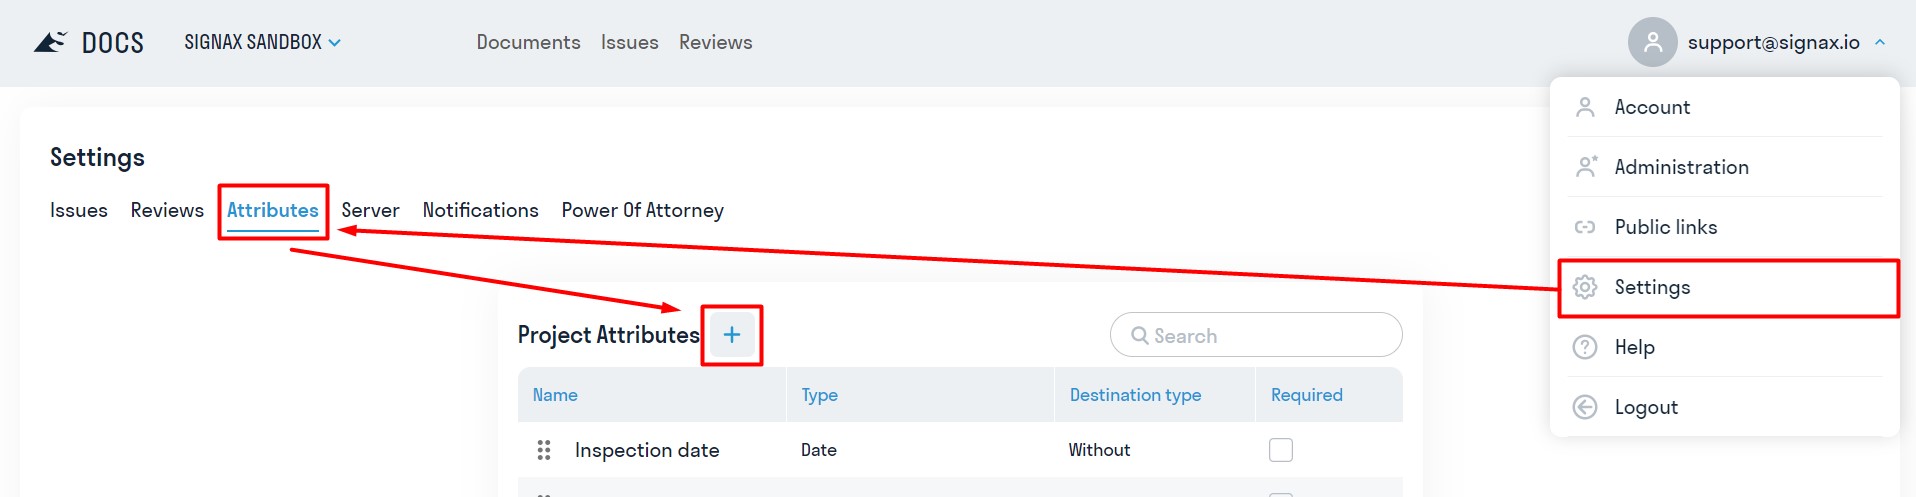
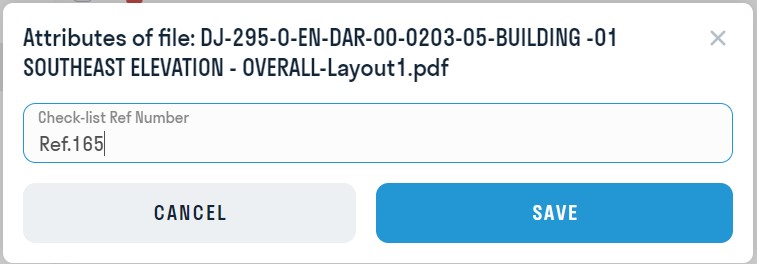
Fill in the fields:
Attribute Types:
-
“Text” allows the user to enter arbitrary text to provide additional information, explanations, or comments for the issue.
-
“Yes/No” represents a logical value, allowing the user to choose one of two options: "Yes" or "No." It is used to obtain a simple answer to a question.
-
“List” is used to provide the user with a list of predefined response options, such as selecting the type of work, type of violation, etc.
-
“Date” allows the user to select or manually enter a date. It is used for specifying timestamps or deadlines related to the issue
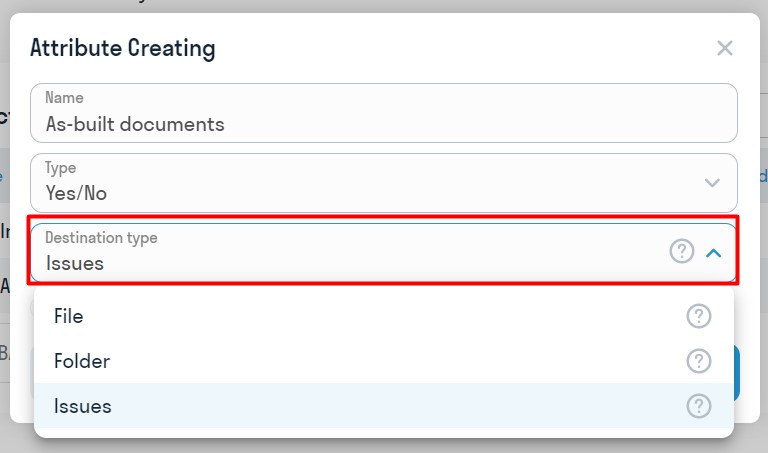
Assignment Type:
-
File - The attribute is assigned to the folder but is filled out separately for each file within the folder. The attribute value will be copied to issues for the files in the folder if this attribute type is added to the specified issue type.
-
Folder - The attribute can be added to the folder and edited as a property of the folder. The attribute value will be copied to issues for files in the folder if this attribute type is added to the specified issue type.
-
Issues - The attribute is only for issues.
Each attribute can be mandatory or optional. This is controlled by the toggle switch ![]() .
.
Example:
-
Create an attribute.
-
Add the attribute to the issue type.
-
Assign the attribute to a folder.
-
Open settings.
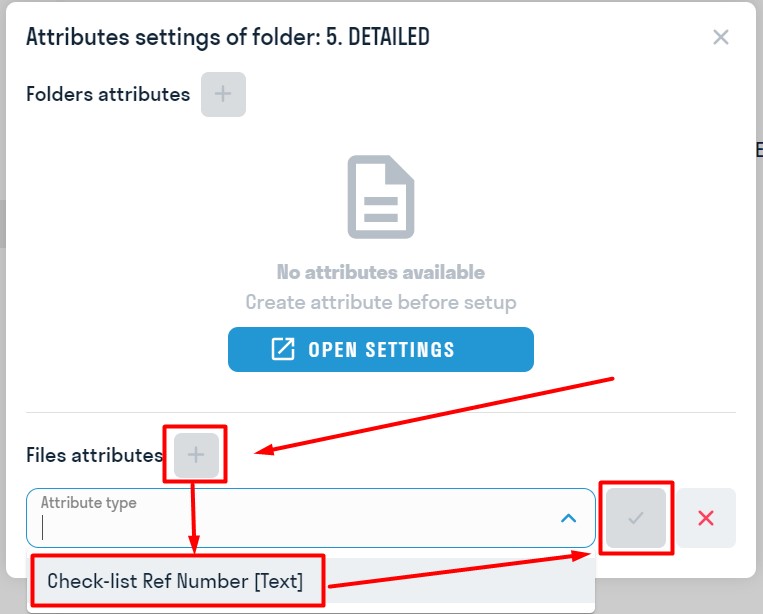
-
Assign the attribute to a file in the folder.
-
Enter a value.
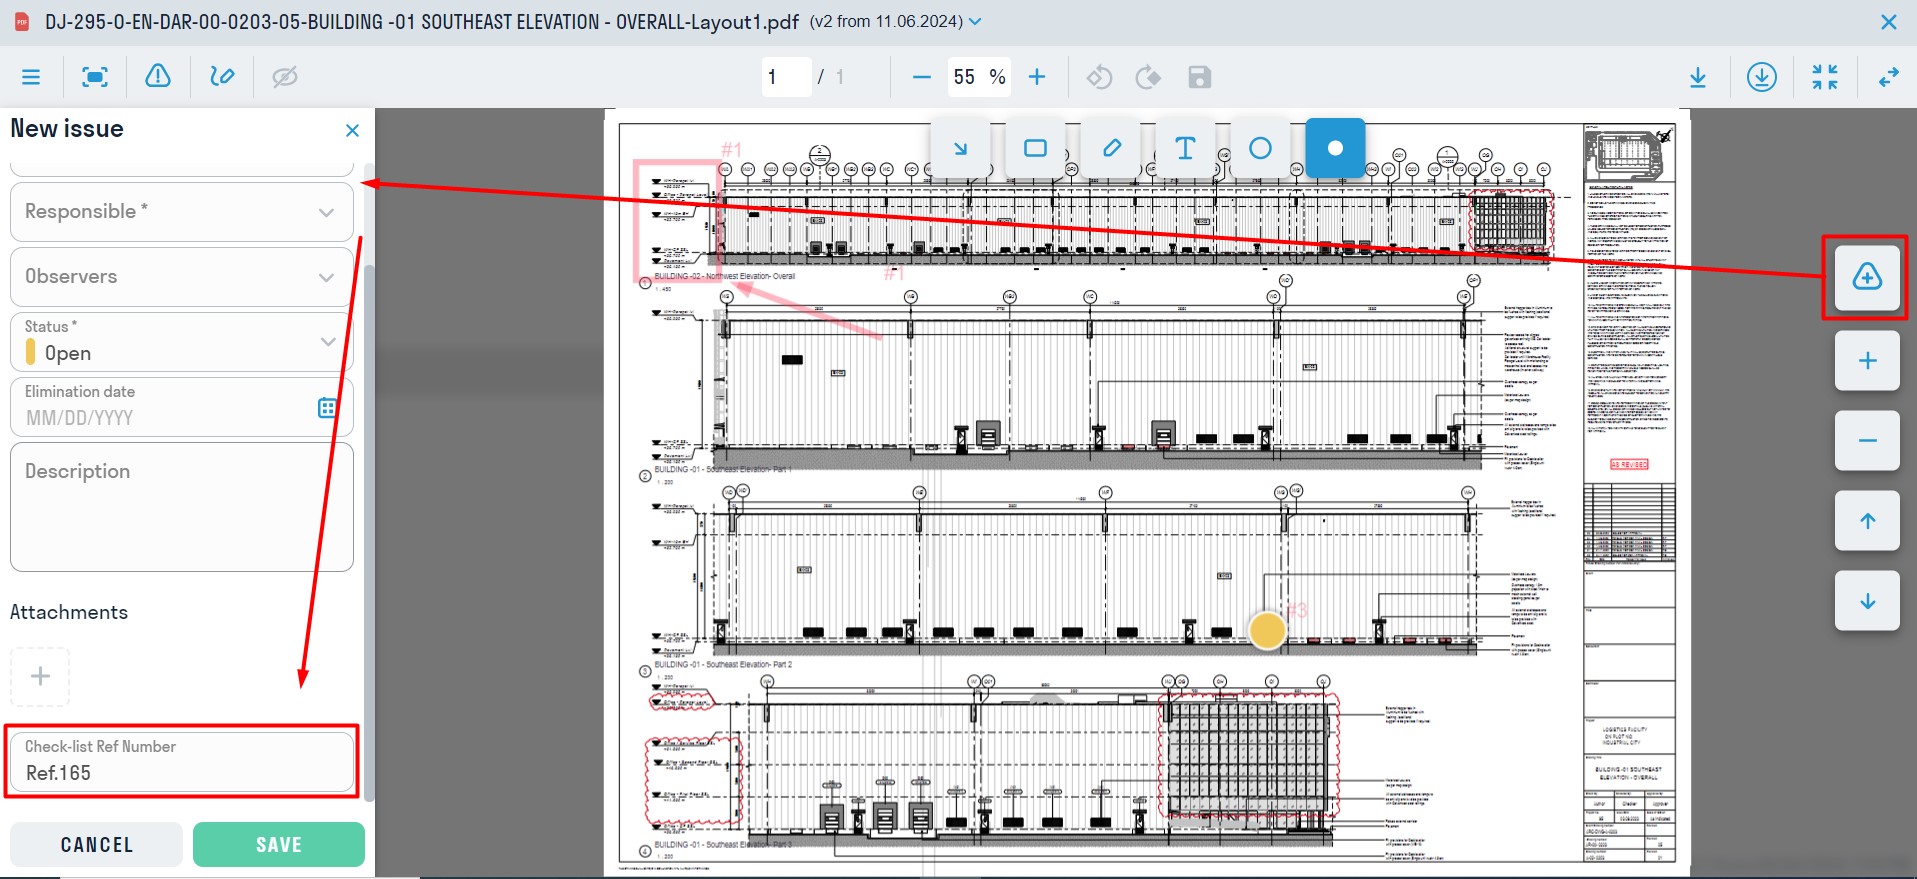
-
Create an issue for the file. The attribute will be filled in automatically.

3.1.2 User SIGNAX DOCS
The user has access to:
- Creating Issues
- Participating in Reviews
- Project structure according to access settings
Uploading Documents
Method 1: Files can be uploaded by “Dragging and Dropping” files from the file explorer into SIGNAX DOCS.
Method 2: In the desired folder, click “+” ➤ select the file ➤ in the window that opens, choose the file to upload.
Method 3: If a previous version of the file has already been uploaded to the system, the next version can be uploaded by right-clicking on the file ➤ Upload Version.
This method works even if the file name on the computer does not match the file name in the SIGNAX DOCS system.
Versioning
SIGNAX DOCS provides version control for files. The previous version of the file is saved in the history when a new file with the same name is uploaded. This allows tracking of different file versions and returning to previous versions if necessary.
1. To open the file history, click on the file version number in the “Version” column.

2. A window will open with a list of all file versions, showing who and when the document was added. The current version of the file is marked as (Current).
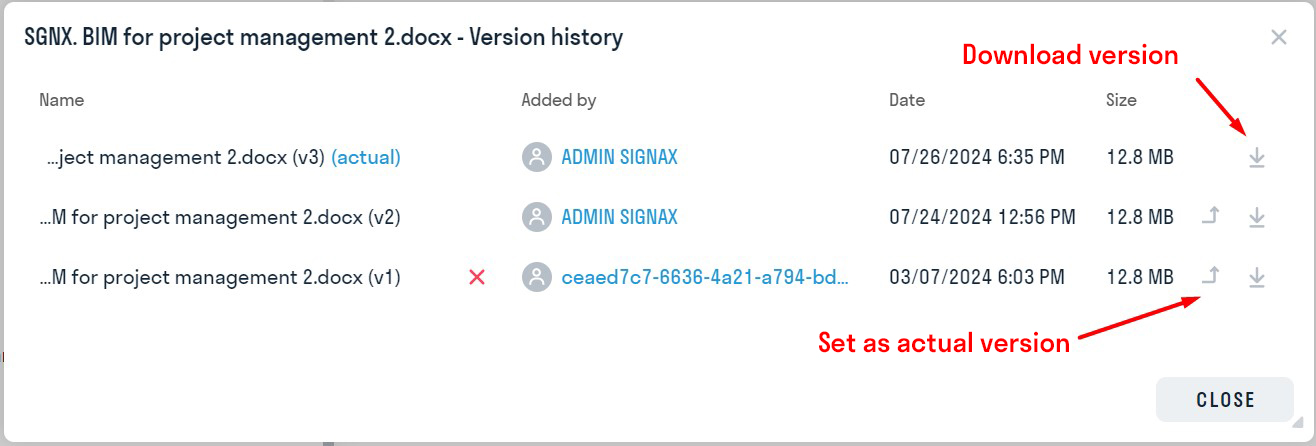
- Users with editing rights can make an older version the current one. To do this, click on the
 .
. - To download any file version, click on the
 .
.
Adding Google Links
In the SIGNAX DOCS service, it is possible to add links to Google Docs and Google Sheets.
1. Click “+” and select “Link.”
2. In the window that appears, enter the file name and paste the copied Google Docs link into the “File Link” field. Click “Upload.”
3. A file will be created, which will open Google Docs and Sheets directly in the DOCS service when clicked.
File Viewing
You can upload any file formats to the system, view PDF documents, DOCX, XLSX, JPG, RVT, DWG, NWD, and other CAD formats, and edit Google documents.
PDF Viewing
Processing BIM Models
To open a model, it must first be processed in Forge Viewer. To do this, right-click on the file ➤ “Process in Autodesk”. To process multiple models, use the corresponding buttons on the toolbar.
Viewing BIM Models
Viewing IFC, RVT, NWC, NWD and other supported formats is done through Forge Viewer.
Forge Viewer offers a standard set of tools for viewing models.
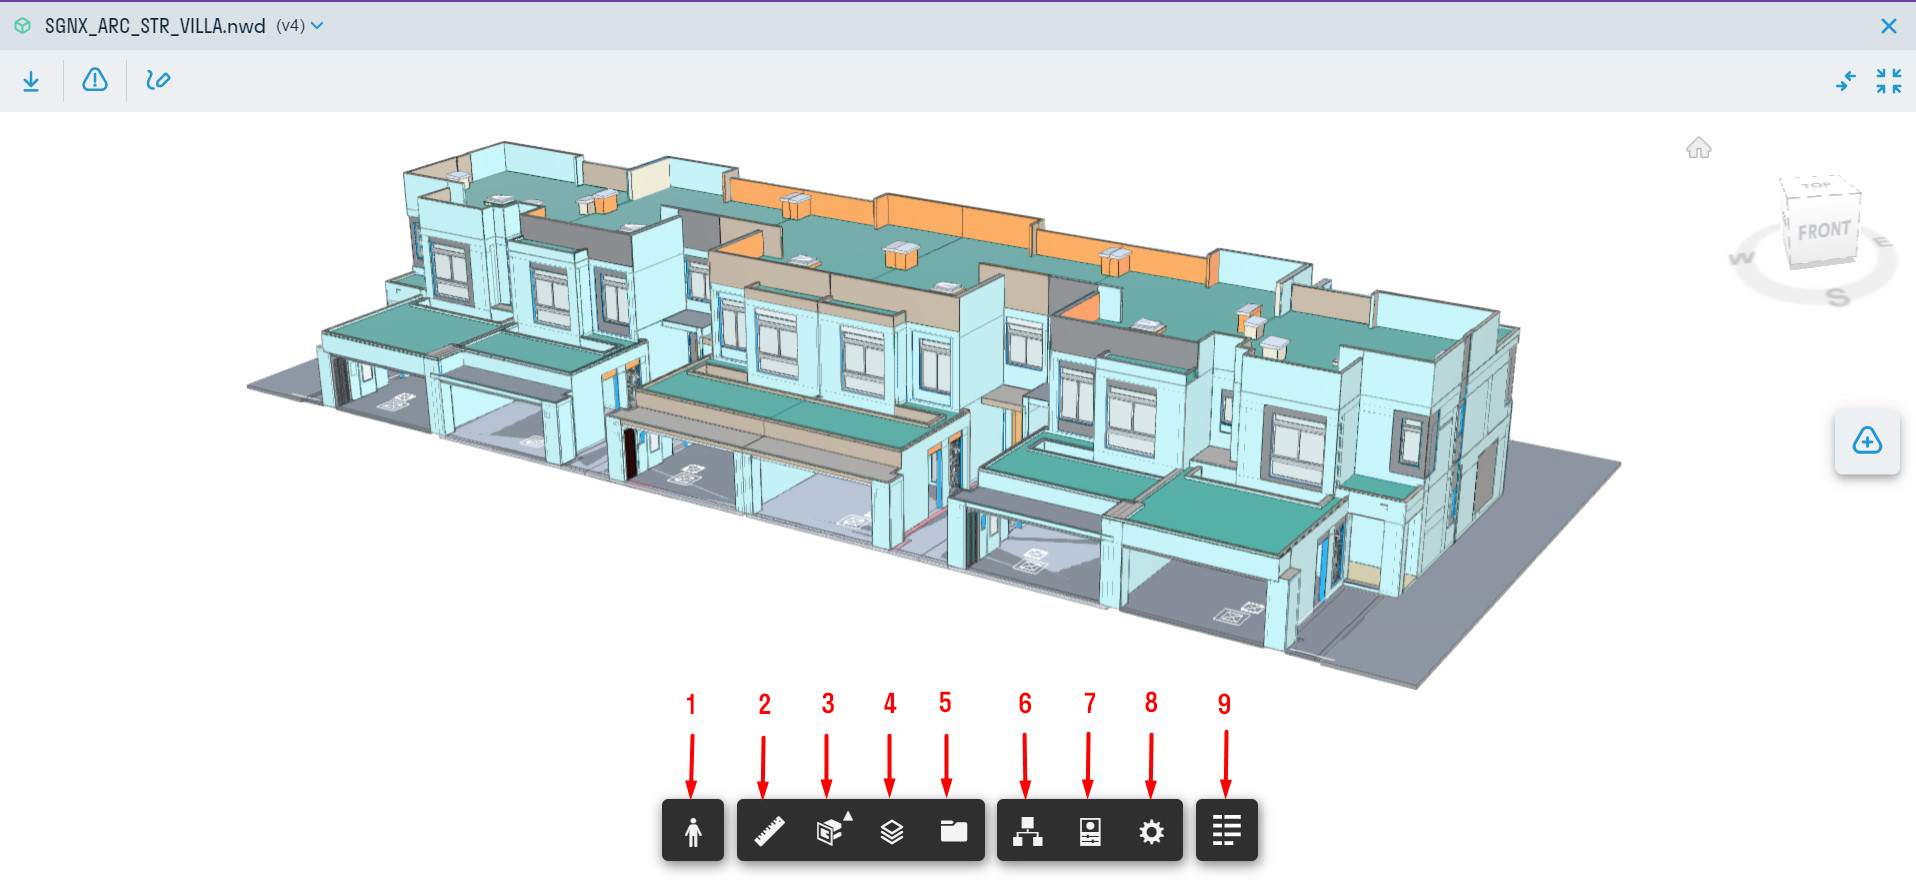
- First-person walk
- Measurement ruler
- Sectioning
- Document viewer
- Levels
- Model composition
- Element properties
- Settings
- Favorite properties
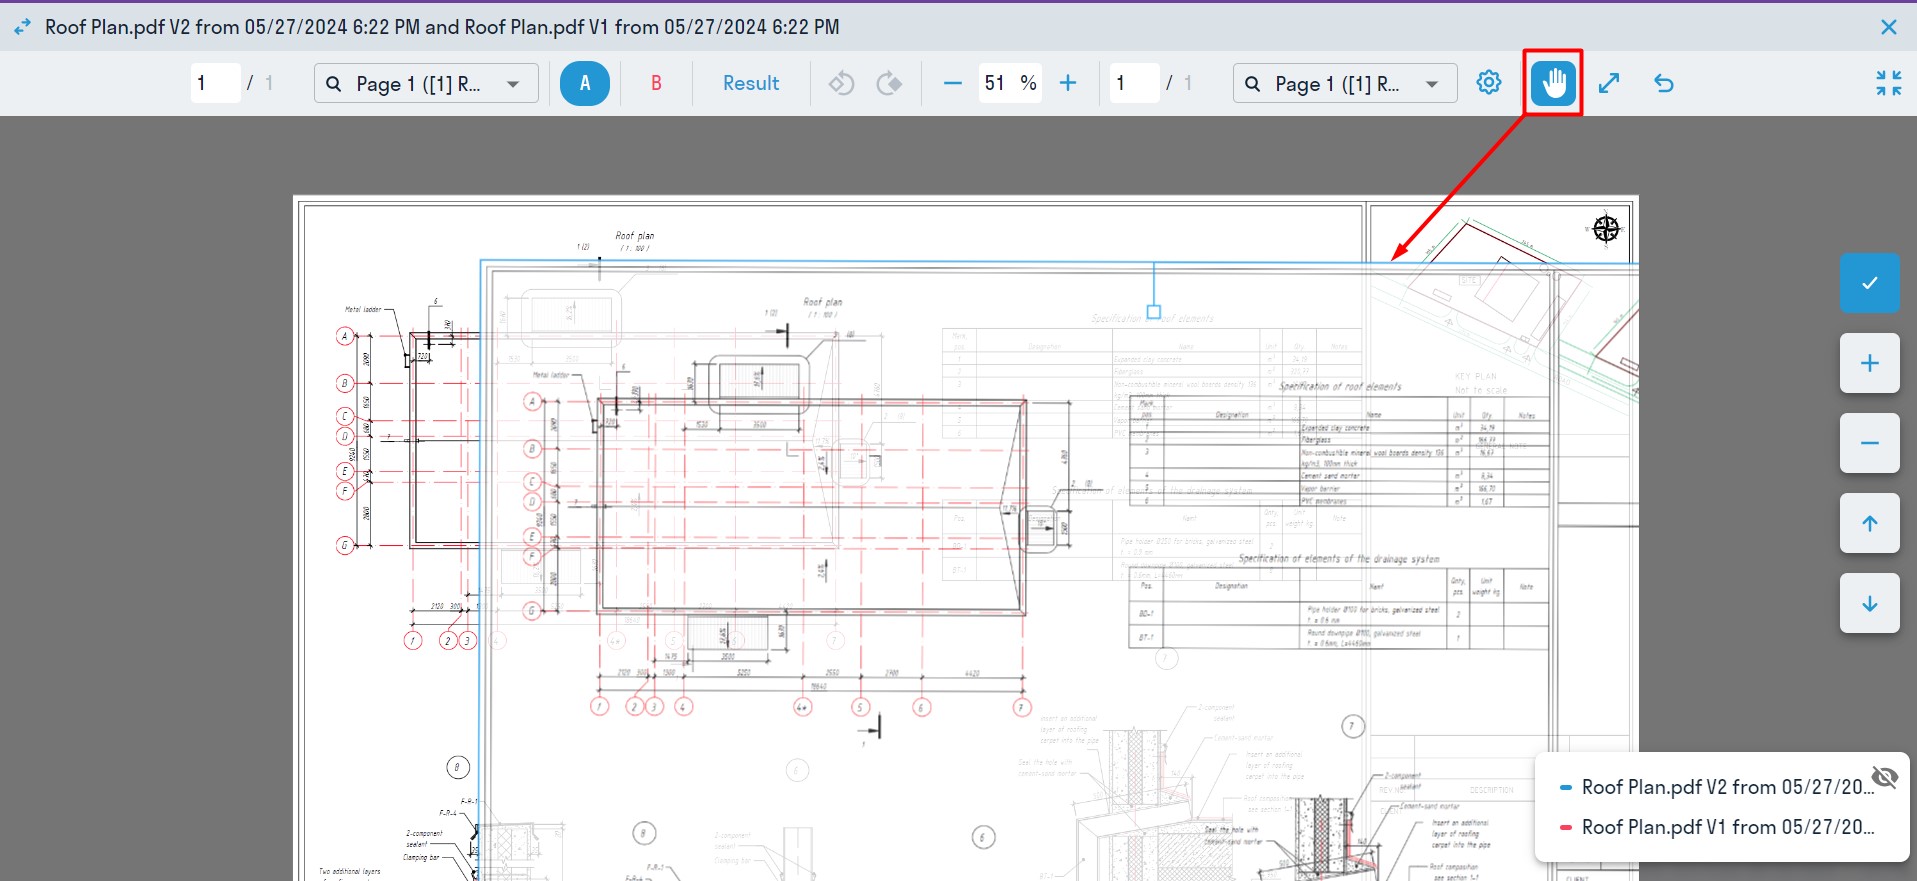
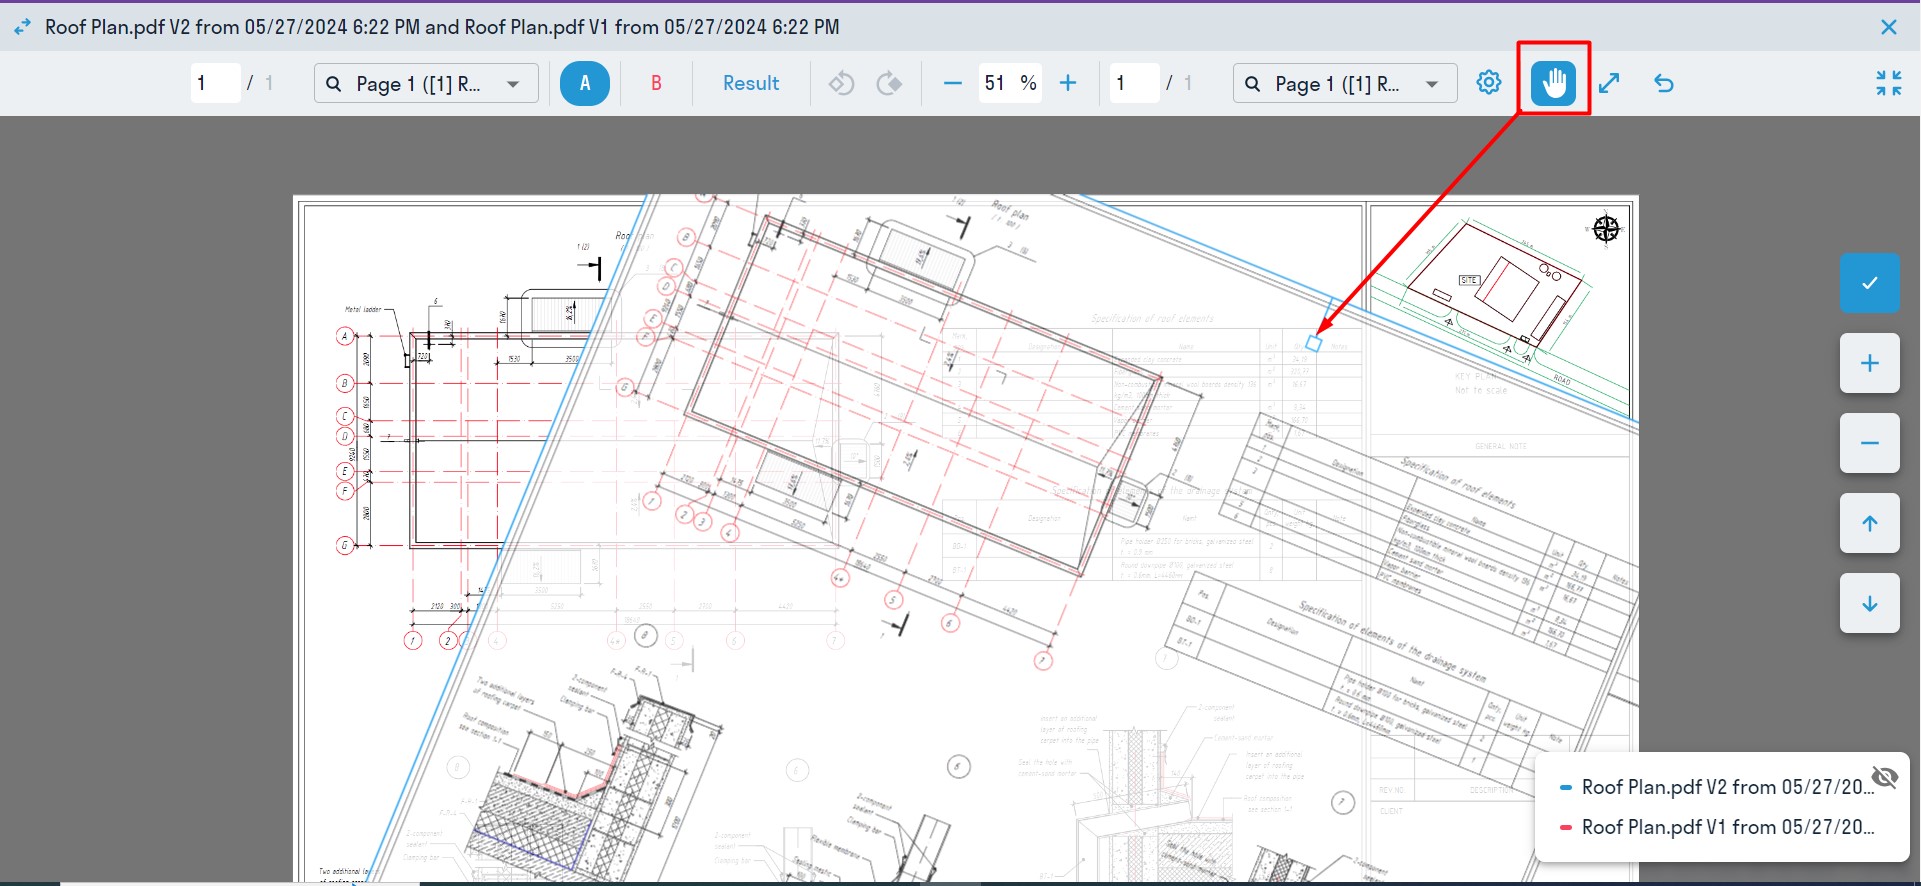
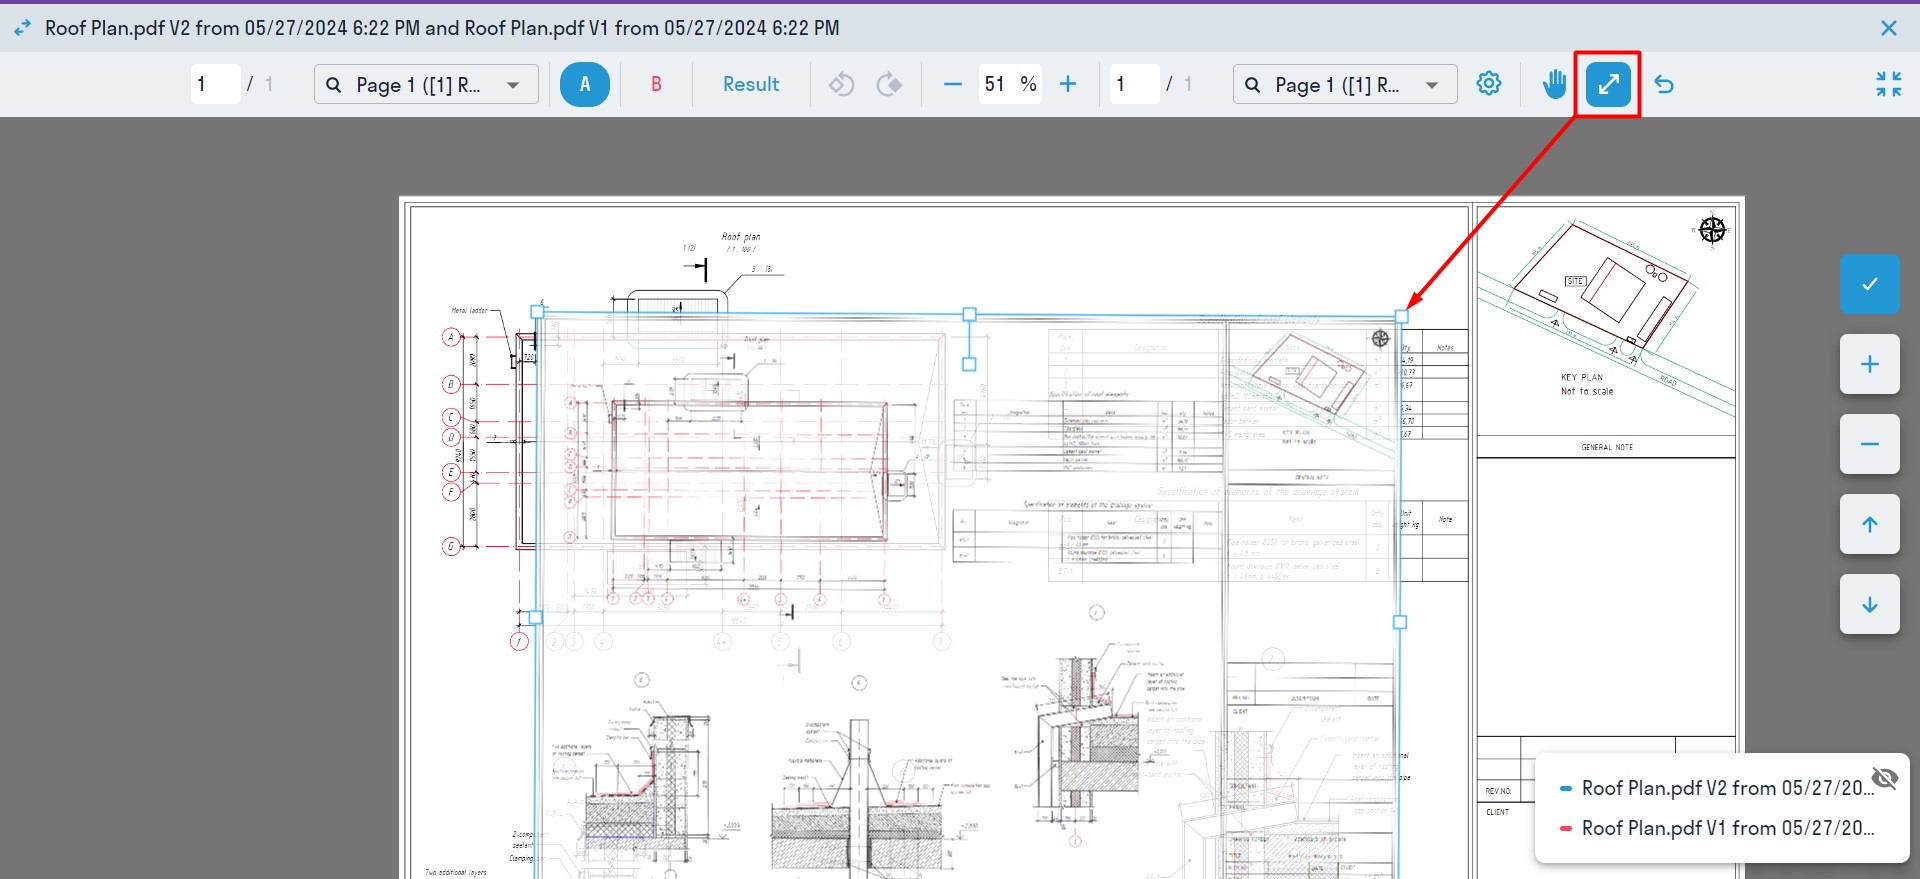
Comparison
Comparing PDF and DWG Files
To enter comparison mode, click on the comparison icon ![]() .
.

Next, you need to select the version for comparison.
If necessary, you can choose another file uploaded to the SIGNAX DOCS system for comparison.

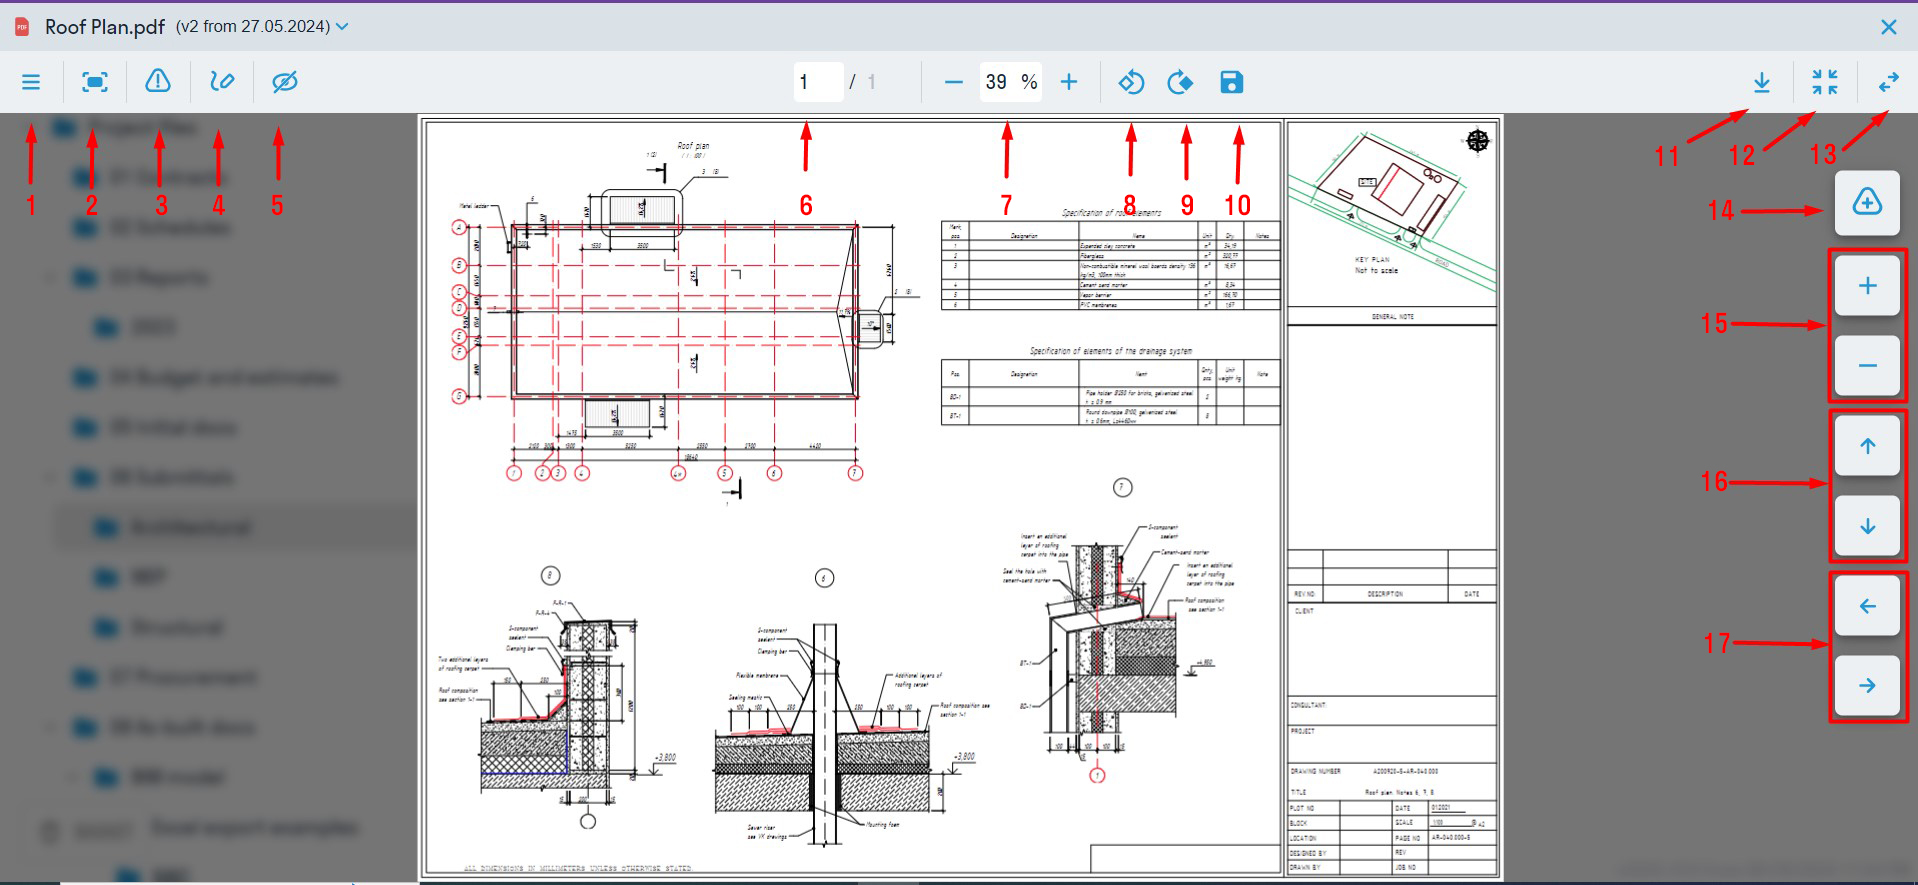
A document comparison window will open.
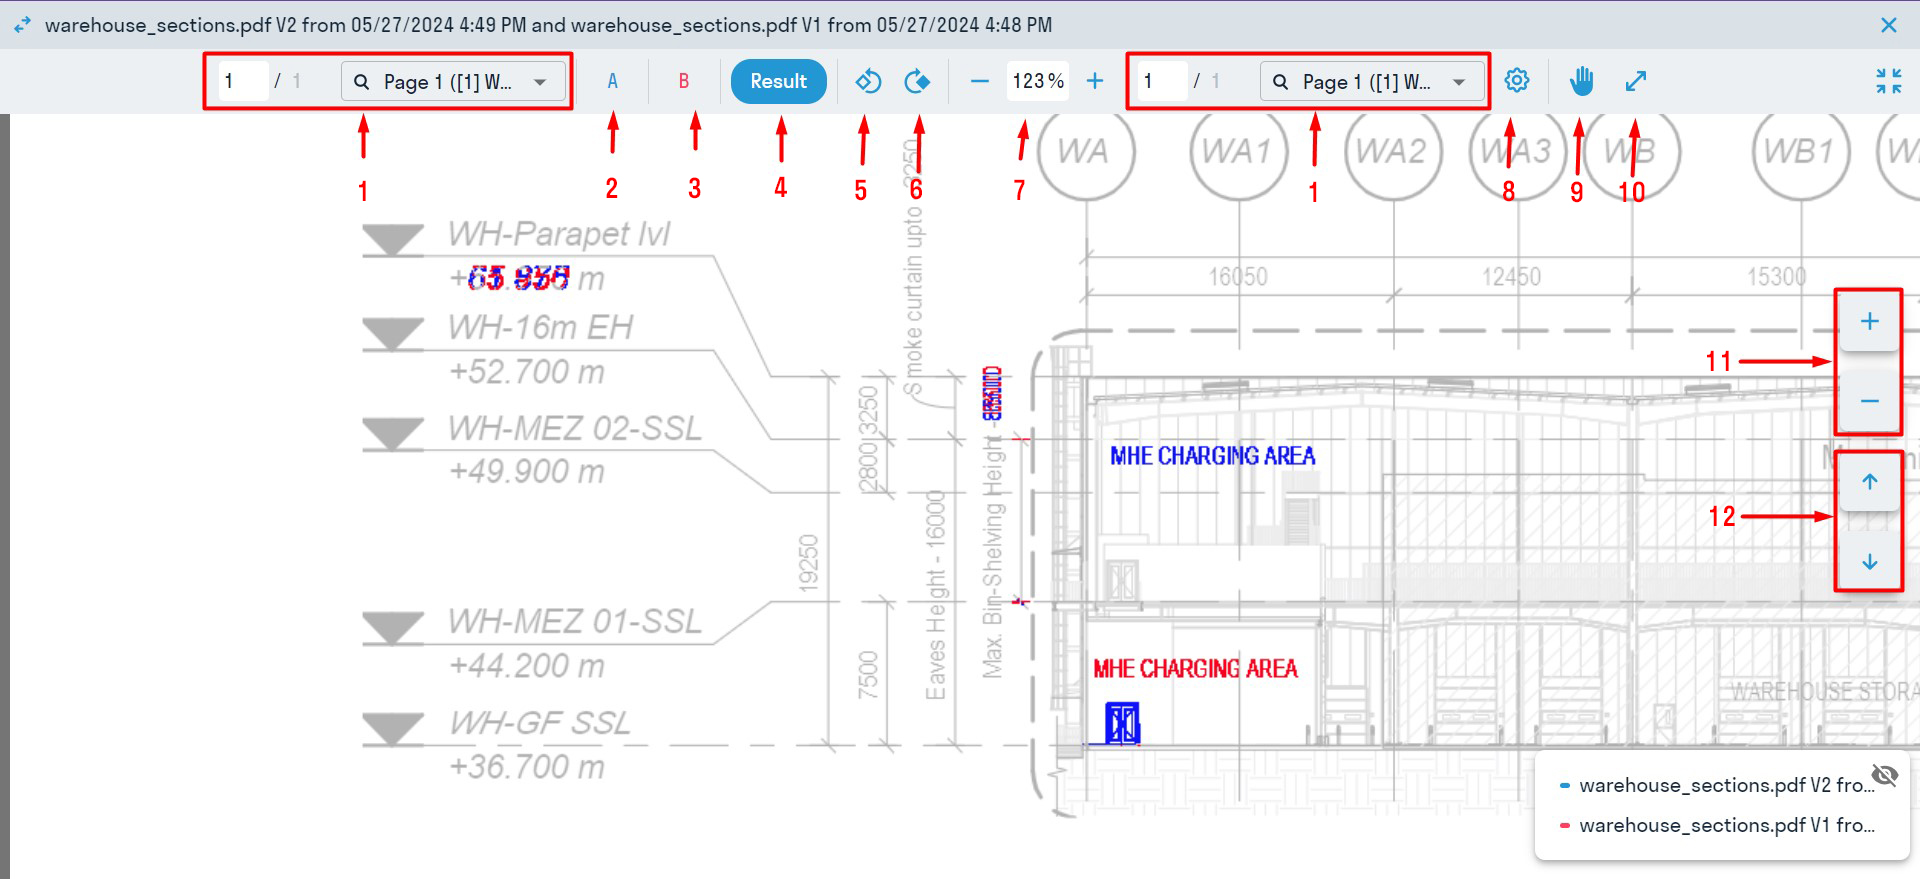
1 - Select sheet for comparison
2, 3 - Toggle version visibility
4 - Comparison result
5 - Rotate counterclockwise
6 - Rotate clockwise
7 - Zoom
8 - Settings
9 - Align versions relative to each other
10 - File version scaling
11 - Viewer window scaling
12 - Switch between pages
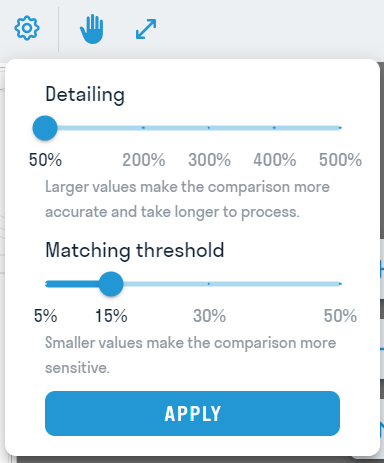
Settings
- Image Detailing: Controls image clarity. The higher the detailing, the sharper the text in the file.
- Matching Threshold: Controls the clarity of the comparison when overlaying two file versions. The smaller the value, the more precise the match must be for the overlapping parts to be displayed in gray.
 Files Version Align
Rotating Compared Files
File Version Scaling
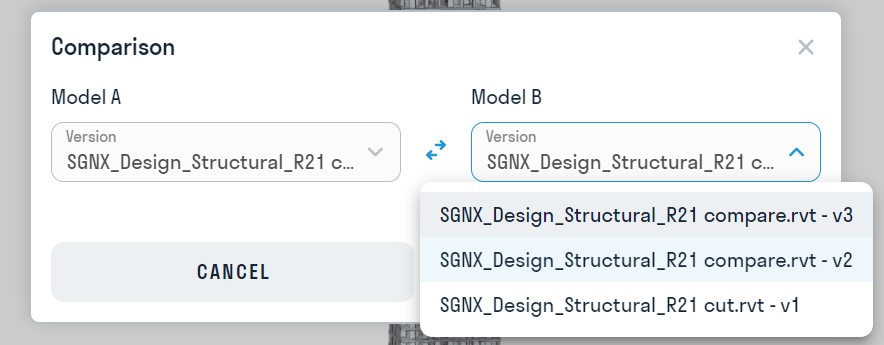
Model Comparison
To enter comparison mode, click on the comparison icon ![]() .
.
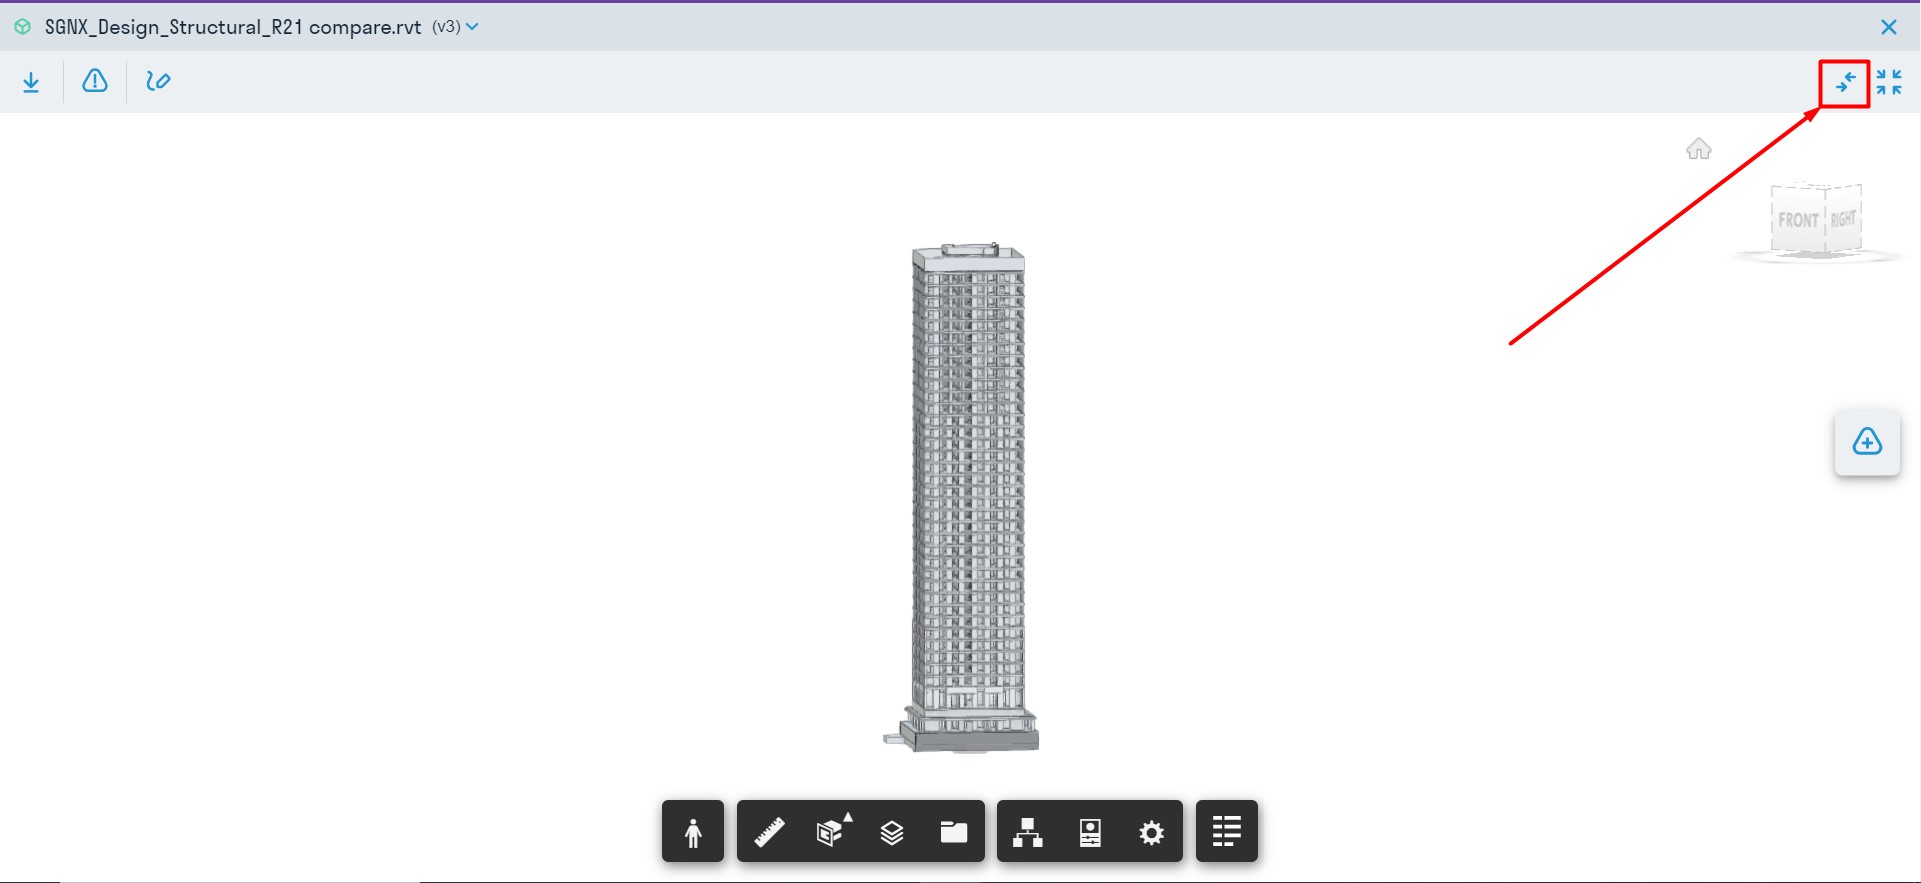
Next, you need to select the version for comparison.
Comparison Results:
- Added: Elements that appeared in the later version of the file
- Removed: Elements that were deleted from the later version of the file
- Modified: Elements whose geometry and/or parameter values were changed
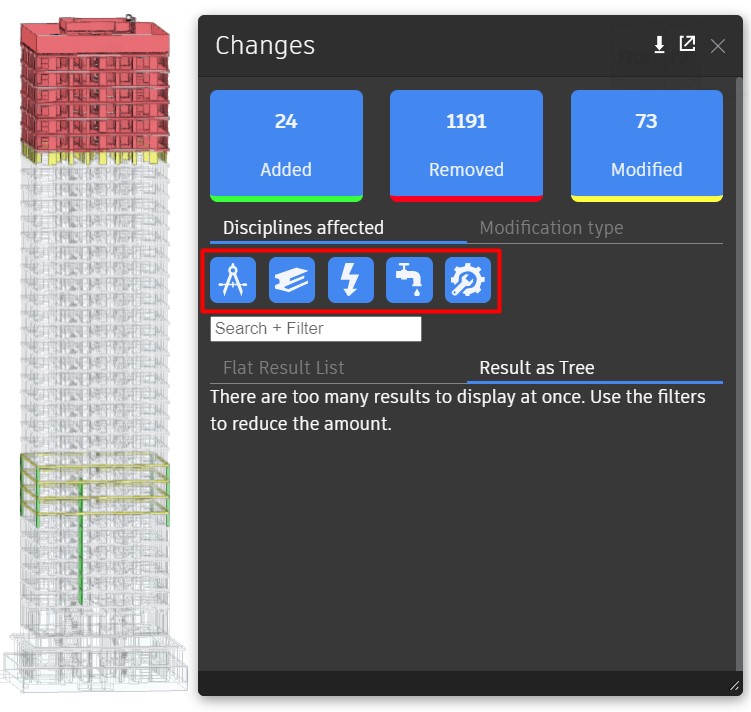
Affected Disciplines: Filters to switch results by disciplines:
- Architectural changes
- Structural changes
- Electrical changes
- Piping changes
- Mechanical changes
Type of Change: Filters to switch results between different types of changes:
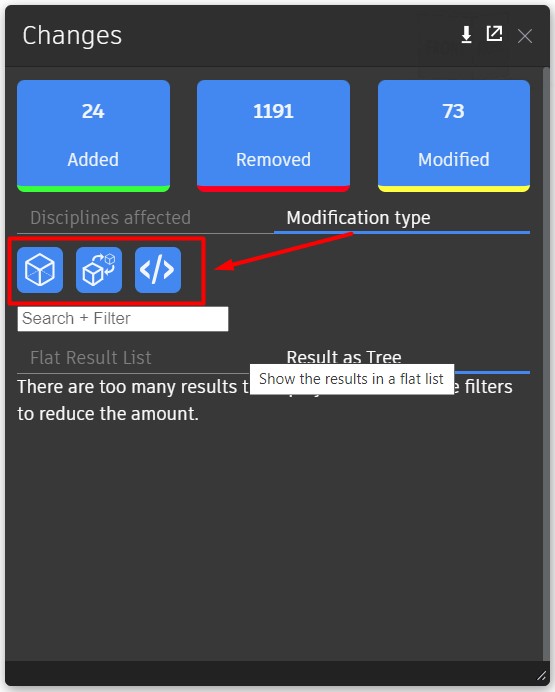
- Shape changes
- Shape transformations
- Properties change
Issues
The SIGNAX DOCS service allows for the creation of issues for files of any format. Issues can be created within the document itself or from the issue register without linking to a specific document.
Issue Register
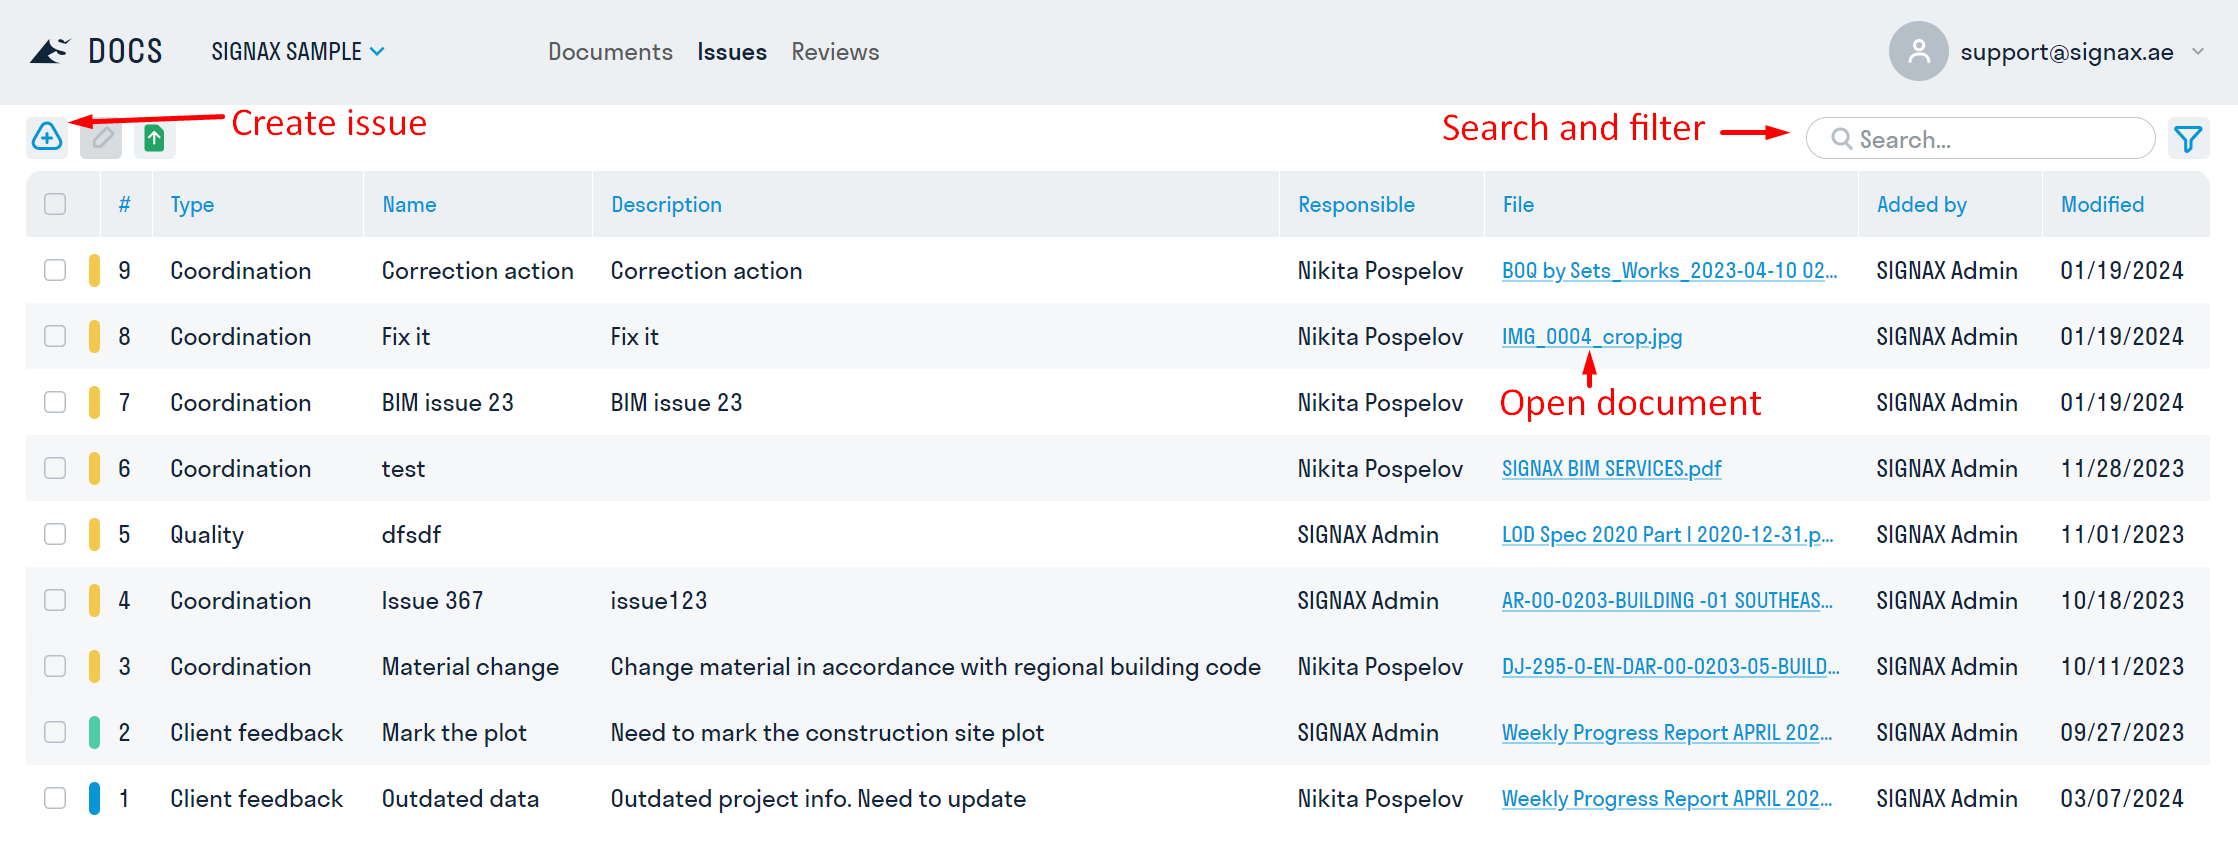
All issues created within the project are stored in a tabular format in the “Issues” section.
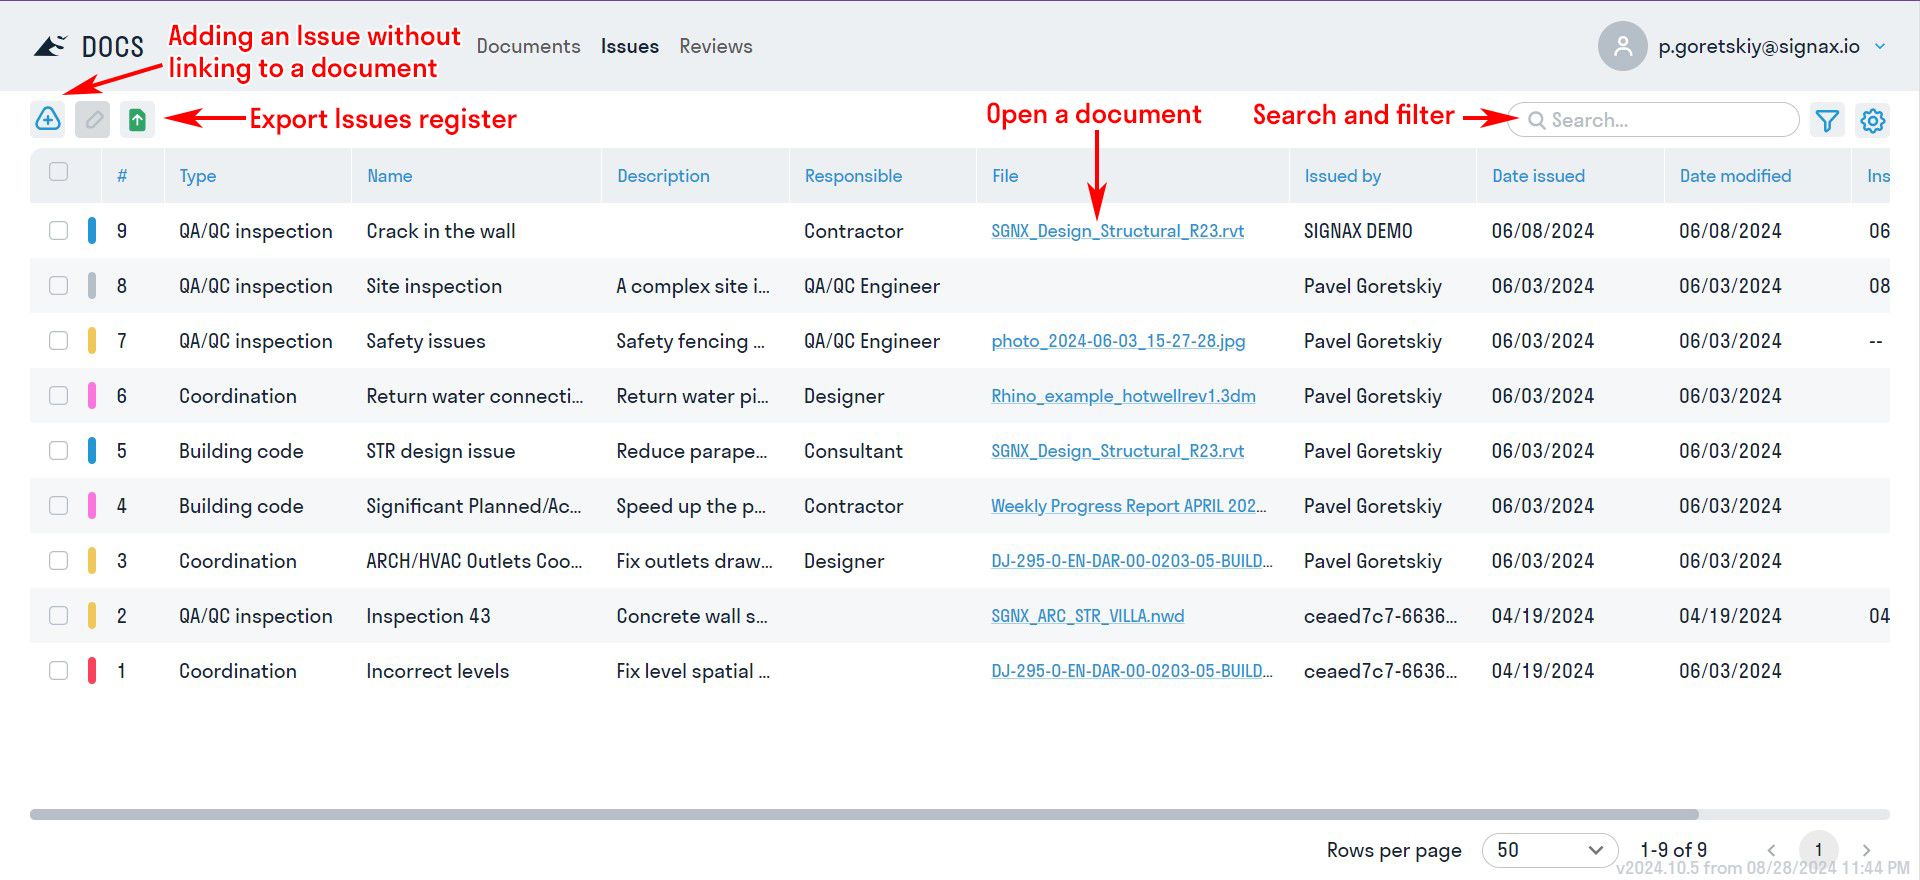
The register displays the necessary information about the issues:
- Issue number and status
- Issue type
- Title
- Description
- Person responsible for resolving the issue
- File - clicking on the field opens the document associated with the issue
- Who added the issue
- Date of last issue modification
To view and edit an issue, click on the issue row in the register.
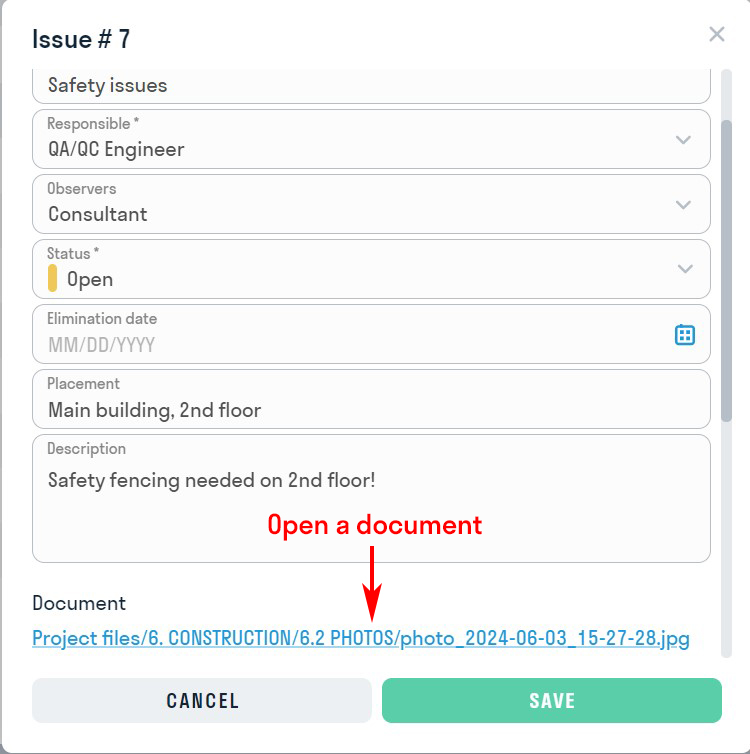
To open the document where the issue was created, click on the file path in the “Document” field.
All issues/filtered issues can be exported in Excel format by clicking ![]() .
.
From the Excel register, you can navigate to the document where the issue was raised by clicking on the file.

Creating Issues
Any SIGNAX DOCS user can create an issue. The issue can be edited by the issue's author, the person responsible for resolving the issue, and the project administrator.
To create an issue without linking it to a document, go to the “Issues” section and click
in the upper left corner. In the window that opens, fill out the issue form.
To create an issue linked to a document, open any file and click  on the right side of the screen.
An issue form will open on the left side of the screen that you need to fill out:
- Issue Type: Types are configured by the project administrator. Each type has its own purpose and custom attributes.
- Title: A brief name for the issue, displayed in the issue register and logically related to the type.
- Responsible: The user or role responsible for resolving the issue, who is a project participant. The responsible person will receive an email notification about the issue creation.
- Status: Choose one of the issue statuses: “Draft,” “Open,” “In Progress,” “In Review,” “Closed,” “Rejected,” “Void.”
- If you select the “Draft” status, the responsible person will not receive an email notification.
- The “Open” status is selected when creating an issue, and the responsible person will receive an email notification.
- The “In Progress” status is set by the responsible person if they agree with the issue and take it into work.
- The “Rejected” status is set by the responsible person when they disagree with the issue, along with a comment in the field.
- The “In Review” status is set by the responsible person after resolving the issue and uploading a new version of the document for review.
- The “Closed” status is set by the auditor when the issue is resolved.
- “Void” is analogous to deleted.
- Location: Specifies the issue's location on the drawing, e.g., Axes A-B/1-2.
- Description: Filled in to provide a more detailed description of the issue.
- Files: Adds additional files to the issue from the project.
- Custom Attributes (if any): Created by the project administrator and used to add additional information to the issue, such as Violation Type, Work Type, Category, etc.
Mandatory fields are marked with an asterisk “*”.
In PDF documents and images, you can add annotations for each issue. Five types of annotations are available: Arrow, Rectangle, Pencil, Text, Ellipse and Dot. The annotations are saved across all versions of the document.
After creating or changing the status of an issue, the responsible user and the issue author will receive an email notifying them of the issue creation or status change.
By following the link in the email, the user can open the document and review the assigned issue in detail.
To open or close the issue list in the current file, click ![]() at the top of the document.
at the top of the document.
The responsible person can change the status of issues to “Open,” “In Progress,” “Under Review,” or “Rejected.”
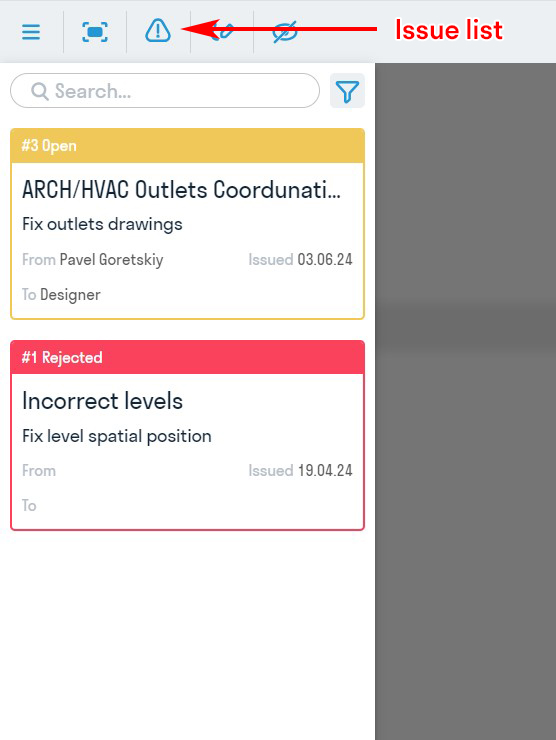
Creating Issues for Models
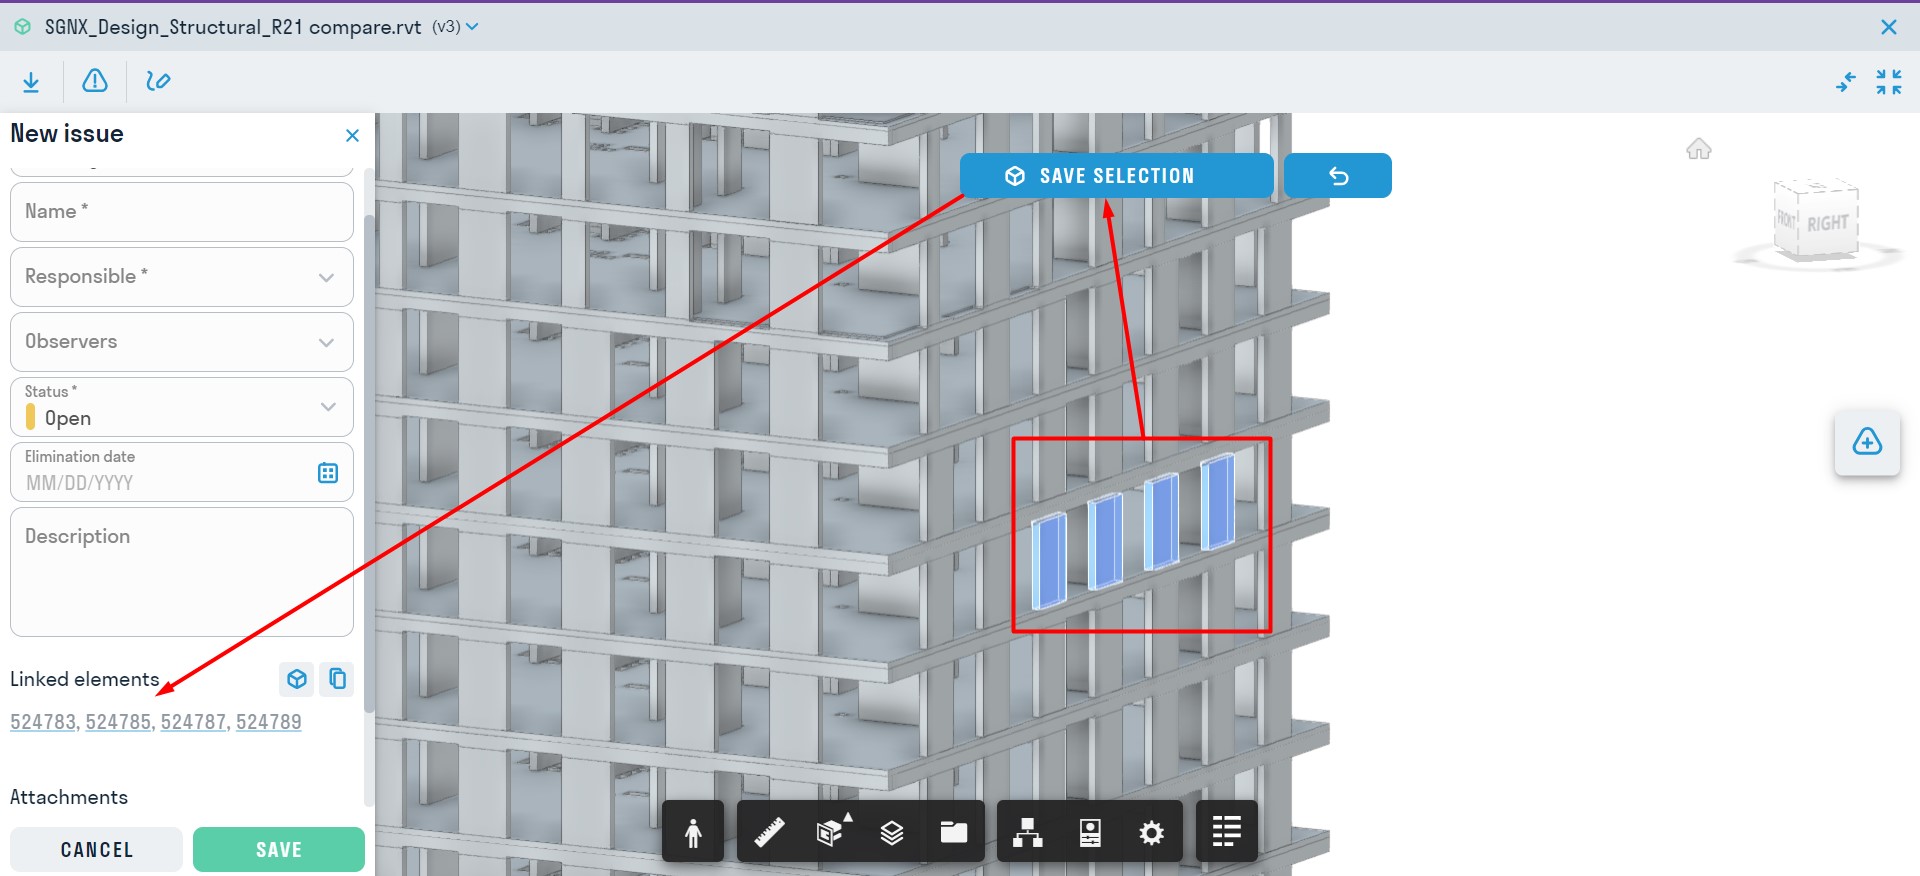
To create an issue, open the model file in Forge Viewer and click ![]() on the right side of the screen.
on the right side of the screen.
Fill in the fields, if necessary, select one or more elements (using Ctrl) to which the issue will be linked, and click save selection. After that, the element IDs will be displayed in the issue body. You can select elements in the model by clicking on them.
Fill in the fields, if necessary, select one or more elements (using Shift) to which the issue will be linked, and click save selection. After that, the element IDs will be displayed in the issue body. You can select elements in the model by clicking on them.
Reviews
Review Creation
All project users can create review sets and submit them for review.
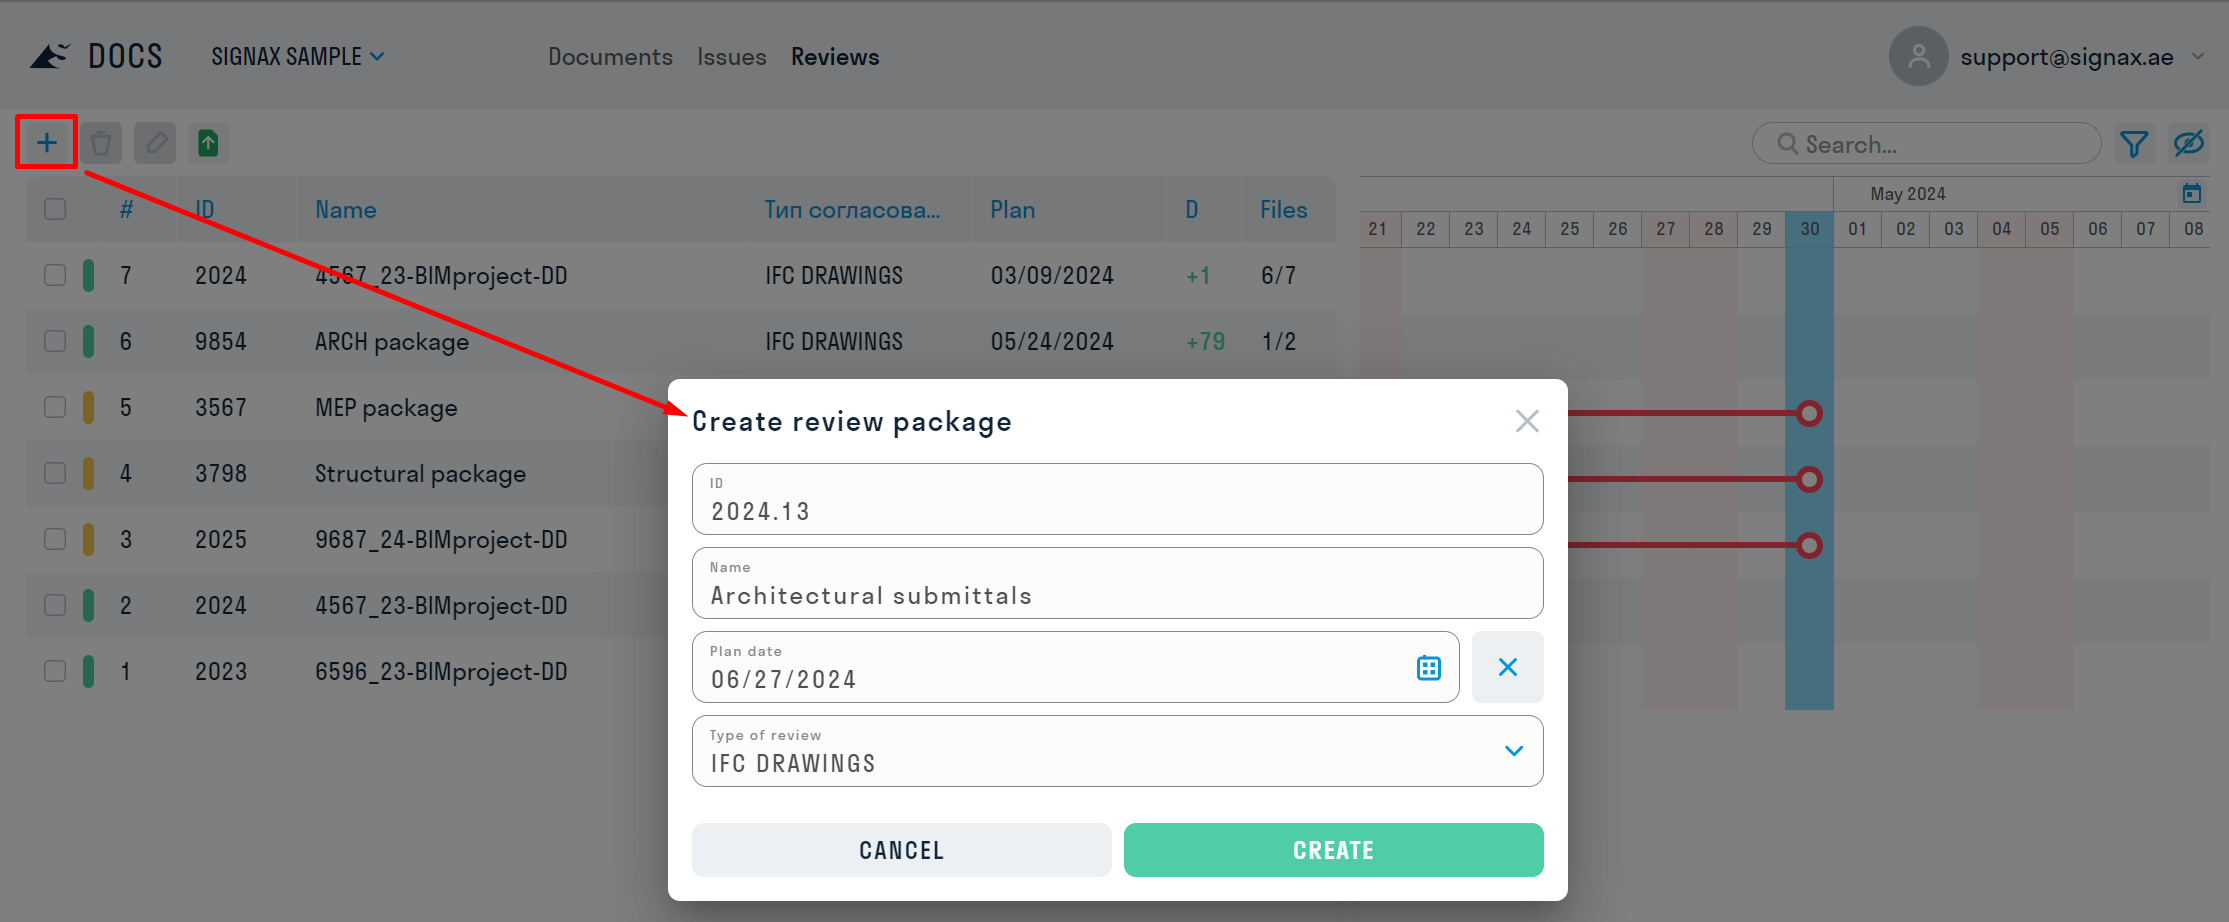
To create a review set, go to the "Reviews" section, click on the "+" button, and in the pop-up window, fill in the following fields:
- "Name" of the set.
- "Code" of the set.
- "Planned date" for the completion of the review process.
- Select a predefined "Review Type".
Next, open the newly created review set by clicking on its row in the registry and adding files to it. You can add files to the set from both within the review set and from the "Documents" section.
- To add files directly from the review set, click on the "+" button and select the necessary documents in the pop-up window.
- To add files from the "Documents" section, right-click ➔ "Add to Reviews".
At the top are the review stages. Hovering over each stage displays information about it. On the right side, you can see the status of each file at the stage.
Key:
|
Review stage with a responsible reviewer. |
|
Document signing stage. |
| Stamping and adding QR codes to files stage. | |
|
Document copying stage from the set to the specified folder. |
|
Final status "Approved" |
|
|
Final status "Rejected" |
Starting Review
Clicking the "Send" button initiates the review process.
At the first stage, the responsible person receives an email notification indicating that they have been assigned a set for review and with deadlines for checking the set. Clicking the link in the email opens the review set directly.
All participants in the review process have read-only access to files. The responsible person reviews the documents in the set, adds comments if necessary, and then assigns the corresponding predefined statuses to each file.
- To set a status for multiple files, select them using checkboxes, then assign the status in the toolbar.
- To set a status for a single file, select the status on the right side of the screen.
After assigning statuses, click "Complete Stage" in the upper right corner of the screen and leave a comment for the stage, for example, if the file was approved with comments.
After completing the stage, the set moves to another review stage with the next responsible person. For detailed information about the previous stage, hover over the stage icon.
After Issues are added to a document, the approval window displays a list of Issues for the corresponding set.
When the status of a comment is changed to "Closed," the Issues is removed from the set's comment list and is only displayed in the general Issues register.
If a new version is uploaded for approval, you must enter the already created approval set, select the files, and click ![]() "Update Version."
"Update Version."
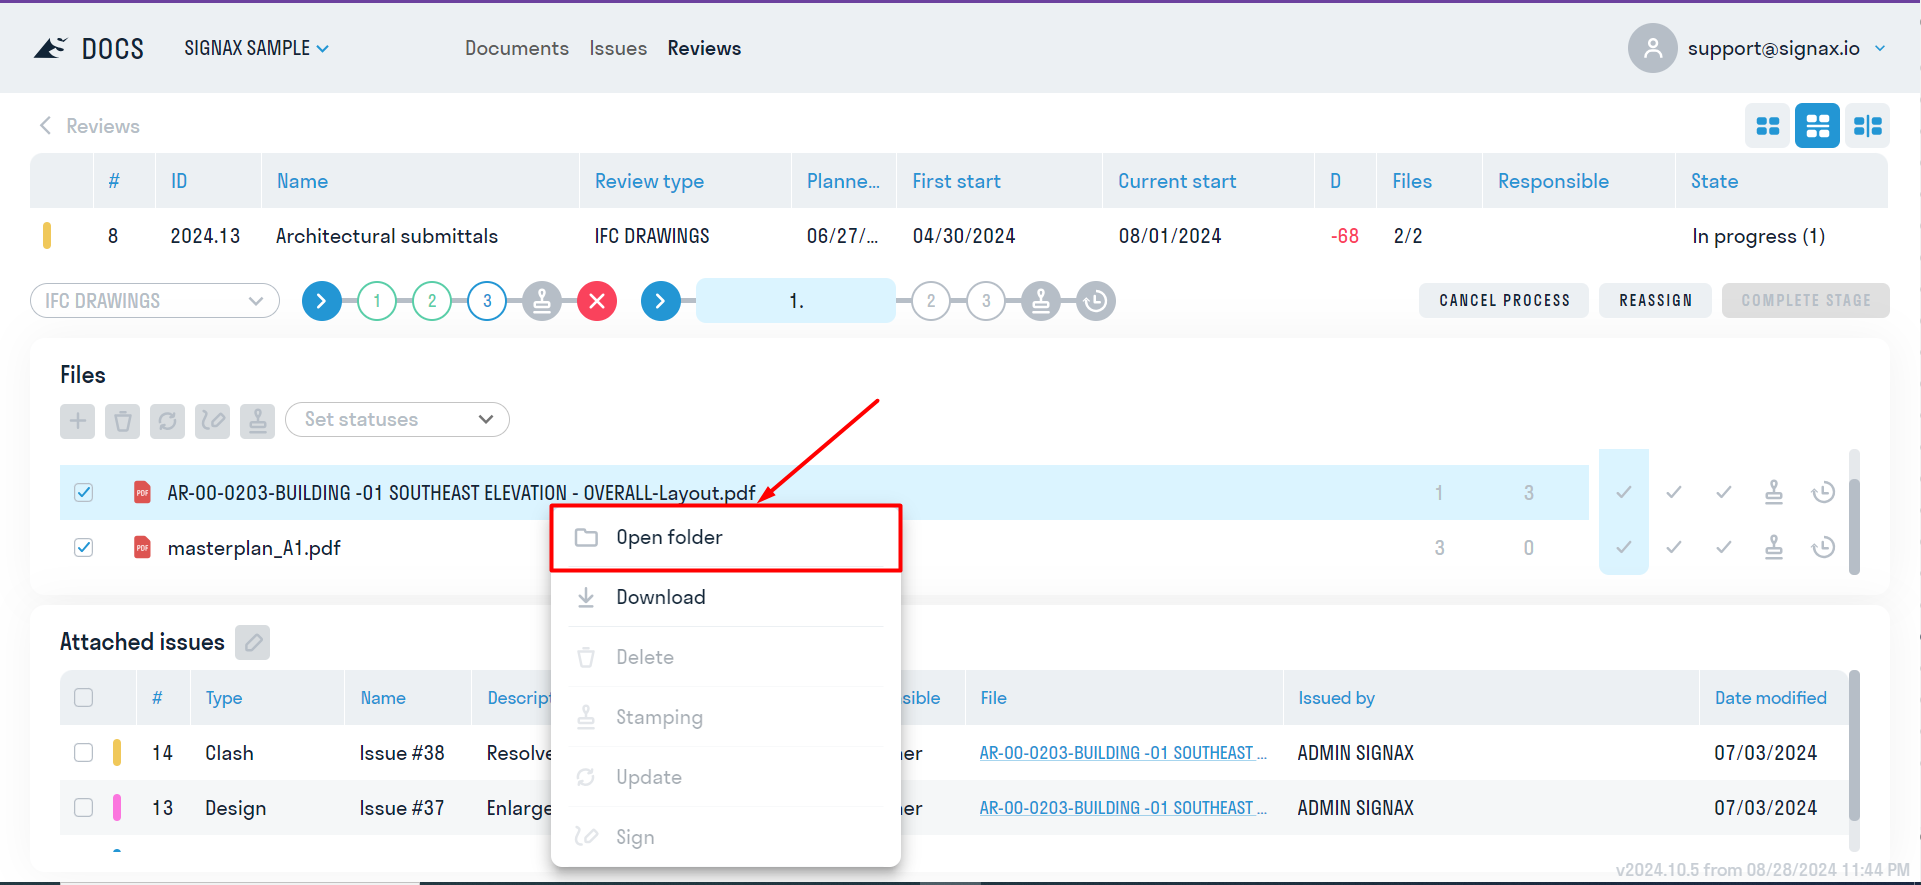
If necessary, you can navigate to the folder where the files are stored. To do this, right-click on the file ➤ Open Folder.
Review Registry
All review sets created in the project are stored in tabular form in the "Reviews" section.
The registry displays the necessary information about the packages:
- Package number and status.
- Package ID.
- Package name.
- Planned completion date of the review.
- Difference between the current date and the planned completion date of review.
- Number of approved files in the package.
- The responsible person at the current review stage.
- Review process status.
To view or edit review package, select row in review register.
To export the review register, select "Export."
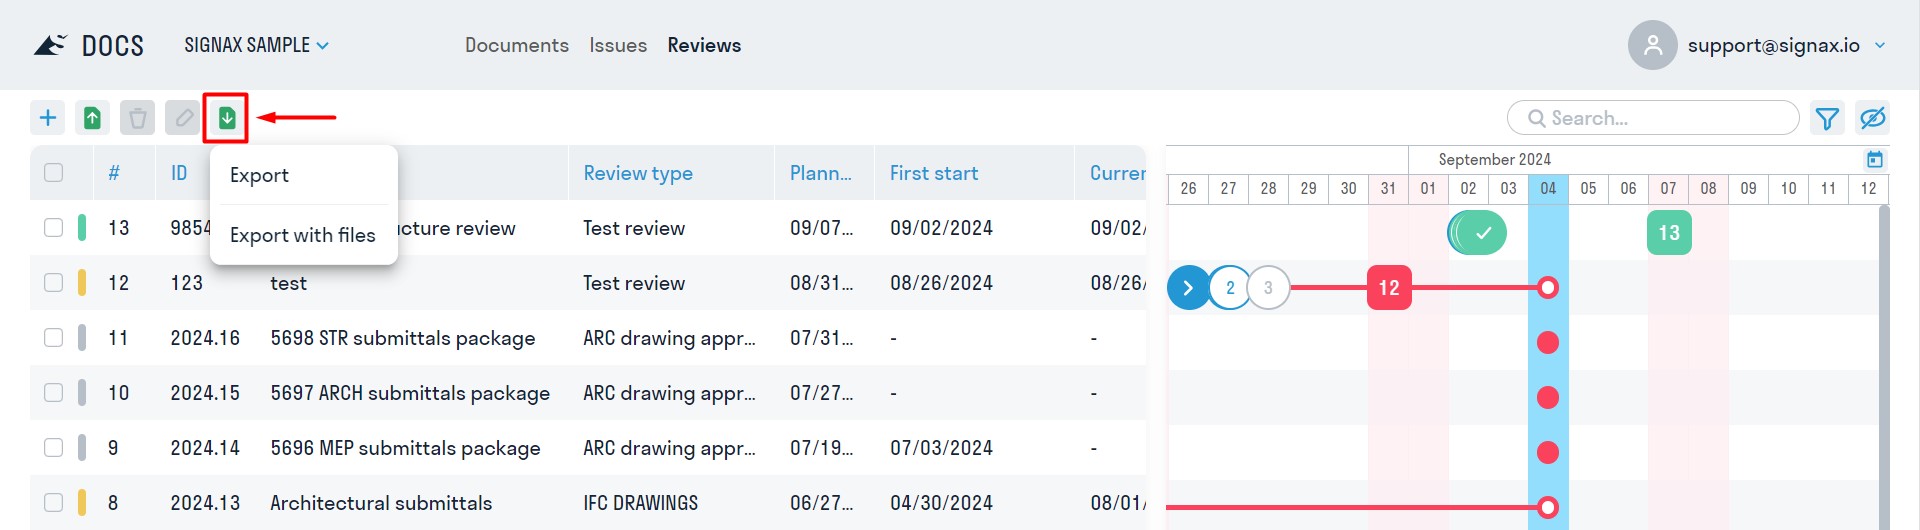
When "Export" is chosen, a table similar to the one in SIGNAX DOCS is generated.
When "Export with Files" is selected, information is exported for each file included in the review set, as well as for each stage of the review process.
Stamping
During the "Stamping" stage, stamps and QR codes are applied to documents from the set.
First, the stamping type is selected from the list:
- Stamp: Only a Stamp will be applied.
- QR Code: Only a QR code will be applied.
- Stamp and QR Code: Both a Stamp and QR code will be applied.
- Do Not Stamp
Then, the Responsible for the stamping stage is selected, who verifies the correctness of stamping the documents.
- If the option "Complete stage automatically" is selected, then upon successful processing of all files (stamping), the stage automatically advances to the next one. However, if an error occurs with at least one file, the Responsible receives a notification via email about the error. In this case, the Responsible needs to take appropriate actions: either resend the file for stamping or continue the review without this file.
- If the option "Complete stage automatically" is not selected, then after stamping the files, the Responsible always receives an email notification about the completion of the stage. They verify the correctness of stamp placement and decide whether to continue the review process. If everything is in order, they can move to the next stage. If there are errors, the Responsible either resends the files for stamping or continues the review process without them.
For QR and Stamp, fill in the overlay pages (pages where the stamp and QR code will be applied). For the Stamp, also fill in the Company, Full Name, and Position fields.
By default, the "Scale," "Indent," and "Size" fields are filled with optimal values for stamp and QR placement. If necessary, replace these values.
During the review process, it is possible to apply the "Issued for construction" stamp and a QR code to the documents. For setup, please contact the project administrator.
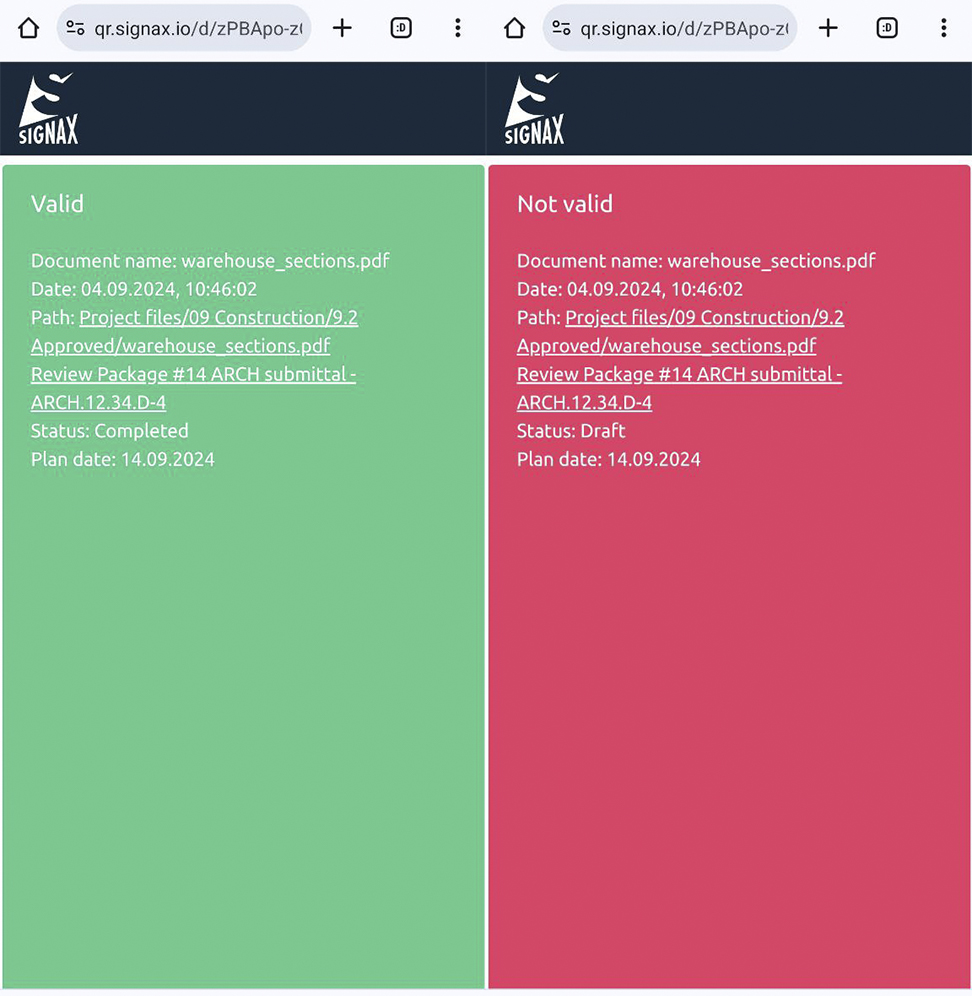
If the set is approved with comments, the QR code on the sheets will be yellow.
When the QR code is scanned with a phone camera, a browser page opens with a note on the document's status.
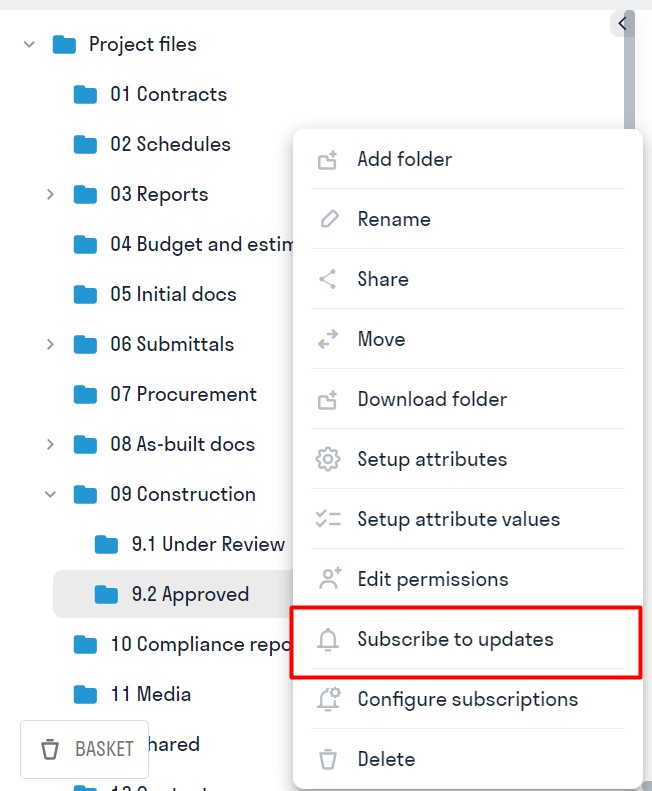
Folder Subscription
A user can subscribe to folder updates in the SIGNAX DOCS system.
To do this, click on the dots next to the folder and select "Subscribe to updates."
Example of an email notification:
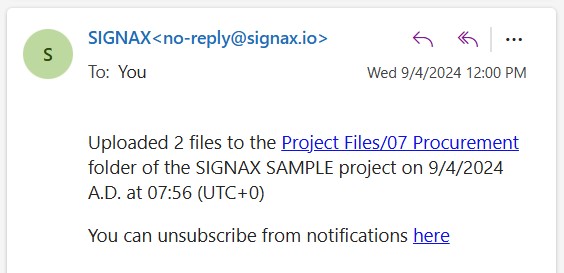
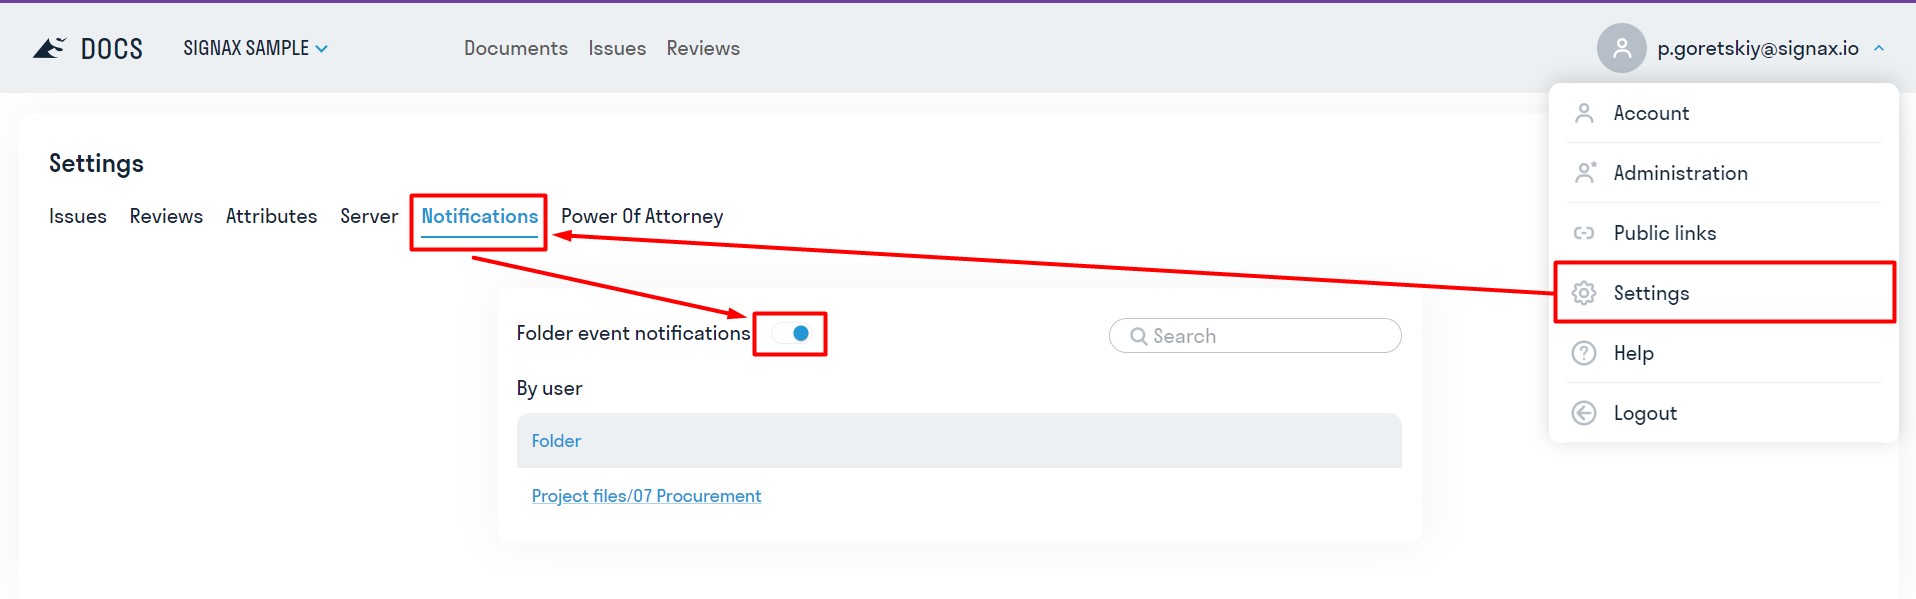
You can unsubscribe from notifications either by following the link in the email or through the settings.
File sharing
In SIGNAX DOCS, there is an option to open shared access to any files and folders and share them with all participants of the construction process, even those without DOCS licenses.
2. In the opened window, select the Publication Type from the list and click "Open Access". The link to the published file will be automatically copied to the clipboard.
Publication Types:
- "View" - allows users only to view the published document without the ability to download it.
- "View and Download" - allows users to view and download the document.
3. When opening the published link to a folder, the user will see all files and subfolders included in the folder with shared access.
By clicking on any file, it can be opened for viewing and downloading, depending on the selected Publication Type.
4. All published files and folders are marked with the![]() icon. By clicking on it, a window will open with the option to recopy the published file, change the publication type, or disable shared access for the file.
icon. By clicking on it, a window will open with the option to recopy the published file, change the publication type, or disable shared access for the file.
5. The project administrator can access all published links stored in tabular form in the Public Links section.
This section displays the following information:
- Link number in the list;
- Name of the published file or folder;
- Link to the published file or folder, which can be copied or deleted, thereby disabling shared access;
- Who added the link;
- Date the link was added.